USPS® meter label
solution
USER GUIDE
September 24th,
2017
Ó 2017 USPS® meter label solution The United States Postal Service®. All Rights Reserved. Terms of Use.
USPS® Customer Commitment
The U.S. Postal
Service™ fully understands the importance of providing information and service
anytime day or night to your Internet and ecommerce customers. For that reason,
USPS® is committed to providing service 7 days a week, 24 hours a day, 365
days a year. Thank you for your continued patronage.
We invite you
to share your comments on how we can improve this application for you and
enhance functions offered in future releases of USPS® meter label solution
software.
Trademarks
USPS Tracking®,
USPS Signature™, Priority Mail Express®, First-Class Package Service®,
and Priority Mail® are registered trademarks of the U.S. Postal Service™.
Global Express Guaranteed®, Priority Mail International®, Priority Mail Express International®,
and First-Class Mail International®, First-Class Package International Service®, USPS Web Tools®, ZIP Code™, and ZIP + 4® are also registered trademarks of the U.S. Postal Service™.
Internet
Explorer®, Microsoft®, Microsoft Excel®,
Microsoft Access®, Vista®, Windows 7®, Windows® 8, Windows 10® and .NET® are registered trademarks of Microsoft® Corporation.
To Our Customers
If you require
technical support, contact the USPS® Internet
Customer Care Center (ICCC). This center is available Monday thru Friday: 8:00
am to 8:30 pm ET, Saturdays 8:00 am to 6:00 pm ET and is closed Sunday’s and
all major holidays.
Email: uspstechnicalsupport@mailps.custhelp.com
Telephone:
1-800-344-7779
Chapter 1. Introduction..................................... 14
Chapter
2. Getting Started................................ 18
Chapter
3. Shortcuts......................................... 21
Chapter
4. Installation and Upgrade................. 25
Getting Started........................................................... 25
Download USPS® meter label solution software via Internet...................................................................... 25
Upgrade to USPS® meter label solution Software........... 37
Uninstall USPS® meter label solution Software.............. 38
Chapter
5. Registration..................................... 40
Getting Started........................................................... 40
Register with USPS® meter label solution Software........ 41
Modify Connection Settings.......................................... 42
Chapter
6. Shipping Overview.......................... 45
Getting Started........................................................... 45
Create........................................................................ 46
Create New Shipments..................................................... 46
Batch Process Orders...................................................... 48
Manage...................................................................... 49
Manage Pending Shipments............................................ 49
Manage and Update Account Settings............................ 50
Manage and Update Address Book................................. 51
View.......................................................................... 52
View Shipping Activity.................................................... 52
View Available Shipping Tools....................................... 53
View Database Management............................................ 54
View Messages................................................................. 55
Track......................................................................... 56
Chapter
7. Create Shipping Labels................... 58
Getting Started........................................................... 59
Create a Domestic Label.............................................. 59
Create an APO/FPO/DPO and Possessions, Territories and Freely
Associated States (PTFAS) Label....................... 68
Create a Priority Mail Express International®, Priority Mail
International®,
First-Class Mail International®
or First-Class Package International Service® Label............................ 79
Create an International Global Express Guaranteed®
(GXG®) Label.............................................................. 95
Create a Customs Form 2976/CN22............................ 101
Create a Customs Form 2976A/CP72.......................... 107
Create an electronic Merchandise Return Service (MRS) Label........................................................................ 114
Create an Open and Distribute™ Label........................ 119
Create First-Class Mail® Letter Shipments................... 125
Create a Label Using the Express Checkout Functionality (Only
for Domestic, International, APO/DPO/FPO & PTFAS labels, and Customs Forms)....................................... 130
Address Book Contacts and Create Label.................... 135
Chapter
8. Address Book................................ 138
Getting Started.......................................................... 138
Add an Address......................................................... 138
Edit an Address......................................................... 141
Delete an Address..................................................... 142
Add a New Group...................................................... 143
Delete a Group.......................................................... 144
Manage My Groups................................................... 146
View Addresses in a Specific Group............................ 148
Search Address Book................................................ 148
Import Addresses...................................................... 150
View Failed Addresses............................................... 154
Export Addresses...................................................... 157
Chapter
9. Shipping Cart................................. 160
Getting Started.......................................................... 160
Detailed Description
of Shipping Cart Status................ 160
Shipping Cart Actions................................................ 161
Print Labels from Shipping Cart.................................. 162
Delete From Shipping Cart......................................... 169
Chapter
10. Import Orders/Labels and Tracking Numbers.......................................................... 172
Import New Orders / Labels........................................ 172
Import eBay®
Labels.................................................. 181
Import Existing Orders / Labels................................... 187
Import Tracking Numbers........................................... 197
Chapter
11. Database Management................. 204
Getting Started.......................................................... 204
First Time Configuration............................................. 204
Access............................................................................ 205
CSV................................................................................. 218
Excel............................................................................... 231
MySQL............................................................................ 245
SQL Server..................................................................... 262
Reconnecting or Editing a Configured Data Source....... 281
Chapter
12. Shipping History.......................... 288
Getting Started.......................................................... 288
Search..................................................................... 289
Advanced Filtering..................................................... 289
Check Status of Packages.......................................... 290
Display Labels for a Specific Status............................ 290
Reship / Recreate Label............................................. 292
Reprint a Label.......................................................... 292
Re-Create PS Form 5630, Confirmation
Services Certification, (SCAN Form)......................................... 292
Create Electronic Merchandise Return Service (MRS) Label........................................................................ 293
Delete Printed Labels................................................. 293
Export Shipping History.............................................. 293
Return Label Tracking Numbers to eBay...................... 294
Chapter
13. User Reporting............................. 296
Generating the Report................................................ 307
Quick Report Summary.............................................. 309
Chapter
14. Package Pickup........................... 312
Getting Started.......................................................... 312
Schedule Package Pickup.......................................... 312
Edit Package Pickup.................................................. 314
Cancel Package Pickup.............................................. 315
Cancel and Reschedule Package Pickup...................... 315
Chapter
15. Shipping Tools and Track and Confirm Tool................................................... 318
Getting Started.......................................................... 318
Calculate a Price (Domestic)...................................... 318
Calculate a Price (International).................................. 321
Verify Address.......................................................... 324
Track and Confirm Tool.............................................. 325
Chapter
16. Shipping Dashboard and SCAN Forms.............................................................. 328
Getting Started.......................................................... 328
View your Outbound Shipments.................................. 329
Open your Current Dashboard View Preferences – Outbound
Shipments................................................. 332
View your Pending SCAN Forms................................. 333
Open your Current Dashboard View Preferences – Pending SCAN
Forms............................................................. 336
Create New Pending SCAN Form................................ 337
Add Labels to your Pending SCAN Form...................... 341
Remove Labels from your Pending SCAN Form............ 344
Deleting your Pending SCAN Form.............................. 347
Close Out your Pending SCAN Forms......................... 348
View your Closed SCAN Forms................................... 353
Open your Current Dashboard View Preferences – Closed SCAN
Forms............................................................. 355
Deleting your Closed SCAN Forms.............................. 356
Chapter
17. Preferences................................. 359
Getting Started.......................................................... 359
Save Your Preferences............................................. 359
Restore Default
Preferences.................................... 386
Chapter
18. Help............................................. 388
Chapter
19. About........................................... 391
Chapter
20. Message Center........................... 393
Chapter
21. Troubleshooting.......................... 395
General FAQs........................................................... 395
Installing USPS® meter label solution Software............ 396
Upgrade USPS® meter label solution.......................... 398
Registration.............................................................. 398
Create Shipping Label................................................ 399
All
Labels......................................................................... 399
Domestic
Labels............................................................... 400
International
Labels.......................................................... 402
International
Labels/Customs Forms................................. 403
Electronic
Merchandise Return Service............................. 403
Import Orders........................................................... 404
Address Book............................................................ 406
General............................................................................ 406
Import
Addresses............................................................. 408
Export
Addresses............................................................. 409
Shipping Cart............................................................ 410
Print
Label and Shipping Cart............................................ 411
Shipping History........................................................ 412
General............................................................................ 412
Package
Pickup............................................................... 412
Shipping Tools.......................................................... 414
Domestic/International
Price and Service.......................... 414
Tracking........................................................................... 414
Address
Verification.......................................................... 414
ODBC Integration...................................................... 415
Preferences.............................................................. 417
Messages................................................................. 419
Chapter
22. Appendix...................................... 421
Domestic Service Descriptions.................................... 421
Domestic Service Options.......................................... 424
International Service
Descriptions........................... 424
International Service Options...................................... 426
Chapter
23. Resources.................................... 428
Chapter
24. Glossary...................................... 430
Chapter 1
Introduction
Chapter 1. Introduction
USPS® meter
label solution is a free and convenient software application that provides easy
access to shipping services from the United States Postal Service®. Major functionality
includes the ability to create domestic, international, Open and Distribute™, First-Class Mail®
letter shipments and Merchandise Return Service labels as well as customs forms
2976/CN22 and 2976A/CP72; the ability to answer your customers’ questions about
shipping fees or tracking information; the ability for your company’s customer
service representatives in a call center, customer service, or shipping
department to easily access shipping-related data and create electronic
Merchandise Return Service labels that may be provided along with your package
or e-mailed to your customer. In more detail, USPS® meter label solution
software provides the following USPS®
shipping services and information:
Create Shipping Labels
- Domestic Shipping Label generates a single-ply barcode
label for Priority Mail Express®, USPS Tracking® or USPS Signature™
bar-coded labels for Priority Mail®, First-Class Package Service®
parcels, and Package Services (Media Mail® and Library Mail
- International Shipping Label generates a multiple-ply bar-coded label for Global
Express Guaranteed®, Priority
Mail Express International®, Priority Mail International®, and First-Class Package International Service®. (Note: The Commercial
Invoice (PS Form 6182), the required documentation for certain Global
Express Guaranteed items, is also available if needed.)
- Customs Declarations Form: generates
either PS Form 2976 or PS Form 2976-A (based on mail class, value, weight
and destination) required for most international shipments, as well as
items sent to domestic APO/FPO/DPO and US Territories locations.
- Electronic Merchandise Return Service (MRS) Label generates a return label with your MRS Permit
account number for items to be returned by Priority Mail®, First-Class Package Service™ or Package
Services.
- Open and Distribute™ Label provides the ability to
create Priority Mail Open and Distribute™ labels, as well as
automatically creating a PS 5630 Form, Confirmation
Services Certification. Users can pay for postage via permit or meter
device.
- First-Class Mail®
address labels provides the ability to
print sender and return addresses on envelopes and The Postal Store® offered label stock.
Import Orders
- Import Orders provides the ability to import
domestic or international labels using an XML, CSV, or Microsoft Access® file or eBay® account.
Shipping Cart
- Shipping Cart provides the ability to store created labels for
processing and printing at a later time. In addition, the Shipping Cart
allows you to print SCAN forms for your label shipments and view/fix
errors for labels in an ERROR state.
Shipping History
- Shipping History provides the ability to view and export previously
printed label data, recreate and pay for a previously printed label, track
status, schedule Package Pickup requests, generate reports from shipping
history, leverage information to recreate labels, update eBay with tracking
status (when shipments are synchronized with eBay), and create electronic
Merchandise Return Service (MRS) labels.
- Package Pickup section provides the ability to schedule USPS® Package Pickup
requests for printed domestic and international labels based on the Next
Postal Delivery Date available.
Use Shipping Tools
- USPS Tracking® allows you to check the status of
any package shipped using the barcoded number, whether created with USPS®
meter label solution software, USPS® retail location, or
other channel, for which the USPS Tracking® tool is available.
- Get Address Info is a standalone
address-checking tool. The address-checking tool provides address
standardization, and city/state and ZIP Code™
lookup features. USPS® meter label solution software uses the USPS®
Address Management System database to standardize addresses by correcting
errors in street addresses and returns the ZIP + 4®.
City/state lookup provides the city and state corresponding to any given
ZIP Code™.
- Calculate a Price
standards calculate and
compare single piece postage prices, delivery standards, discounted
electronic prices, Confirmation services fees, and insurance fees for
packages shipped domestically by, First-Class™ Package Service, Priority Mail Express® (includes
standard/customer’s own packaging, and flat rate envelopes), Priority Mail® (includes standard/customer’s
own packaging, flat rate envelope, medium flat rate box, large flat rate
box, and small flat rate box), and Package Services mail classes, or internationally
by Global Express Guaranteed®,
Priority Mail Express International®, Priority Mail International®, and First-Class
Package International Service®.
Also provides country specific mailing conditions and restrictions.
- Cutoffs &
Commitments (Priority Mail Express® only) allows you
to know the scheduled delivery time, drop-off time cutoff, and nearest drop-off
facility types and addresses.
Address Book
- Address Book provides
the ability to add, edit, and delete individual addresses, manage address
groups, and apply addresses to create labels faster and easier.
Preferences
- Preferences provide the ability to assign
default information into your shipping labels and other areas of USPS®
meter label solution software. A unique set of preferences can exist for
each selected sender address, allowing you to create multiple profiles of
preferences within a single version of USPS® meter label solution software.
Preferences also provide the ability to manage an external device such as
a postage meter and imports.
Messages
Messages provides the ability to view USPS® meter label solution software or mail service related message
updates via a browser within the USPS® meter label solution software. Also, access The Postal Store® for ordering free mailing
supplies or self-adhesive labels.
Offline Capabilities
- Offline capabilities
throughout the application provide a way to make use of
limited-functionality of USPS® meter label solution software without Internet
connectivity. Offline functionality available includes, but is not limited
to, addingg domestic, international, and/or customs labels/forms
to the Shipping Cart.
For further quick-reference
information, refer to the Help link in the USPS® meter label solution
application.
Chapter 2
Getting Started
Chapter 2. Getting Started
System Requirements
USPS® meter
label solution software is supported on Vista®, Windows 7®,
Windows® 8, and Windows 10® Operating Systems. In
addition, you will be required to have:
- Internet Explorer® version 6.0.1 (or
higher).
- At least 89 MB of free space to
install and run the program (If .NET®
4.5 framework is already installed).
- Screen Resolution is set at a
minimum of 1024 x 768 pixels.
- At least one printer installed in
order to use the Print Preview
functionality in Shipping Cart.
- Adobe Reader is required to view electronic
Merchandise Return Service (MRS) labels via the attachment when an email
recipient is requested by the Sender.
- A PC with an Internet connection
is required to register for USPS® meter label solution software and use
the key online capabilities and attain application updates from USPS®.
Data Entry Guidelines
Before using USPS®
meter label solution software, you should have a working knowledge of the
following guidelines for data entry that apply to all screens in the
application:
- Any fields with an asterisk
adjacent to field label name are required fields.
- USPS® meter label solution software will not alert you
to invalid data until a request is submitted. An error message dialog box will be
returned when an error is encountered.
- Fields with drop down boxes contain all valid entries
for that field. You cannot enter any other data.
- ZIP Code™
fields only accept five numeric characters.
- ZIP + 4®
fields only accept four numeric characters.
- Pounds and ounces fields only
allow numeric characters. If the total weight is invalid, an error
message will be displayed.
- Invalid combinations of city/state or city/state/ZIP
Code™ will cause an error message to be displayed.
This error message will have to do with an invalid address rather than
invalid characters.
- If an error message is returned, a pop-up box will
appear with the error description. If the error was due to the input
on the screen, corrections can be made and the request re-submitted.
- Communication between your session of USPS® meter
label solution software and USPS® servers occurs via a Secure
Sockets Layer (SSL) connection to maintain integrity of the data.
Chapter 3
Shortcuts
Chapter 3. Shortcuts
When
selecting records within Tables
In Shipping
Cart, Shipping History, Package Pickup and Shipping Tools - Track/Confirm
tables, the following shortcuts apply when selecting (i.e., highlighting) and/or
checking records.
IMPORTANT: In general, always first select
(i.e., highlight) the rows you wish to apply an action to (i.e., edit, delete)
and then make use of the checkboxes.
Q. How do I select (i.e. highlight) a record?
A. Click on any
of the read-only text field columns in the grid.
To check multiple label records in a row:
1 Select (i.e., highlight) a label row by clicking on any of
the text fields. When a record is selected, the entire row will be highlighted.
2 Hold down Shift key.
3 Select another label row by
clicking on any of the text fields. All records between the first and last
selected rows will be selected.
TIP
- To deselect
one of the rows while multiple rows are selected, press the Ctrl key and click on any of the text
fields on the row that you wish to deselect.
4
Click on a single checkbox of one of
the selected (i.e., highlighted) rows. All highlighted rows will be checked.
TIP
- To uncheck
all records that are selected simply click one of the checkboxes again. All
records that are selected will be unchecked.
To check
multiple label records not in a row:
1 Select a label
row by clicking on any of the text fields. When a record is selected, the
entire row will be highlighted.
2 Hold down Ctrl key.
3 Select another label row by
clicking on any of the text fields. Only the rows clicked on will be selected.
TIP
- To deselect
one of the rows while multiple rows are selected, press the Ctrl key and click on any of the text
fields on the row that you wish to deselect.
4 Click on a single checkbox of one
of the selected (i.e., highlighted) rows. All highlighted rows will be checked.
TIP
- To uncheck
all records that are selected simply click one of the checkboxes again. All
records that are selected will be unchecked.
Keyboard
Shortcuts
To check a checkbox for a record in the Shipping History,
Address Book, Package Pickup, Shipping Cart, or Shipping Tools - Track/Confirm tables:
1 Tab into the checkbox column for a specific record.
2 Press the spacebar key. A
checkbox for the selected record will be checked.
To open the edit panel for an address in the Address book:
1
Tab into the Edit button for a specific record.
2
Press the Enter key. The record will be open for editing.
To display the context menu in Shipping Cart, Shipping
History, and Package Pickup tables:
1
Tab into any of the text columns of a
specific record. Note: Shipping History
and Package Pickup tables will require you to check the row selected in order
to access all of the functionality available in the context menus.
2
Click the Context Menu key and use the up and down arrows to navigate to
select an action.
3
Click Enter.
To display a specific main window using shortcut keys:
1
To have JAWS users read status in the
middle of processing a request, click Insert
> Page Down.
Chapter 4
Installation
and Upgrade
Chapter 4.
Installation and Upgrade
In this introduction to installation, you will learn how to do the
following:
ONLINE connection status:
·
Download USPS® meter label solution software
via the Internet
·
Upgrade USPS® meter label solution software
·
Uninstall USPS® meter label solution software
OFFLINE connection status:
·
Uninstall USPS® meter label solution software
Getting Started
Prior to installing the USPS® meter label solution application, verify
that all System Requirements have been met.
Download
USPS® meter label solution software via Internet
1
The USPS® meter label solution software can be downloaded
from the USPS® meter label solution web site
(https://www.usps.com/business/business-shipping.htm).
2
Scroll down to the Compare
Shipping Tools section of the page
3
Click the Download and Install USPS® meter label solution software link.
3 Click Install or Run from the popup box.
TIP
- If your computer does not have.NET® 4.5 Framework already installed, it will automatically be
installed onto your computer along with USPS® meter label solution software.
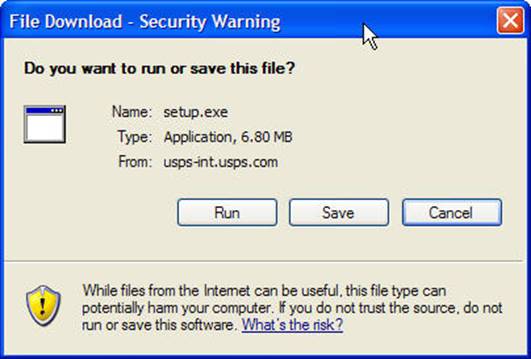
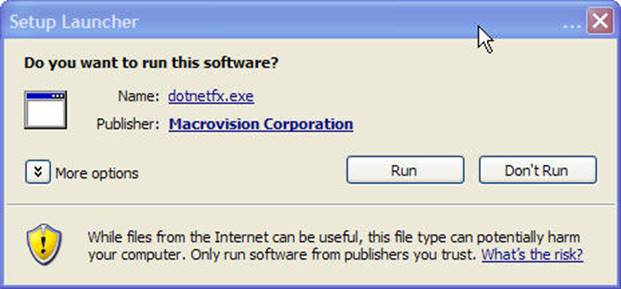
Note: If you are using Internet Explorer®
6.1 or later versions, you will see the following dialog. Click Run or Save to your desktop and run from the Start menu.
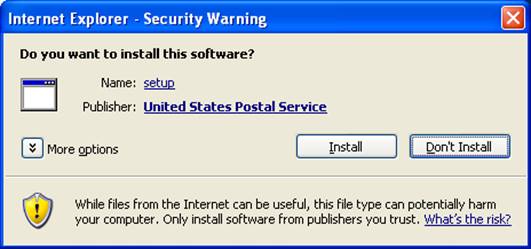
4 Click Install from the popup
box
.
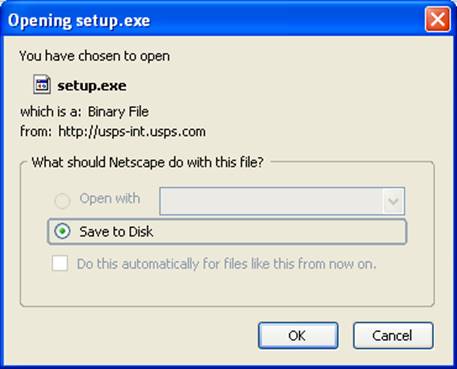
Note: If you are using Netscape® 6.X or Firefox®
browsers, you will see the following dialog. Click OK or Save to your desktop
and run from the Start menu. You will then see the USPS® meter label solution
software Installation dialog which is digitally signed.
5 If you do not have .NET®
4.5 framework already installed, please note that additional dialog boxes will
display. Click Run:
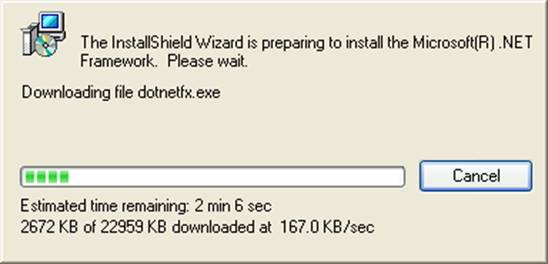
5a View Install Shield Wizard
indicating that .NET®
Framework can be installed.
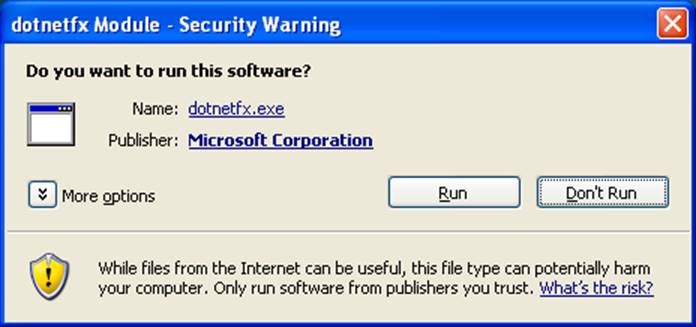
5b In
the middle of processing, click Run
on the following dialog box.
5c View
Install Shield Wizard after .NET® framework has been installed.
6 View the USPS® meter label solution software Installation Wizard Welcome
Page. Click Next.

7 View Terms and Conditions. You
will be required to accept the terms and conditions in order to continue with
the USPS® meter label solution software installation process. Click Next.
8 Enter Customer Information. Click Next.
9
Verify the
destination folder to store USPS® meter label solution software files. Click Next. Note: In order to change the destination folder, click Change… and navigate to the new
destination folder.
10
Review all Installation settings. Click
Install.

- Please wait as USPS® meter label
solution software installs onto your computer.
- View Install Shield Wizard
Completion page. Click Finish. Note: In order to auto-launch USPS®
meter label solution software after installation process is complete,
verify that the Launch the program
checkbox is checked.
- After downloading the application, the USPS® meter
label solution splash bar followed by the USPS® meter label solution
registration page will appear for first time users. Note: Registration is
NOT required when upgrading to a new version of USPS® meter label solution
software.
Upgrade to USPS® meter label solution Software
MICROSOFT
VISTA® AND
WINDOWS 7® OS
USERS ONLY
You must be
logged in as a System Administrator in order to complete the update process
for Click-N-Ship for Business® successfully. Please note that ‘elevated administrator
rights’ specific to the Vista® operating environment, will not suffice when
attempting to upgrade, install, or uninstall Click-N-Ship for Business®.
Please
follow the instructions under the Troubleshooting section in order to obtain the required Click-N-Ship
for Business® update. Once these steps are completed, all Vista users going
forward will automatically be prompted for Click-N-Ship for Business®
updates per the guidelines below.
|
|
Note: USPS®
meter label solution software will auto-detect if a patch or file updates
and/or a new version of the application is available upon launching the old
application. IMPORTANT:
Upgrading USPS® meter label solution software will maintain your entire address
book, shipping cart, and shipping history data.
1 Open the USPS® meter label
solution Application.
2 If patch or file updates and/or a
new version of the application are available, a pop-up box indicating that an
update to the application is available. Click Continue.
TIP
- The USPS®
meter label solution application will not prompt you to upgrade to a new
version while the application is running. To check for updates while the
application is running, view new messages in the Message Center. If a new
version is available, exit out of USPS® meter label solution application and
re-launch the application while ONLINE.
Version Updates. IMPORTANT:
Version Updates will prompt you to walk through the installation process again upon
completing the update.
3 Click Ok.
4 Click Continue.
5 The USPS® meter label solution
software will automatically upgrade. Note:
No backwards capabilities will be provided for. You will need to obtain a new
update to continue using the USPS® meter label solution application.
Uninstall USPS® meter label solution Software
Note: These steps may differ based on the operating
environment. Please see general help in order to locate the
add/remove programs functionality on a specific operating environment.
1 Click Start on your desktop.
2 Click Control Panel.
3 Click Add or Remove Programs.
4 Select USPS® meter label solution.
5 Click Change/Remove.
6 Select Remove the Application
from this Computer.
7 Click OK.
Chapter 5
Registration
Chapter 5.
Registration
In this introduction to registration, you will learn how to do the
following:
ONLINE connection status:
·
Complete profile information.
·
Read and agree to Hazmat Question and view Privacy Policy.
·
Modify connection settings.
·
Register with USPS® meter label solution.
IMPORTANT: If you have a
MID number, contact ICCC at 1-800-344-7779 in order to activate your account in
the USPS® meter label solution software.
Getting
Started
After completing the installation process, you will have the option to
auto-launch the USPS® meter label solution application. If you choose to
automatically launch, you will be navigated to the USPS® meter label solution
Registration screen. Registration is only required the first time after
installing the USPS® meter label solution application.
Register with USPS®
meter label solution Software
1 Fill out the required fields on the registration screen.

2 Check to agree to the Hazmat Terms.
3 Please see our Privacy Policy
via the link provided.
4 Verify connection settings. The
application will automatically default the connection settings to use Internet
Explorer® settings. To
modify connection settings prior to registering, see Modify Connection Settings.
TIP
- To modify
connection settings in the future, access the Preferences > General tab once
the application has launched.
5 Click Cancel.
6 Click Register. Once
registration is successfully completed, the USPS® meter label solution software
splash screen will redisplay and navigate you to the Create Shipping Label view
of the application.
IMPORTANT: If you are
having any problems with your addresses, please first ensure that your address
is valid by ensuring that your address returns on ZIP Code™ Lookup page (http://www.usps.com/zip4). If your address does not appear contact your
local AMS offices, which can be identified by using the AMS Office Locator Tool (https://ribbs.usps.gov/locators/find-ams.cfm).
Modify Connection Settings
1 Click connection settings.
2 Select the Use Proxy Server radio
button to manually enter connection information.
3 Enter a Proxy Address (ex. http://proxy.test.com).
TIP
- USPS® meter
label solution software is not able to execute proxy scripts to determine the
actual proxy server. If a proxy script is being used with USPS® meter label
solution software, then you should select ‘Use IE settings’ and insert the
value in Internet Explorer® as this
browser is capable of executing such scripts.
4
Enter a Proxy Port (ex.8080).
5 Click Save.

Chapter 6
Shipping Overview
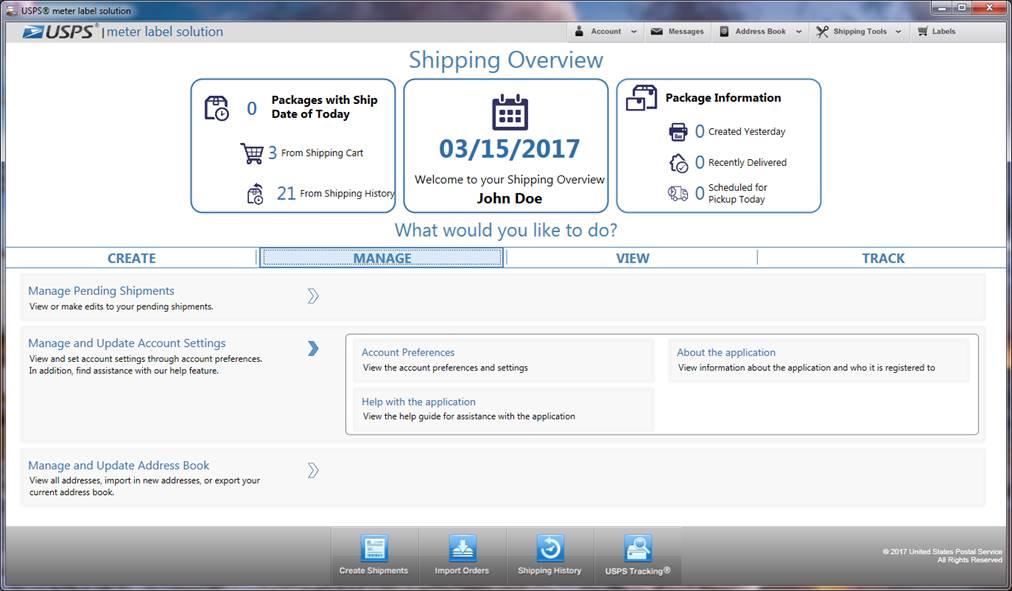
Chapter 6. Shipping Overview
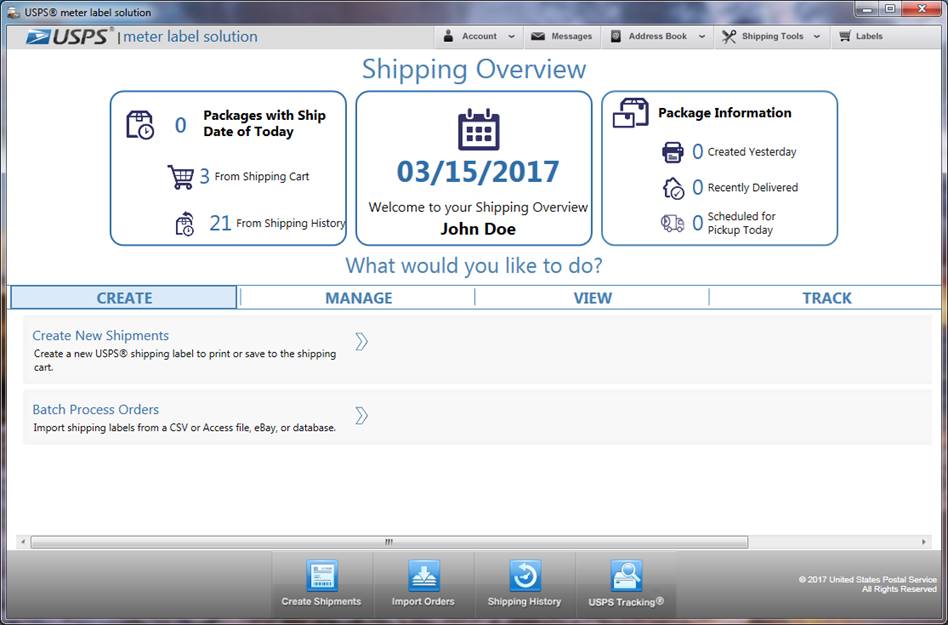
Getting Started
Shipping
Overview is now the default start up page of the application. When you open the
application for the first time or if you have your preferences set to the
default start up page you wil be taken to the Shipping Overview page. If your
start up page is not the default you can view the Shipping Overview by clicking on the
USPS meter label solution logo (home button) to access the Landing Page. By
clicking on the USPS® meter label solution logo while on any page in the
application it will take you to the Shipping Overview page.
What you can do in the Shipping Overview
- View information about who the application is
registered to.
- View metrics on:
- The number of shipping labels in
shipping cart
- The number of packages with
today’s ship date
- Today’s date
- Package information
- The number of labels created
yesterday
- The number of shipments recently
delivered
- The number of shioments
scheduled for pickup today
- To view the Shipping Overview
click on the USPS® meter label solution logo (home button) to access the
Landing Page.
- Click on the following options for your shipping
needs:
o Create
o Manage
o View
o Track
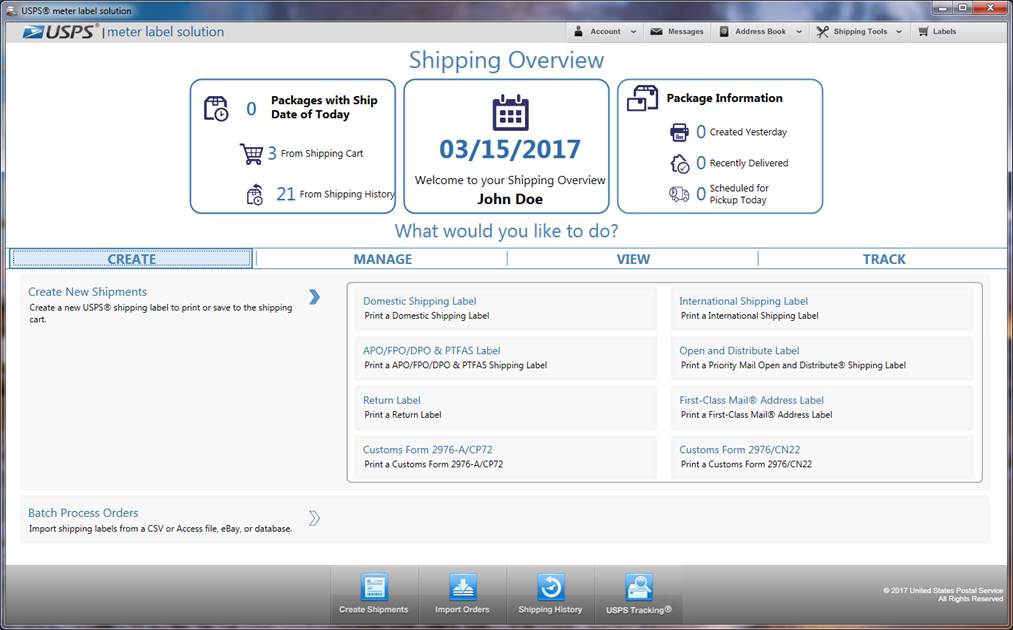
Create
1
Click here to create a new USPS® shipping label to print or save to the
shipping cart.
2
Click one of the following labels to create and print:
a. Domestic
Shipping Label
b. APO/FPO/DPO
& PTFAS Label
c. Return Label
d. Customs Form
2076-A/CP72
e. International
Shipping Label
f. Open and
Distribute™ Label
g. First-Class
Mail® Address Label
h. Customs Form
2976/CN22
3
When you click on any of the above menu
items it will direct you to that particular label creation page.
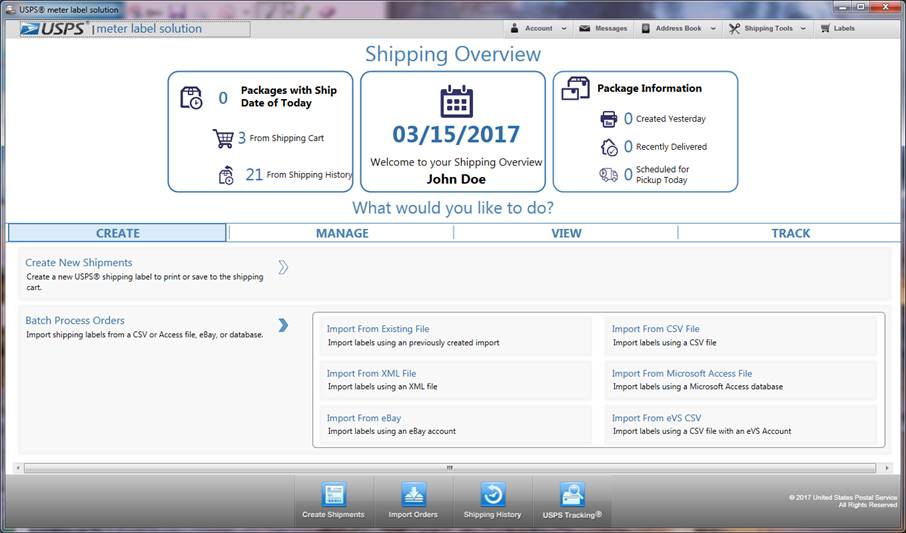
1 Click here to import shipping labels from a
CSV or Access file, eBay, or database.
2 Click one of the following import file types:
a.
Import From Existing File
b.
Import From XML File
c.
Import From eBay
d.
Import From CSV
e.
Import From Microsoft Access File
f.
Import From eVS CSV
3 When you click on any of the above menu items it will direct you to that
parctiular import wizard set up window.
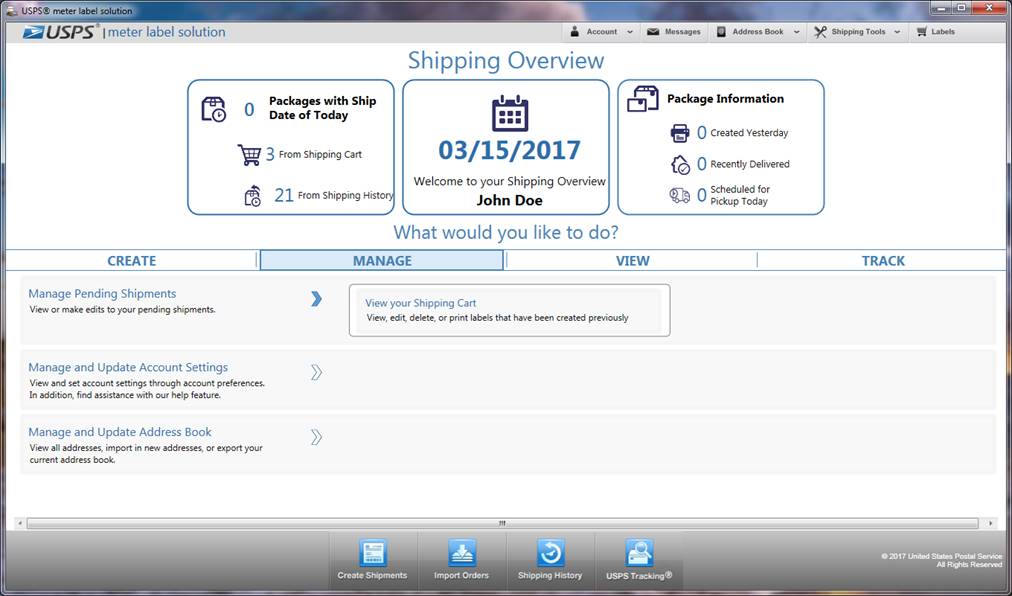
Manage
1 Click here to view or make edits to your
pending shipments.
2 Click on View your Shipping Cart to be able to view, edit, delete or print
labels that have been created previously.
1 Click here to view and set account settings
through account preferences. You can also find assistance with our help
feature.
2 Click on:
a.
Account Preferences to view the account preferences and settings.
b.
Help with the application to view the help guide for assistance with the
application.
c.
About the Application to view information about the application and who it is registered to.
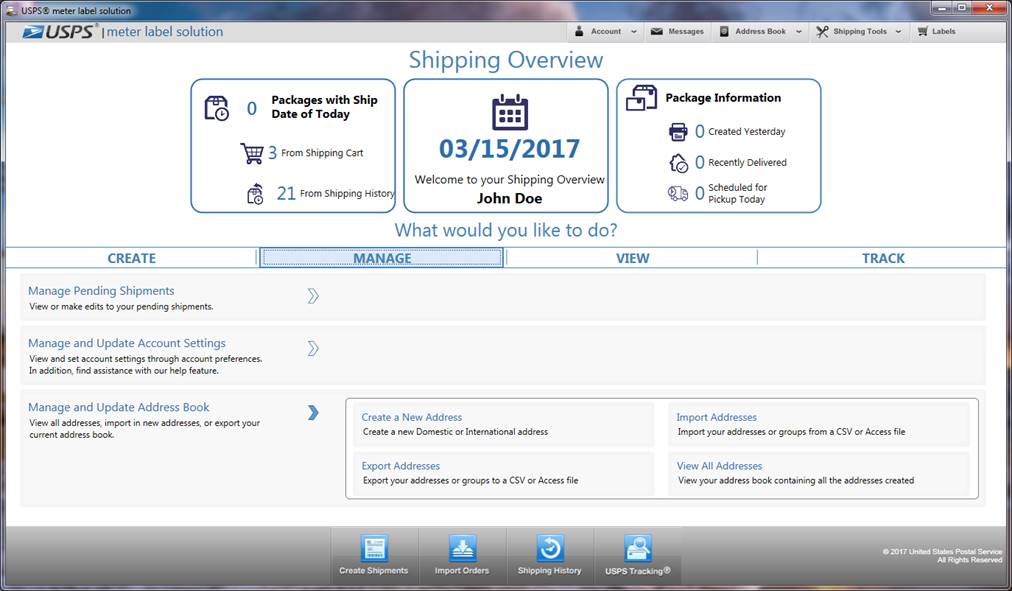
1
Click here to view all addresses, import in new addresses, or export you
current address book.
2
Click on:
a.
Create a New Address to create a new Domestic or International address.
b.
Export Addresses to export your addresses or groups to a CSV or Access file.
c.
Import Addresses to import your addresses or groups from a CSV or Access file.
d.
View All Addresses to view your address book containing all the addresses created.
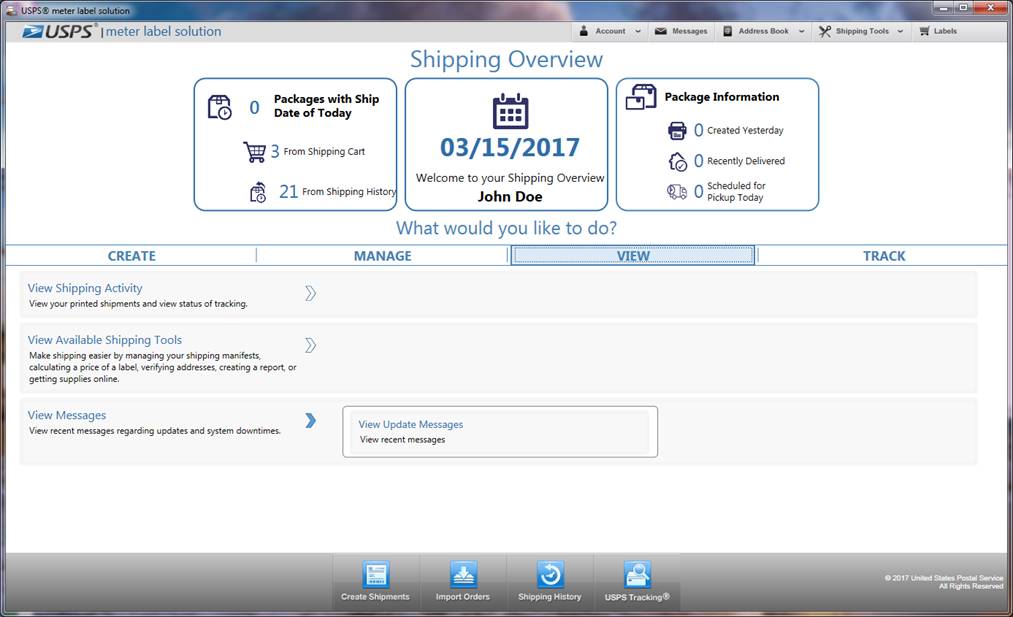
View
1 Click here to view your printed shipments
and view status of tracking.
2 Click on View your Shipping History to view, reship, delete, or export
labels that have been printed previously.
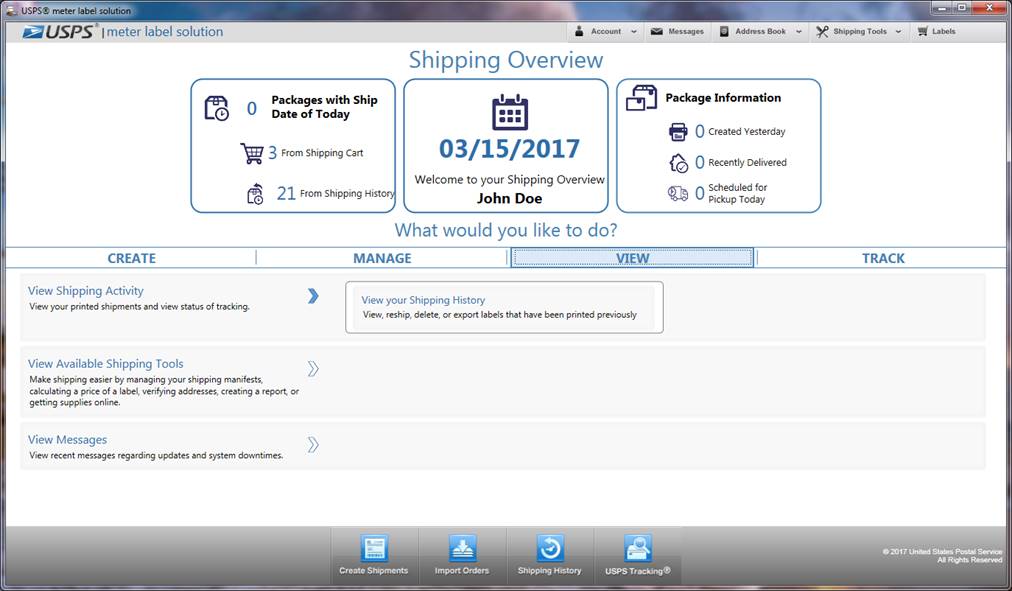
View Available Shipping Tools
1 Click here to make shipping easier by calculating
a price of a label, verifying addresses, creating a report, or getting supplies
online.
2 Click on:
a.
Calculate a Price to calculate the rate of a Domestic or International label.
b.
Create a Report to create a Shipment Report based on your printing activites.
c.
Verify Address to create a Domestic address using the information you know.
d.
Shipping Dashboard to view your outbound shipments and manage your SCAN Forms.
e.
Open Database Connectivity to integrate internal database(s) with the application.
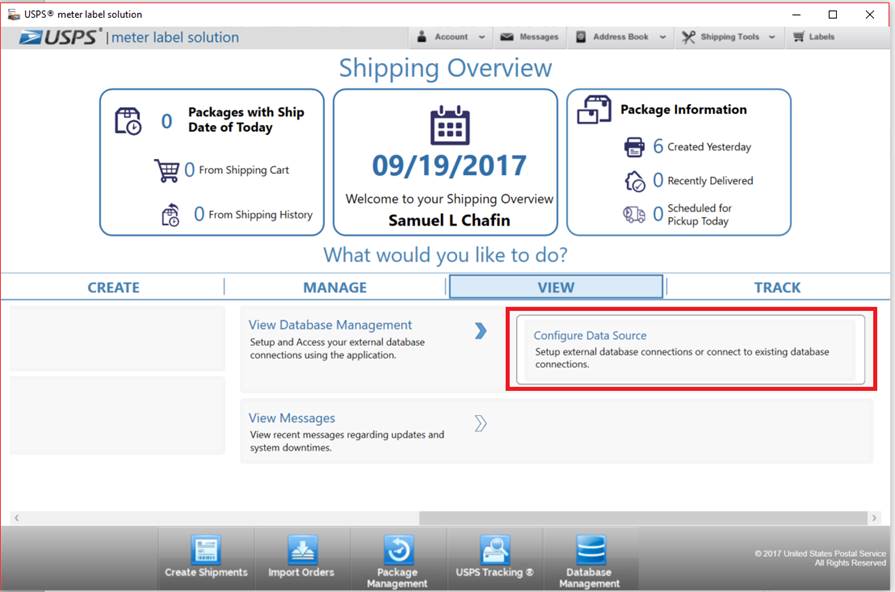
1
Click here setup and access your external database connections using the
application.
2
Click on Configure Data Source to setup external database connections or connect to
existing daabase connections.
3
Click here to view recent messages regarding updates and system downtimes.
4
Click on View Update Messages to view your recent messages in the message center.
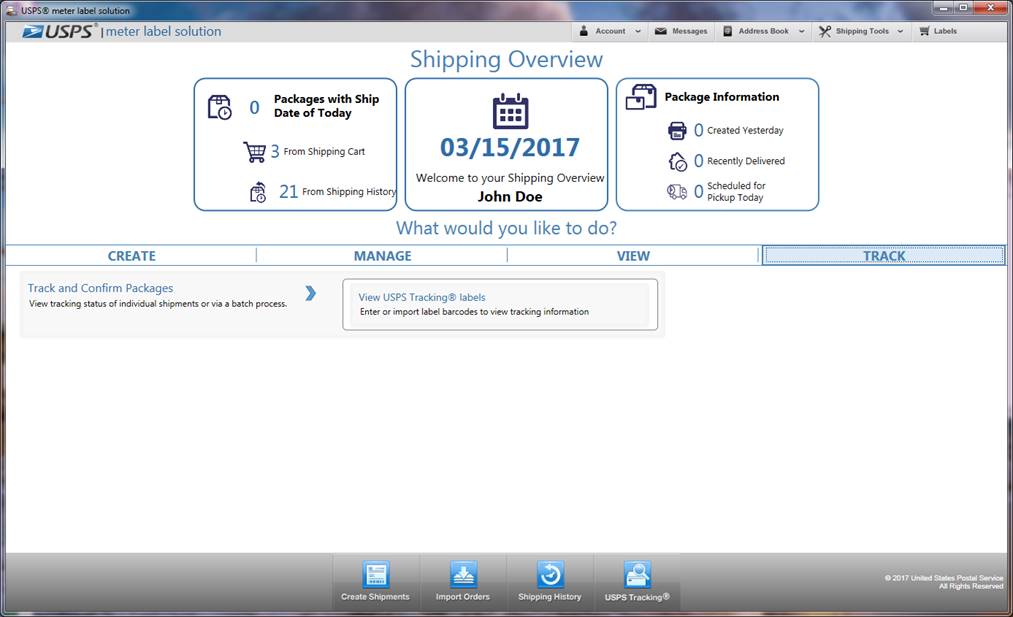
Track
1 Click on Track
and Confirm Packages to view tracking status of individual shipments or via
a batch process.
Chapter 7
Create Shipping Labels
Chapter 7. Create
Shipping Labels
In this introduction to create shipping labels, you will learn how to do
the following:
ONLINE connection status:
·
Add to Shipping Cart for printing at a later time.
·
Compare Service Types related to all services available for
an individual package.
·
Use the Calculate functionality to view exact postage, insurance (only
printing. postage), and service fees due for an individual package.
·
Email, or Save an electronic Merchandise Return Service
(MRS) label by using the Submit button.
·
Edit sender address using information that exists in the
Address Book.
·
Edit Recipient Address using Open Address Book.
·
Add Recipient Addresses entered to
Address Book using Save to Address Book.
·
Use the Express Checkout functionality and print labels quicker without
adding to Shipping Cart
OFFLINE connections status:
·
Add to Shipping Cart for printing at a later time. IMPORTANT:
For international addresses, verify that your domestic Sender Address has a
phone number in the address book prior to plugging OFFLINE.
·
Edit sender address using information that exists in the
Address Book.
·
Edit
Recipient Address using Open Address
Book.
Getting Started
The Create
Shipments navigation allows the user to create Domestic shipping labels,
International shipping labels (with a Commercial Invoice for GXG label),
Customs 2976/CN22 and Customs 2976A/CP72 Forms, APO/FPO/DPO and Possessions,
Territories and Freely Associated States (PTFAS) labels, Open and Distribute™
labels, and First-Class
Mail® letter labels. The Return Labels navigation allows the user to create electronic
Merchandise Return Service labels.
Create a Domestic Label
1
Select Domestic Shipping Label from the Create
Shipments navigation or the Shipping Overview navigation under Create->
Create New Shipments.
2
Edit the Sender
Information by clicking Edit. This button will display the Address
Book where a new Sender Address can be chosen or an existing Sender Address can
be modified.
TIP
- For more details
on how to Edit, see Address
Book and Create Labels section.
- For more details
on how to pre-populate the domestic label, see edit Preferences.
- Some domestic
labels require the use of a customs form.
More details can be found in DMM 608.2.4 and DMM 608.2.5.
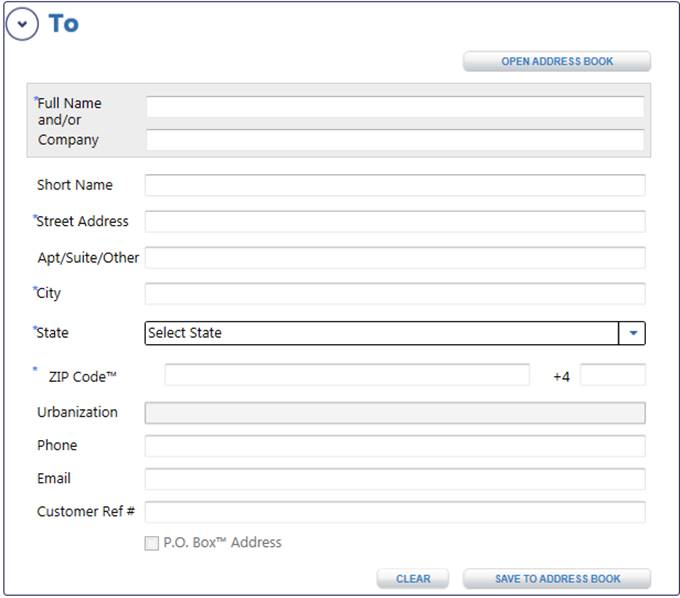
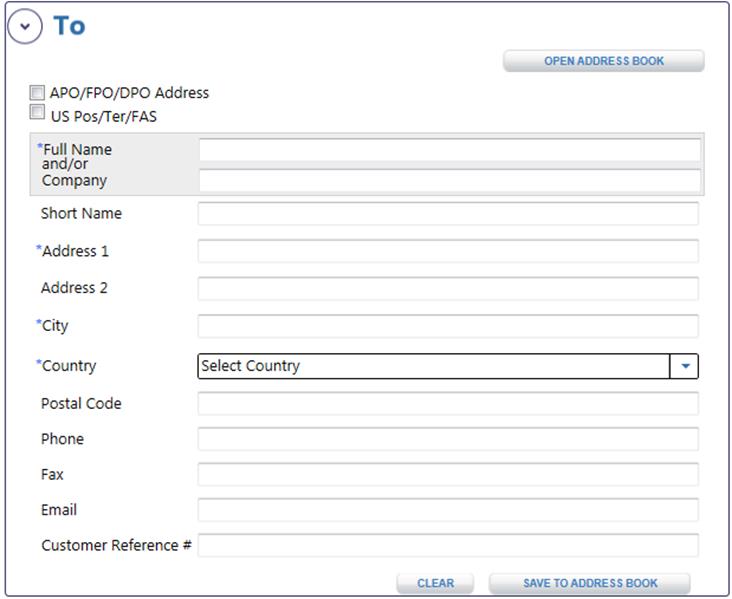
3
Click Recipient expander and enter Recipient
Information. Either manually fill in the required fields in the Recipient
Information or click Open Address Book.
Open Address Book will display the Address Book where the user can
choose a previously saved address(s) for the Recipient Information. Only domestic addresses and/or APO/FPO/DPO
addresses may be selected in this section.
TIP
- For more details on how to Open Address Book, see Address Book and Create Labels section.
- Also, when you begin typing in the Full Name or a Short
Name, matching full names or short names in the Address book will appear in a
dropdown box. Select the correct
Full Name or Short Name and click tab
in order pre-populate the Recipient field with address information.
4 You may save new addresses to the Address
Book by clicking Save To Address Book before proceeding with entering package information. All domestic
addresses will automatically be standardized to USPS® formatting standards upon performing this action.
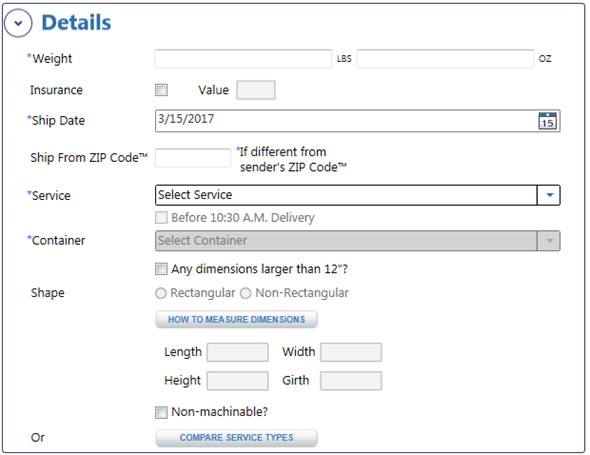
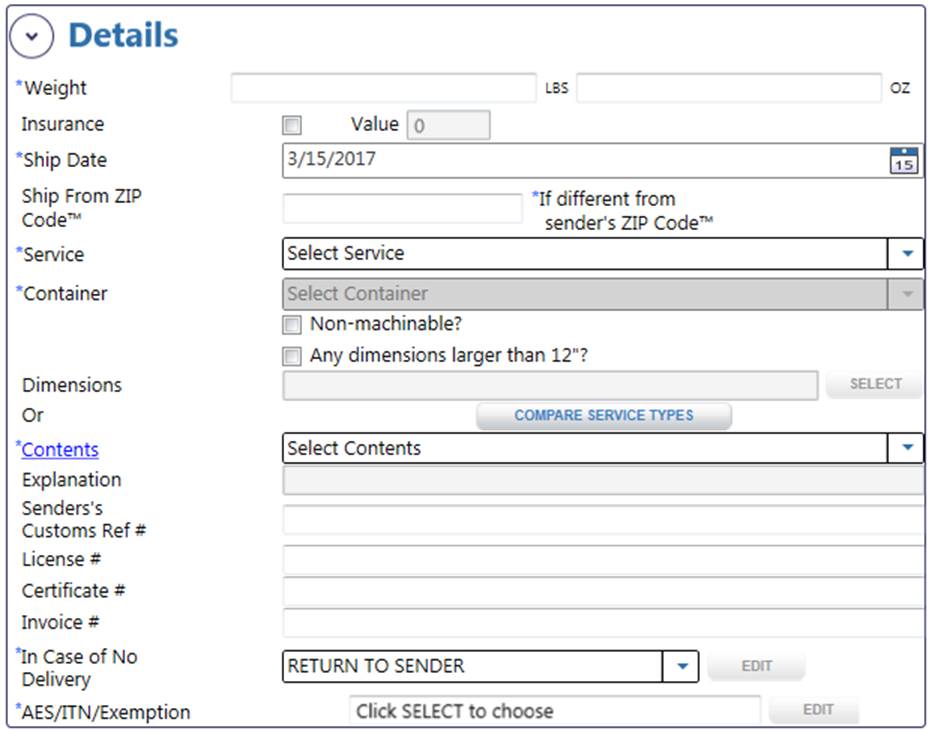
5 Click Details expander and enter Package Information. Also, if available,
enter a Value to be insured and subsequently pay for Insurance along with
postage.
Please visit
the Troubleshooting section for
the most frequently asked questions regarding USPS® meter label solution
software changes due to USPS®
price changes.
Example without
“Custom Packages” option:
TIP:
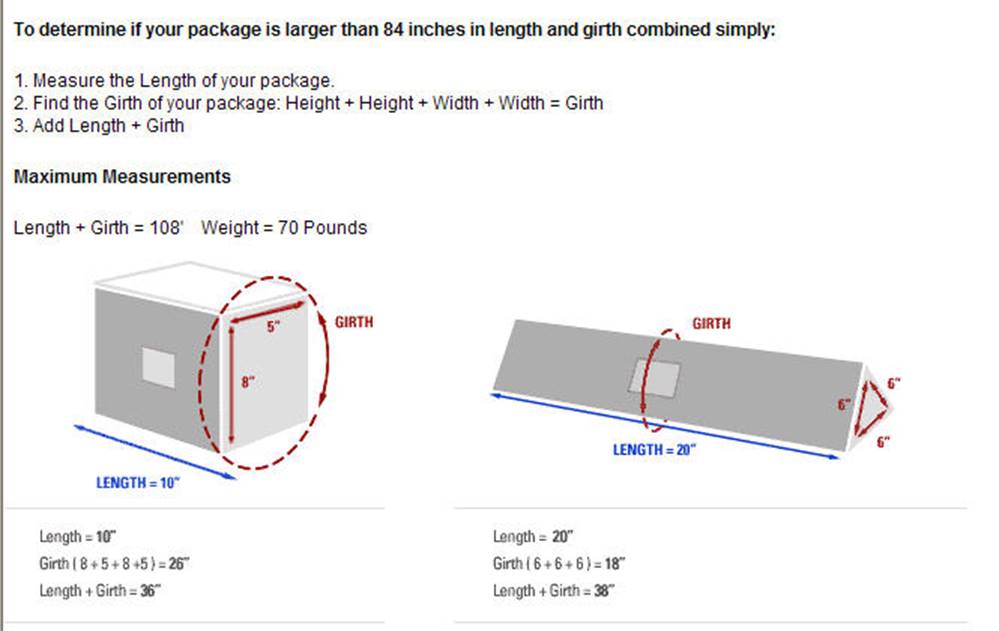
How to measure
dimensions
- For further
direction on how to measure Length, Width, Height, and Girth for Large /
Priority Mail® items, click on How
to Measure Dimensions button on the create domestic label screen or view Appendix.
10:30 A.M.
Delivery
- This option is available, for a fee, when the Priority
Mail Express® service is
selected. Service availability is
determined by the origin and destination ZIP Code™(s) and Post Office
acceptance time. An error message will
be displayed when the service is unavailable for the locations entered.
Using Custom
Packaging option
- If shipping
with a constant package size, you can create Custom Packages for selection with
certain Services. For more information
on creating Custom Packages, view Preferences.
Compare Service
Types
- Enter a Ship
From ZIP Code™ if you intend
on mailing your package from a ZIP Code™ that differs
from your Sender ZIP Code™ to ensure
correct postage price attained for your mail piece.
- Select the Service you wish to use to ship your
package. If you want to see a list of
all available Services based on the Origination and Destination ZIP Code™(s), Weight, and Size entered, click Compare Service
Types prior to selecting a service. This will provide the price, scheduled/expected
delivery date, and a brief description of the available Services should you
wish to shop across USPS® services.
1
Click Compare
Service Types.
2
Highlight the desired Service.
3
Click Apply
Selected Service Type.
Note: Please
refer to Priority Mail Express™ Cutoffs & Commitments link for a list
of service commitments. Be advised, the link is only available when selecting
the Priority Mail Express™ service.

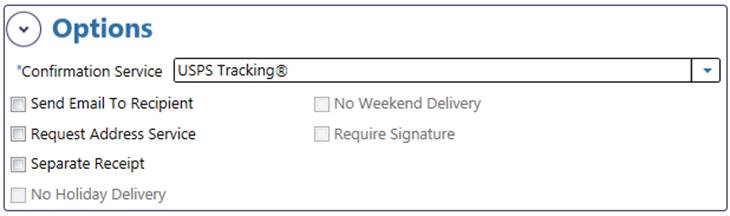
6
Click Option
expander and enter Package Options.
Depending on the service chosen, various package additional options will be
available. Choose those you wish to
include on your Domestic Shipping label as an endorsement. Note: For more information regarding the confirmation services
available, refer to the Glossary section.

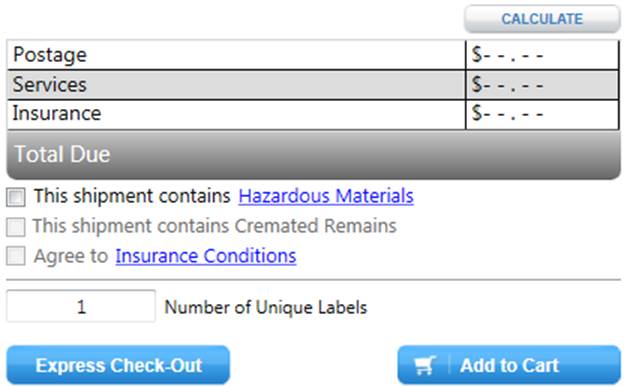
7
Click Calculate in order to display the postage(for
domestic destinations, the Commercial Base® price applies to
supported products and services if calculated with an IBI postage meter), insurance fees, service fees, and scheduled/expected delivery
associated with the label you have created. Provided that enough information is
provided, domestic addresses will automatically be standardized to USPS® standards upon
performing this action. If there is missing information, you will be prompted
to correct error(s) and re-calculate to obtain prices.
TIP
- If Priority Mail Express® service was selected, click Priority
Mail Express® Cutoffs & Commitments to view drop off location, drop off times, and scheduled delivery
dates. Note: Priority Mail Express®
scheduled delivery date and time depend on origin, destination and Post Office™
acceptance time. Some restrictions apply. For additional information, visit the
Postage Calculator at http://postcalc.usps.com.
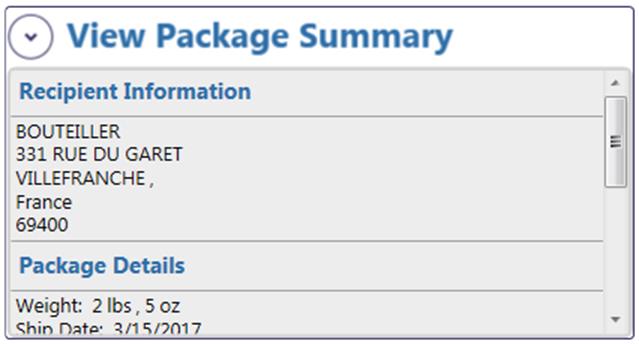
8
Click View Package
Summary expander to preview all entered information. You can also use this
feature as you view the label form.

9 Click Calculate in order to display the postage, insurance fees,
and scheduled/expected delivery date or delivery days associated with the label
you have created. Note:
Scheduled/Expected delivery date or days represents the time period for the
package to go from the origin to its destination; please note that this does
not include time for the package to go through customs.
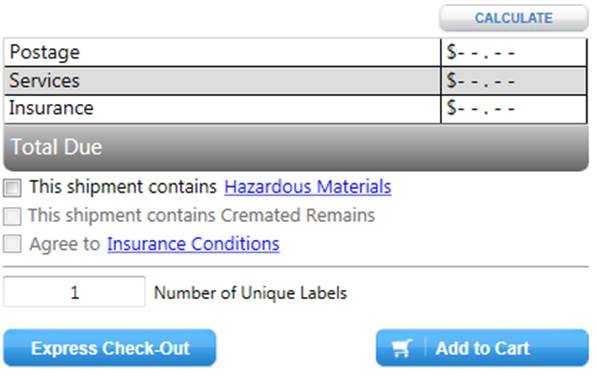
10
Click the Hazardous
Materials link. This link will
display the rules and restrictions for what can and cannot be mailed with USPS®
services.
11
Click This shipment
contains Hazardous Materials to notify USPS® if shipment
contains hazardous materials to ensure proper processing and handling.
12
Click This shipment
contains Cremated Remains to notify USPS® if shipment contains
cremated remains to ensure proper processing and handling (available only when service selected is Priority Mail Express®).
13
Click the Insurance checkbox to agree to Insurance
conditions (available only if printing
postage & required if applicable).
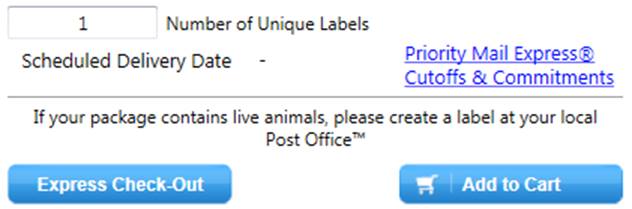
14
Entering a number into the Number of Unique Labels text box will create that many labels with
individual barcode properties. The
maximum number of labels that can be printed or saved in this manner is 2000.
15
Click Add to Cart to save the
label to the shipping cart in order to print. If online, all domestic addresses will
automatically be checked for proper Postal Service™ format and standardized if
necessary. Note: The delivery address
manually entered on the label may be different than the address that appears on
the label. Check to ensure that the
standardized address displayed on your printed label is accurate.
16
If you do not wish to add to the
shipping cart, click the clear all button.
TIP
- See Preferences for
more details on how to immediately have new preferences take effect.
For information
regarding package size requirements
and how to measure packages, refer to the screenshot below:
Create an APO/FPO/DPO and Possessions,
Territories and Freely Associated States (PTFAS) Label
Important Note:
- When you
create labels on the APO/FPO/DPO
and Possessions,
Territories and Freely Associated States (PTFAS)
module labels will be printed as either an integrated shipping label with a
customs form or as a separate domestic label and customs form.
1
Select APO/FPO/DPO & PTFAS Label from the
Create Shipments navigation or the Shipping Overview navigation under
Create-> Create New Shipments.
2
Edit the Sender
Information by clicking Edit. This button will display the Address
Book where a new Sender Address can be chosen or an existing Sender Address can
be modified.

TIP
- For more details on how to Edit, see Address Book and Create Labels section.
- For more details on how to pre-populate the
APO/FPO/DPO and Possessions, Territories and Freely Associated States (PTFAS)
label, see edit Preferences.
- Some domestic labels require the use of a
customs form. More details can be found
in DMM 608.2.4 through 2.5.
3
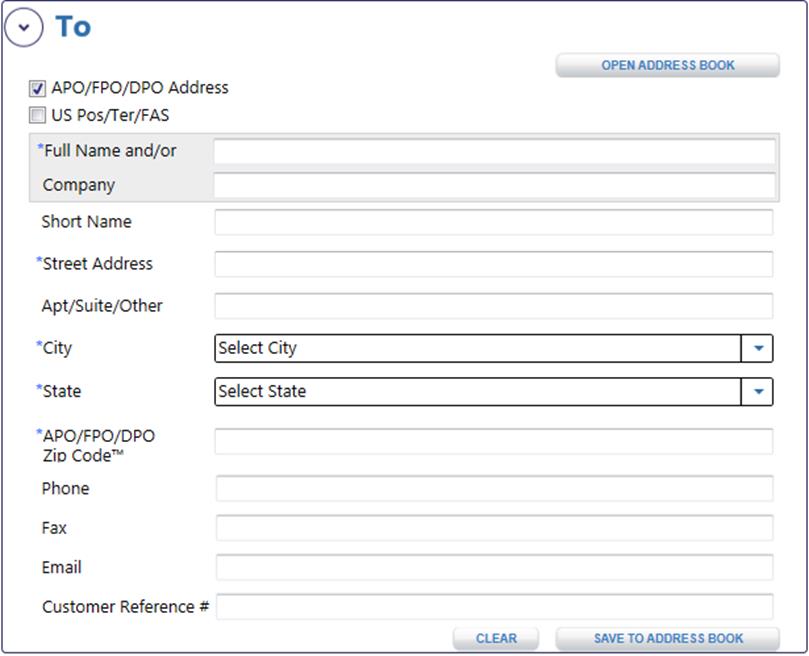
Click Recipient
expander and enter Recipient
Information. Either manually fill in the required fields in the Recipient
Information or click Open Address Book.
Open Address Book will display the Address Book where the user can choose
a previously saved address(es) for the Recipient Information. Only APO/FPO/DPO and Possessions, Territories
and Freely Associated States (PTFAS) addresses may be selected in this section.

TIP
- For more
details on how to Open Address Book,
see Address Book and Create Labels section.
- Also, when
you begin typing in the Full Name or a Short Name, matching full names or short
names in the Address book will appear in a dropdown box. Select the correct Full Name or Short Name and click tab in order pre-populate the Recipient
field with address information.
4
You may save new addresses to the Address Book by clicking
Save To Address Book before
proceeding with entering package information. All domestic addresses
will automatically be standardized to USPS® formatting standards upon performing this action.
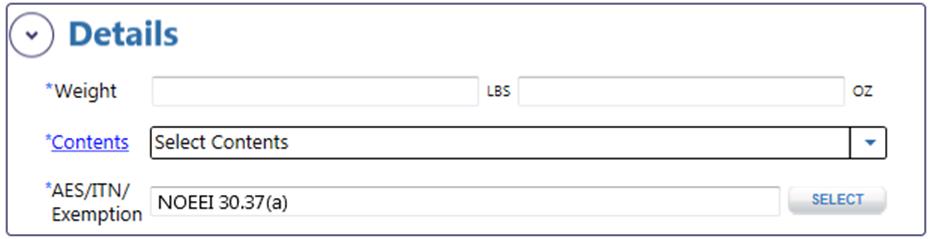
5
Click Details
expander and enter Package
Information and Customs Information describing
your package. Also, if available, enter a value to be insured and
subsequently pay for Insurance along with postage. Also, choose
the delivery option you want if, for some reason, your package cannot be
delivered. These options may result
in extra charges. Note: For more
information regarding the customs information available, refer to the Glossary section.
Please visit the Troubleshooting section for
the most frequently asked questions regarding USPS® meter label solution
software changes due to USPS®
price changes.
Example without
“Custom Packages” option:
TIP:
How to measure
dimensions
- For further direction
on how to measure Length, Width, Height, and Girth for Large / Priority Mail®
items, click on How to Measure
Dimensions button on the create domestic label screen or view Appendix..
Compare Service
Types
- Enter a Ship
From ZIP Code™ if you intend
on mailing your package from a ZIP Code™ that differs
from your Sender ZIP Code™ to ensure
correct postage price attained for your mail piece.
- Select the Service you wish to use to ship your
package. If you want to see a list of
all available Services based on the Origination and Destination ZIP Code™(s), Weight, and
Size entered, click Compare Service Types prior to selecting a service.
This will provide the price, scheduled/expected delivery date, if
applicable, and a brief description of the available Services should you wish
to shop across USPS® services.
·
Click Compare
Service Types.
·
Highlight the desired Service.
·
Click Apply
Selected Service Type.
Note: Please
refer to Priority Mail Express™ Cutoffs & Commitments link for a list
of service commitments. Be advised, the link is only available when selecting
the Priority Mail Express™ service.
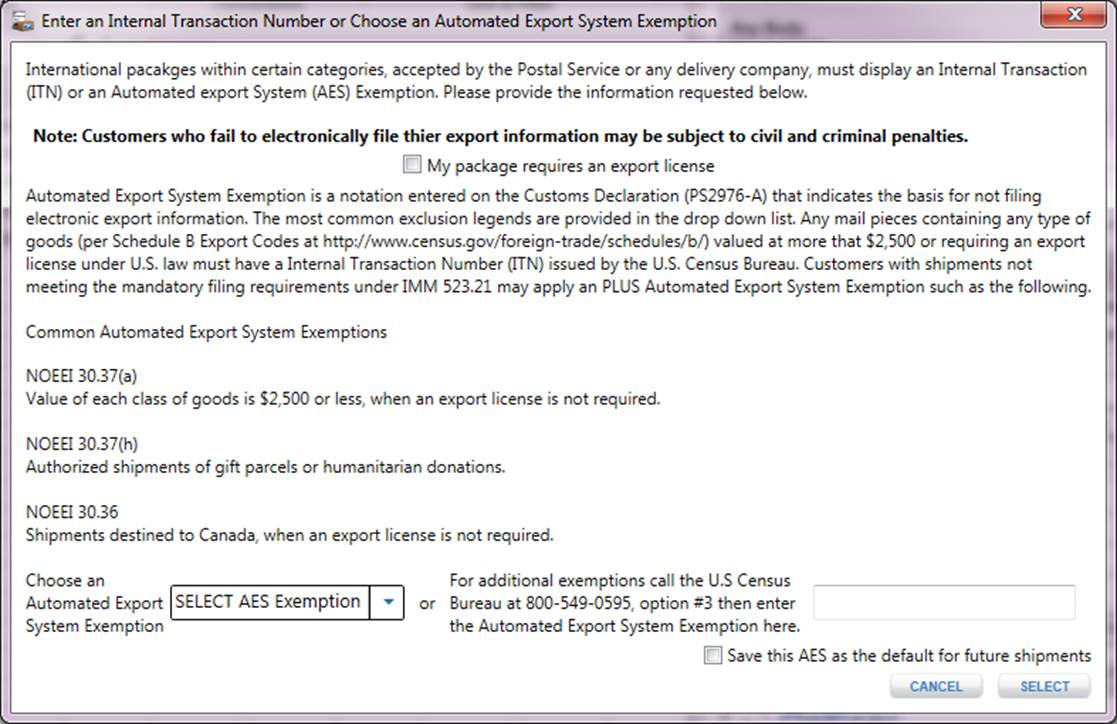
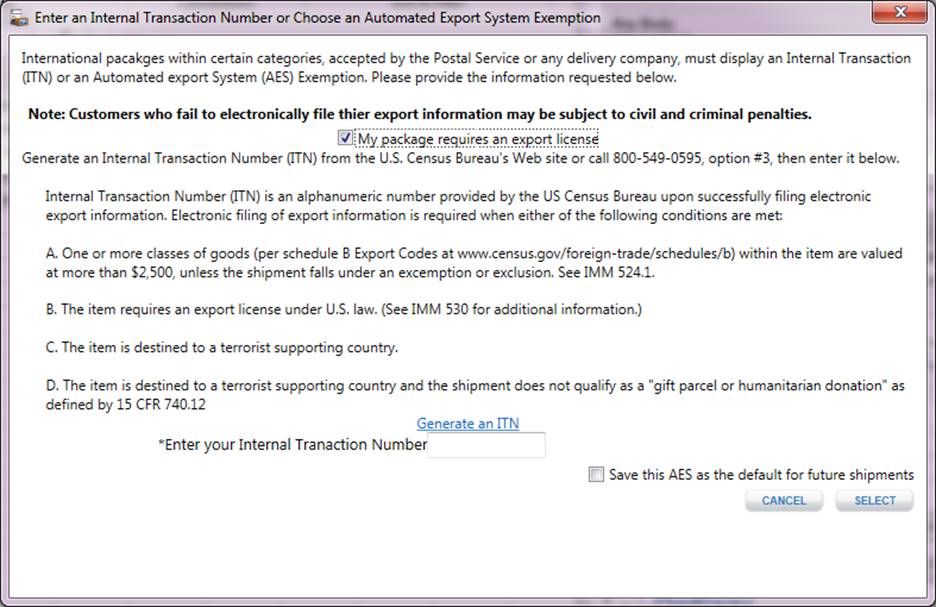
6 For some international label types, the Census Bureau requires either an
Automated Export Compliance/Internal Tracking Number/Exemption. To provide AES or ITN information, click the SELECT button. Either select a commonly used AES, manually
enter the AES, or mark the My Package Requires an Export license and enter the
ITN information.
Automated Export System Exemption
Internal Transaction Number

7
Click Options
expander and enter Package Options.
Depending on the service chosen, various package options will be
available. Choose those you wish to
include on your Domestic Shipping label as an endorsement. Note: For more information regarding the confirmation services
available, refer to the Glossary section.
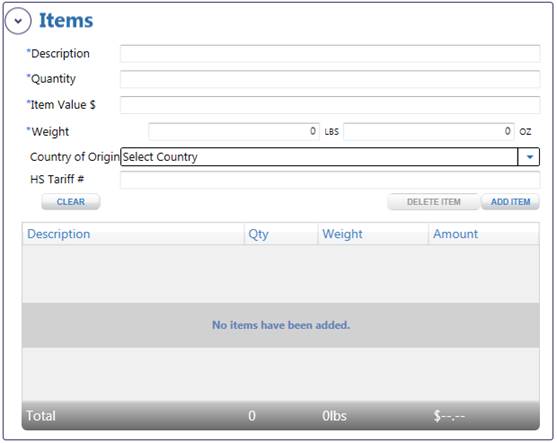
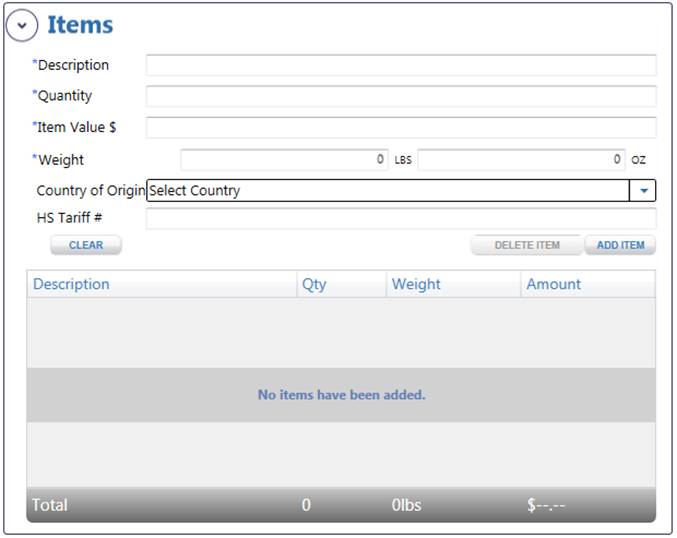
8 Click Items expander and add
the various items contained in your package by entering a Description, Quantity, Unit Value, Unit Weight, Country of Origin,
and/or HS Tariff Number and click Add
Item. The item and subsequent items
added will be displayed in the Item Content table. Note: The maximum number
of items that can be added to an APO/FPO/DPO and Possessions, Territories and
Freely Associated States (PTFAS) label is 30 items.
TIP
- To Delete a Content Item, select the item
in the items table, right-click to view context menu and select Delete
Item or click the Delete button.
- To Modify a Content Item double-click an item in the items
table, verify
that content details populates in respective fields, and modify information. Prior to re-adding the modified item,
user must delete original item record from item contents table.
-Country of Origin
and HS Tariff # are optional fields and are of use to Commercial Senders
only.
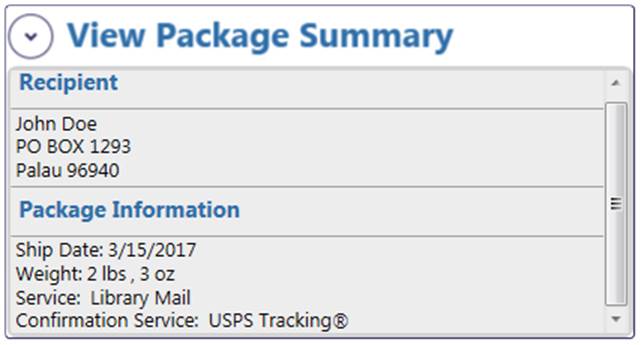
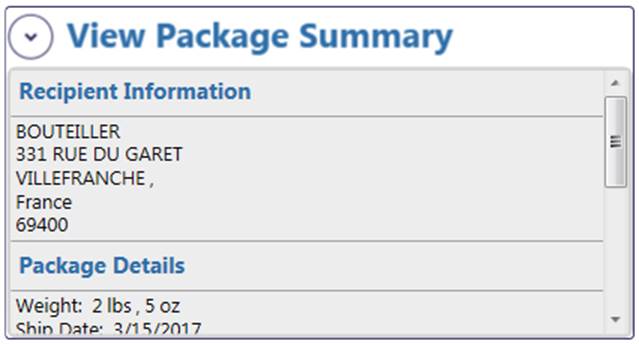
9
Click View Package
Summary expander to preview all entered information. You can also use this
feature as you view the label form.
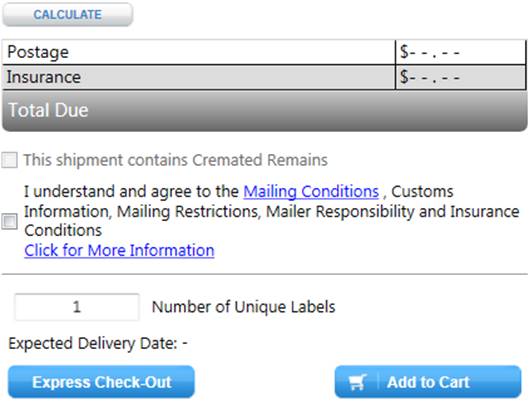
10 Click Calculate in order to display the postage, insurance fees,
and scheduled/expected delivery date or delivery days associated with the label
you have created. Note:
Scheduled/Expected delivery date or days represents the time period for the
package to go from the origin to its destination; please note that this does
not include time for the package to go through customs.
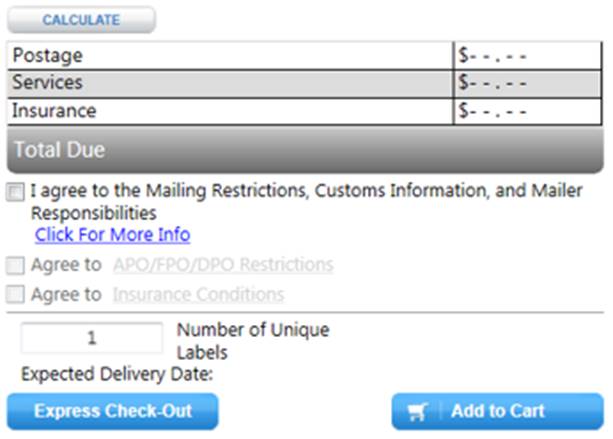
11 Click on the Click for More
Information hyperlink. This link will display static customs information
related to all international labels
12 Click the Mailing Restrictions, Customs Information, and Mailer
Responsibilities checkbox to
agree to international mailing restrictions, customs information, and mailer
responsibilities (required only If
printing).
13 Click the APO/FPO/DPO Restrictions
checkbox to agree to APO/FPO/DPO restrictions (if applicable – required only if printing).
14 Click the Insurance Conditions
checkbox to agree to insurance conditions (if applicable – required only if printing).
15
Entering a number into the Number of Unique Labels text box will create that many labels with
individual barcode properties. The
maximum number of labels that can be printed or saved in this manner is 2000.
16
Click the “Separate Label and Customs Form” checkbox if
you would like the APO/FPO/DPO and PTFAS Label to be added to the cart as a
separate Domestic Label and Customs Form 2976A/CP72 label. This will allow you
to print the Domestic Label and Customs Form 2976A/CP72 in different print
formats.
17 Click Add to Cart to save the label to the shipping cart in order
to print.
TIP
-If you receive an
error message that states “Requested Service is not available” it could mean
that (1) The service indicated is not available to the destination country or
(2) The weight or value indicated exceeds the maximum allowed by the
destination country. For more information on how to view what services are
available to different destination countries and details regarding maximum
weight and dimension, refer to the Shipping Tools section.
-If you choose to
add a separate Domestic label and Customs form to the shipping cart, these
labels will be treated independently i.e., if you edit the domestic label, the
customs form associated to this label will not reflect these changes and must
be manually updated. Please see Shipping Cart for instructions
on how to edit labels from the shipping cart.
18
If you do not wish to add to the
shipping cart, click clear all button.
TIP
- See
Preferences
for more details on how to immediately have new preferences take effect.
Create a Priority Mail Express International®, Priority
Mail International®,
First-Class Mail International®
or First-Class Package International Service® Label
1
Select International Shipping Label from the Create
Shipments navigation or the Shipping Overview navitagation under Create-> Create
New Shipments. .
2
Edit the Sender Information by clicking Edit. This button
will display the Address Book where a new Sender Address can be chosen or an
existing Sender Address can be modified.
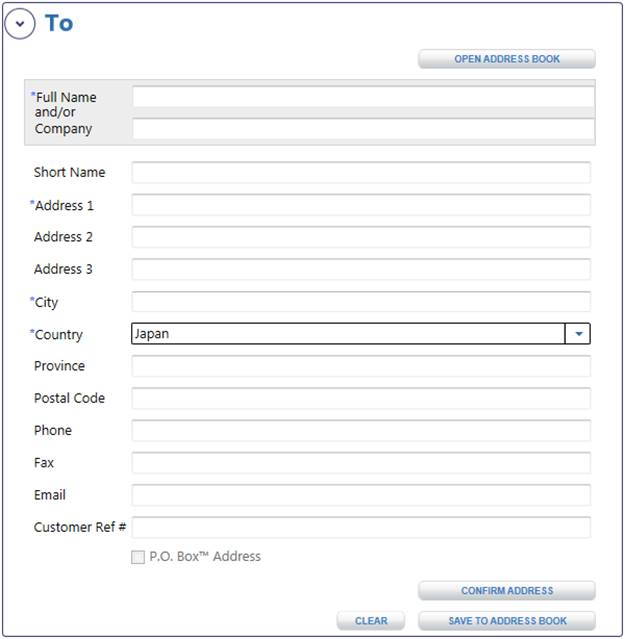
3
Click Recipient expander and enter Recipient
Information. Either manually fill in the required fields in the Recipient
Information or click Open Address Book. Open
Address Book will display the Address Book where the user can choose a
previously saved address to populate the Recipient Information. Only international addresses may be selected.
TIP
- For more details
on how to Open Address Book, see Address
Book and Create Labels section.
- Also, when you begin typing in the Full Name or a Short
Name, matching full names or short names in the Address book will appear in a
dropdown box. Select the correct
Full Name or Short Name and click tab
in order pre-populate the Recipient field with address information.
4 You may save a new address to the Address Book by clicking Save To
Address Book (optional).
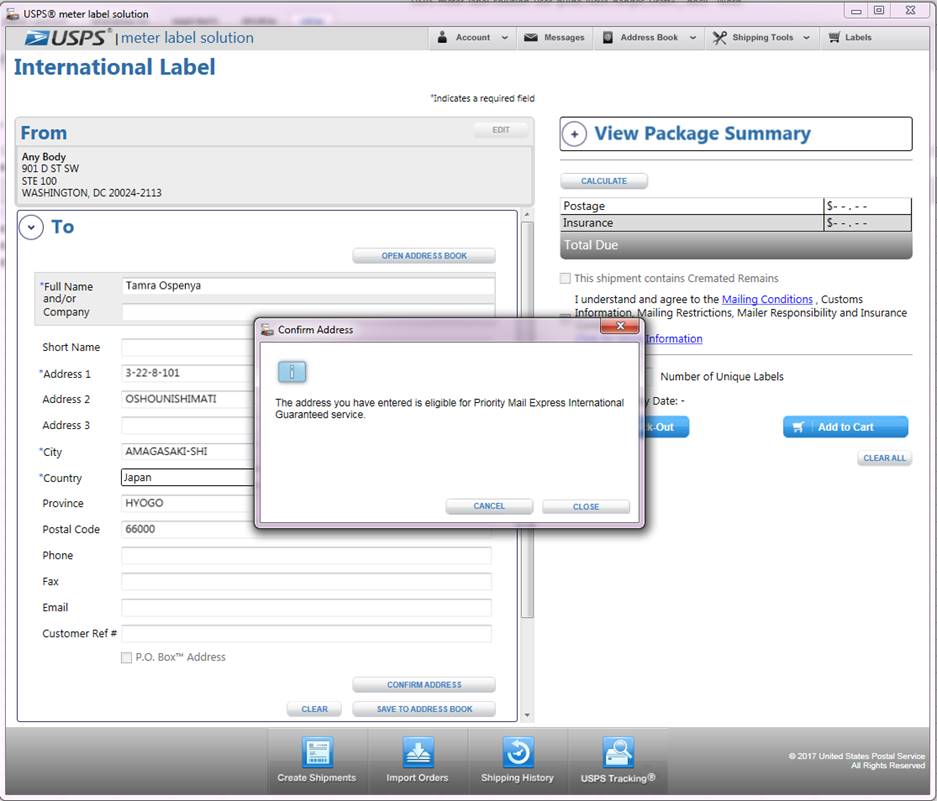
5 Click Confirm Address to
verify if the recipient address qualifies for Priority Mail Express
International® with guaranteed service. Note: Confirm Address button is only enabled
when Priority Mail Express International® with guaranteed service is available
for the selected country.
6 If recipient address entered is correct and eligible for Priority Mail
Express International® with guaranteed service, a confirmation modal will be
displayed. Click Close and proceed with international label creation.
Example with Address Found:
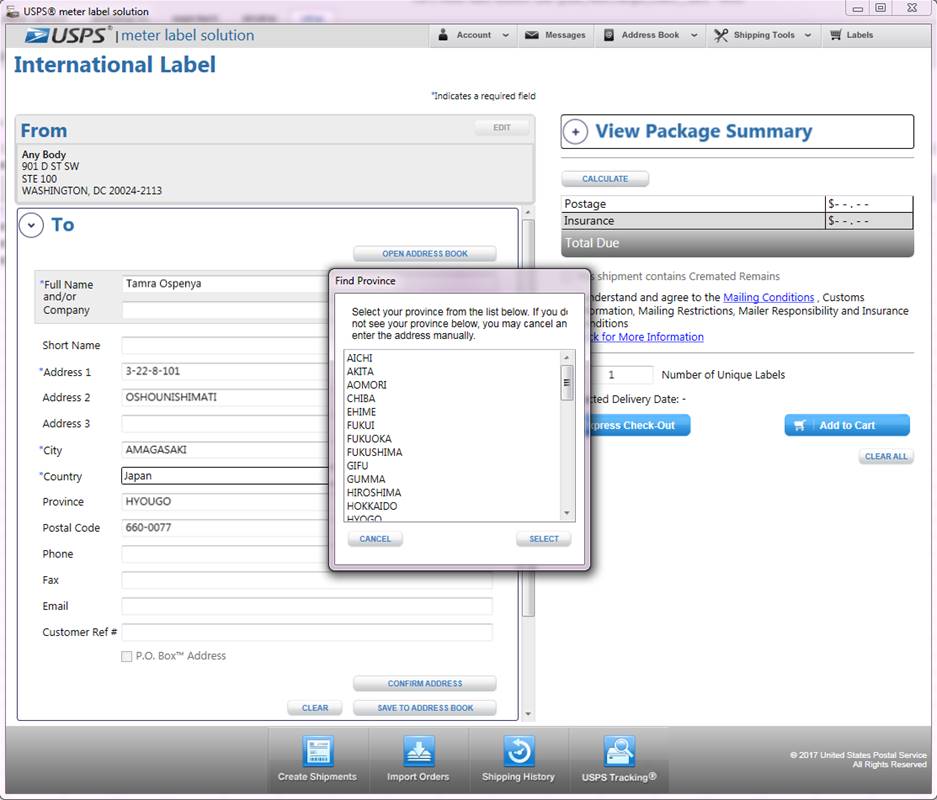
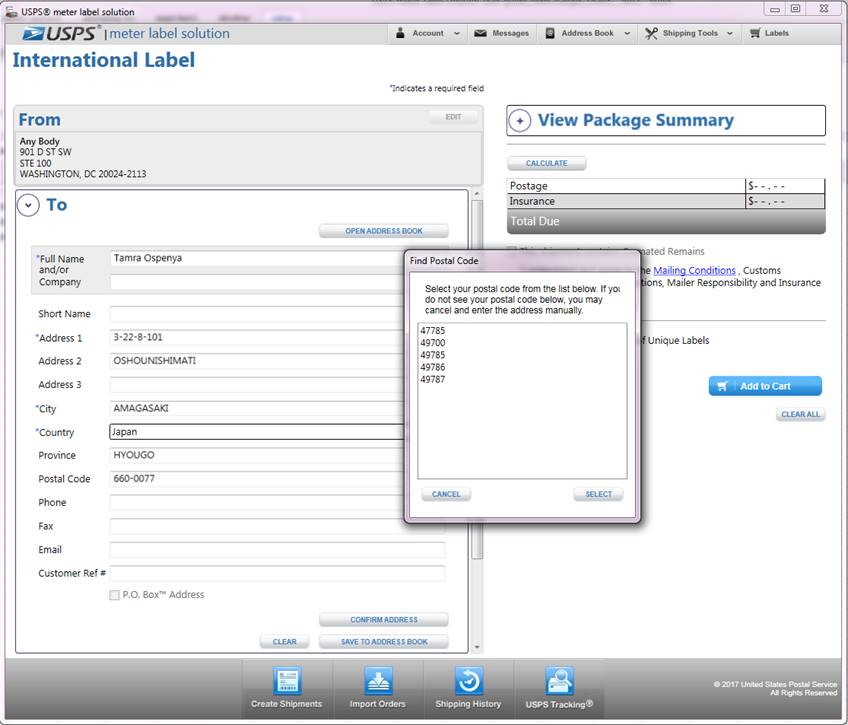
7 If recipient address entered is incorrect and/or ineligible for Priority
Mail Express International® with guaranteed service, a modal will be displayed
that will allow you to either look up the correct address, select the closest
matching address found, or continue with the address as entered. If you continue with the address as entered, Priority
Mail Express International® with guaranteed service will be unavailable.
Example with Incorrect Address – Match Found

Example with Incorrect Address – Lookup Address (Province)
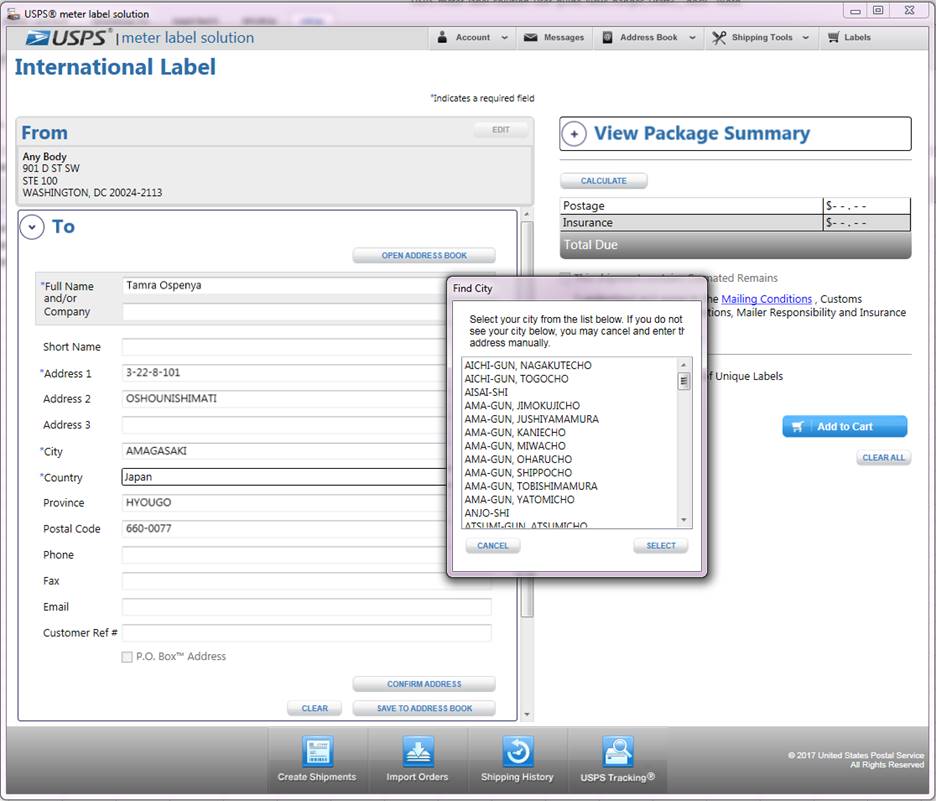
Example with Incorrect
Address – Lookup Address (City)
Example with Incorrect Address – Lookup Address (Postal Code)
8 Click Details expander and Enter Package Information. Enter total
weight of the package in pounds and ounces including packaging and shipping
labels. Note: Your total unit weight
should not exceed the package weight.
Please visit
the Troubleshooting section for
the most frequently asked questions regarding USPS® meter label solution software
changes due to USPS® Price
Change.
Example with “Custom Packages” option:
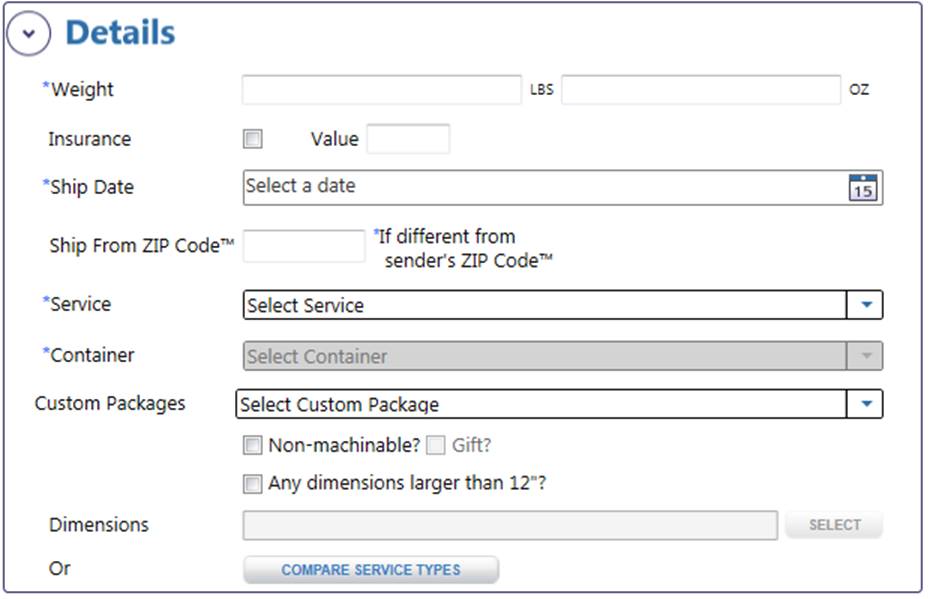
TIP
Compare Service Types
- Enter a Ship from ZIP Code™ if you intend on mailing your package from a ZIP Code™ that differs from your Sender ZIP Code™.
- Select the Service you wish to use to ship your
package. If you want to see a list of all available Services based on the
Weight and Country entered, click Compare Service Types prior to selecting a service. This will provide the price, scheduled/expected
delivery date, if applicable, and a brief description of the available
Services. Note: If no service displays, then it is a good indication that the
services offered for creating online labels via the USPS® meter label solution application
is not available to the destination country entered. Another convenient way to
check what services are available is by going to your Shipping Tools. If no services display in the Compare Service Types
pop-up, it means that none of the services are available for creating an
international label in the USPS® meter label solution application to the
destination country.
1 Click Compare
Service Types.
2 Highlight the desired Service.
3 Click Apply
Selected Service.
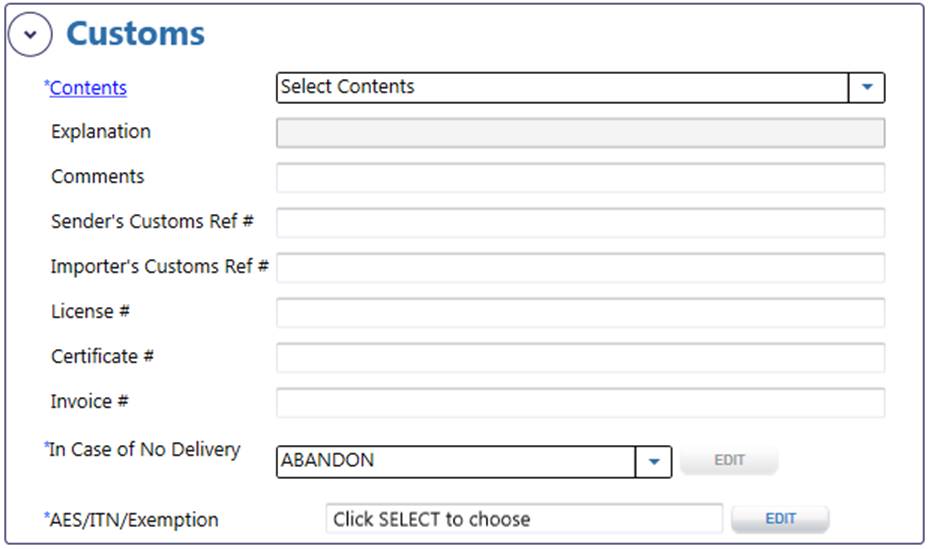
9 Click Customs expander and enter the Customs Information describing your package. Also, choose the delivery option you want if,
for some reason, your package cannot be delivered. These options may result in extra charges. Also, enter or select an Automated Export System (AES) Exemption or Internal
Transaction Number. Note: For more
information regarding the customs information available, refer to the Glossary section.
10 For some international label types, the Census Bureau requires either an Automated
Export Compliance/Internal Tracking Number/Exemption. To provide AES or ITN information, click the SELECT button. Either select a commonly used Exemption, manually
enter the AES, or mark the My Package Requires an Export license and enter the ITN
information.
Automated Export System Exemption
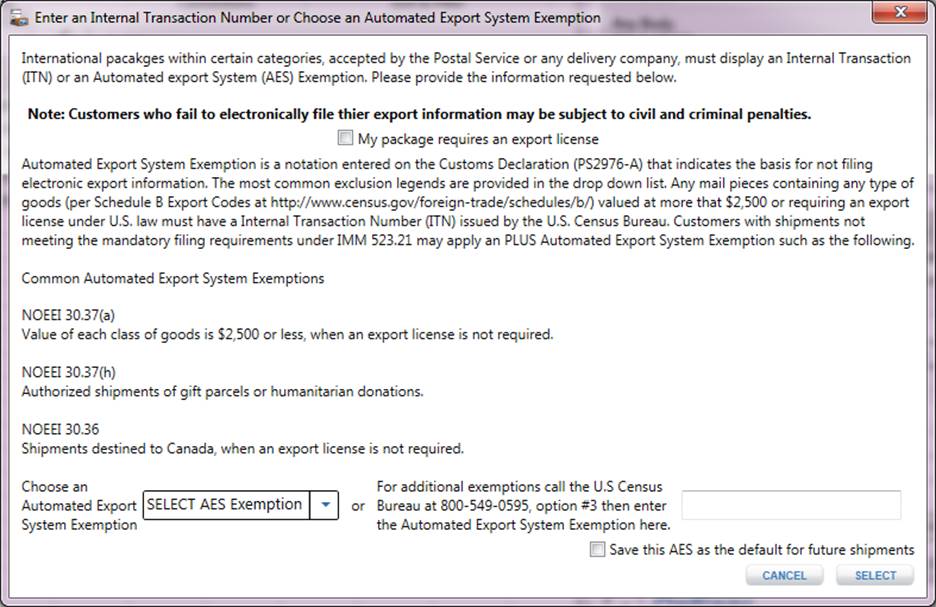
Internal Transaction Number
11 Click Items expander and add
the various items to your package by entering a Description, Quantity, Unit Value, Unit Weight, Country of Origin,
and/or HS Tariff Number and click Add
Item. The item and subsequent items
added will be displayed in the Item Content table. Note: The maximum number of items for Priority
Mail Express International®, and Priority Mail International® parcels (excludes the Flat Rate Envelops and Small Flat
Rate Boxes),, Large Flat Rate Box, and Medium Flat Rate Box is 30 items. For
other international service types (e.g. The Priority Mail International
Flat-Rate Envelopes and Small Flat Rate boxes), the maximum is 5 items.
TIP
- To Delete a Content Item, select the item
in the items table, right-click to view context menu and select Delete
Item or click the Delete button.
- To Modify
a Content Item double-click an
item in the items table, verify
that content details populates in respective fields, and modify information. Prior to re-adding the modified item,
user must delete original item record from item contents table.
-Country of Origin and HS Tariff # are
optional and are of use to Commercial Senders only.
12
Click View Package
Summary expander to preview all entered information. You can also use this
feature as you view the label form.
13 Click Calculate in order to display the postage, insurance fees, and
scheduled/expected delivery days associated with the label you have created. Note: Expected delivery days represent the
time period for the package to go from the origin to its destination; please
note that this does not include time for the package to go through customs. For
Priority Mail Express International® with guaranteed service, a guaranteed date
will be scheduled and displayed.
14 Click the mailing conditions hyperlink. This link will display any Restrictions,
Prohibitions, Observations, Customs Form Notes, and Priority Mail
Express International® Notes based on the country you have
selected.
15 Click on the Click for More
Information hyperlink. This link will display static customs information
related to all international labels.
16 Click the mailing conditions, customs information, and Insurance conditions (applicable and required only if printing
postage) checkbox to agree to international mailing conditions, customs
information, and insurance conditions (required).
17
Entering a number into the Number of Unique Labels text box will create that many labels with
individual barcode properties. The
maximum number of labels that can be printed or saved in this manner is 2000.
18 Click Add to Cart to save the label to the shipping cart in order
to print.
TIP
- If you receive an error message that
states “Requested Service is not available” it could mean that (1) The service
indicated is not available to the destination country or (2) The weight or
value indicated exceeds the maximum allowed by the destination country. For
more information on how to view what services are available to different destination
countries and details regarding maximum weight and dimension, refer to the Shipping
Tools section.
19 If you do not wish to print or save to the shipping cart, click clear
all button.
TIP
- See
preferences for more details on how to immediately have new preferences take effect.
Create an
International Global Express Guaranteed® (GXG®) Label
1
Select International Shipping Label from the Create
Shipments navigation or the Shipping Overview Navigation under Create->
Create New Shipments.
2
Edit the Sender
Information by clicking Edit.
This button will display the Address Book where a new Sender Address can be
chosen or an existing Sender Address can be modified.
3
Click Recipient expander and enter Recipient
Information. Either manually fill in the required fields in the Recipient
Information or click Open Address Book. Open Address Book will display the Address
Book where the user can choose a previously saved address to populate the
Recipient Information. Only
international addresses may be selected.

TIP
- For more details on how to Open Address Book, see Address Book
and Create Labels section.
- Also, when
you begin typing in the Full Name or a Short Name, matching full names or short
names in the Address book will appear in a dropdown box. Select the correct Full Name or Short Name and click tab in order pre-populate the Recipient
field with address information.
4
You may save a new address to the
Address Book by clicking Save To Address Book (optional).
5
Click Details expander and
enter Package Information. Enter total weight of the package in
pounds and ounces including packaging and shipping labels. In addition, select
Global Express Guaranteed®
(GXG®) as your service
type as well as an option for container type. Note: Your total unit weight should not exceed the package weight.
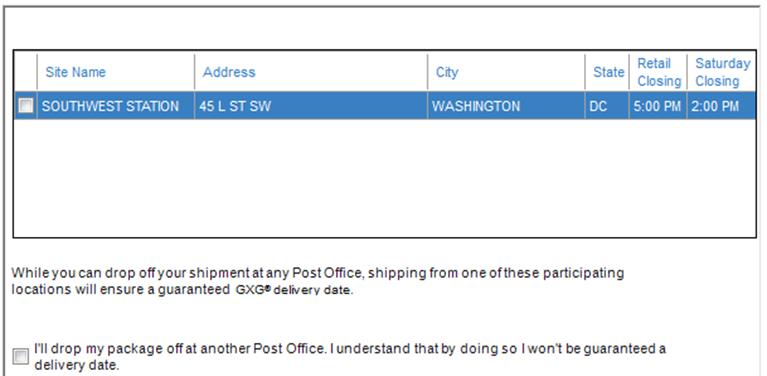
6
Select Origin Post Office™. Check the checkbox of the Post Office™ facility you intend to drop your GXG® package at. If
you do not wish to drop the package off at any of the listed Post Office™(s) you will have the option to check the drop off at
another location checkbox. When complete, click the Next button. Note: By checking the other location
checkbox, the guaranteed delivery date will be void.
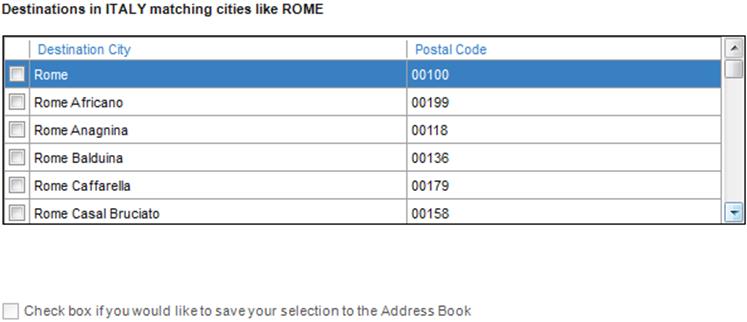
7
Select Delivery City. Select the delivery city radio button
that you wish to use for your package. When complete, click the Next
button. Note: You will be able to save all updates to your selected address by
checking the Save in Address Book checkbox.
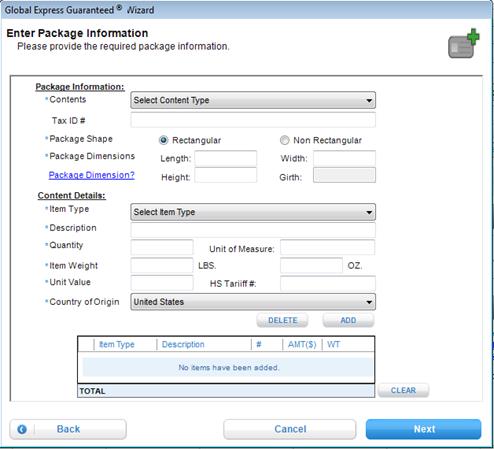
8
Enter Package Information. Select or enter all required Package and
Content Information. When complete,
click the Next button. Note: You will be required to add at least
one and no more than four contents.
Also Note: If required, you might have to answer some additional questions or fill out a commercial
invoice (PS Form 6182) if your contents require it.
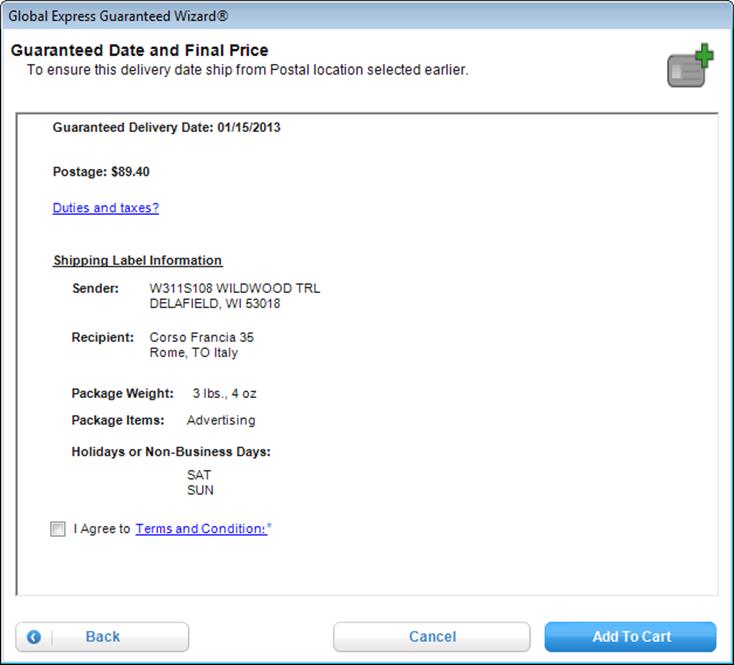
9
Summary. The Summary page will list a condensed review of your order. You will
have to agree to the terms and conditions before you will be able to Save the
label to the shipping cart.
Create a Customs
Form 2976/CN22
1
Select Customs Form 2976/CN22 from the Create
Shipments navigation or the Shipping Overview navigation under Create->
Create New Shipments.
2
Edit the Sender Information by clicking Edit. This button will display the Address Book where a new Sender Address
can be chosen or an existing Sender Address can be modified
3
Click Recipient expander and enter Recipient
Information. Either manually fill in the required fields in the Recipient
Information or click Open Address Book.
Open Address Book will display the Address Book where the user can
choose a previously saved address to populate the Recipient Information. Only International addresses, APO/FPO/DPO
addresses, or Possessions, Territories and Freely Associated States (PTFAS) addresses may be selected. NOTE: Possessions, Territories and
Freely Associated States (PTFAS) addresses are listed as Domestic addresses.
Example: APO/FPO/DPO
4
You may save a new address to the
Address Book by clicking Save To Address Book (optional).
5
Click Details expander and enter Package
Information. Enter total weight of the package in pounds and ounces
including packaging and shipping labels. Note:
Your total unit weight should not exceed the package weight. Also, enter or
select an Automated Export Compliance/Internal Tracking Number/Exemption.
Example:
6
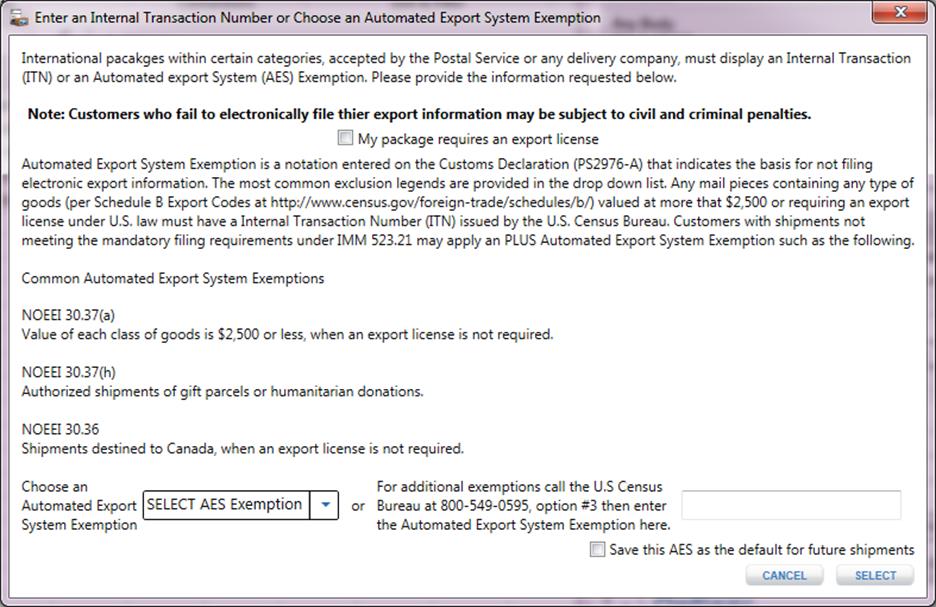
For CN22 Custom Forms, the Census
Bureau sometimes requires that an Automated Export System (AES) Exemption be
selected. The AES/ITN/Exemption field will
be enabled and marked with an * when required.
To provide AES information, click the SELECT button and select an AES from the Choose an Automated Export
System (AES) Exemption dropdown.
Automated Export System (AES) Exemption
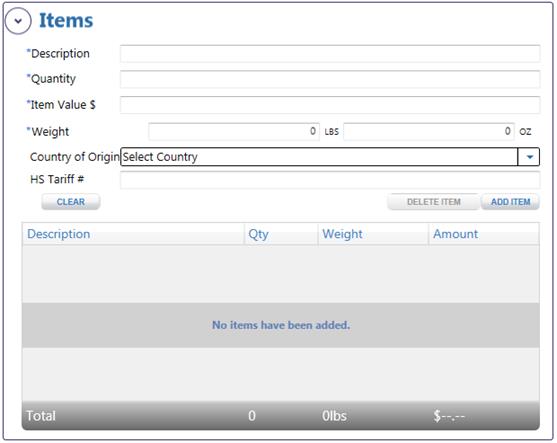
7
Click Items expander and add the various items to your package by
entering a Description, Quantity, Unit
Value, and Unit Weight, and clicking Add
Item. The item and subsequent added
items will be display in the Item Content Box. Note: The maximum number
of items that can be added to a CN22 form is 3 items.
TIP
- To Delete a Content Item, select the item in the items table, right-click to view context menu and select Delete
Item or click Delete button
- To Modify a Content Item double-click an item in the items
table, verify that content details populates in
respective fields, and modify information.
Prior to re-adding the modified item, user must delete original item record
from item contents table
-Country of Origin and HS Tariff # are
optional fields and are of use to Commercial Senders only.
8
Click View Package
Summary expander to preview all entered information. You can also use this
feature as you view the label form.
9
Click on the Click for More Information hyperlink. This link will display static
customs information related to all customs labels.
10
Click the mailing restrictions,
customs information, and mailer responsabilities (applicable
and required only if printing postage)
11
Click Add to Cart to save the
label to the shipping cart in order to print.
12
If you do not wish to print or save to
the shipping cart, click on the clear all button.
TIP
- See Preferences for more details on how to immediately have new
preferences take effect.
Create a Customs
Form 2976A/CP72
1
Select Customs Form 2976A/CP72 from the Create
Shipments navigation or the Shipping Overview navigation under Create->
Create New Shipments.
2
Edit the Sender Information by clicking Edit. This button will display the
Address Book where a new Sender Address can be chosen or an existing Sender Address can be modified.
3 Click Recipient expander and enter
Recipient Information. Either
manually fill in the required fields in the Recipient Information or click Open
Address Book. Open Address Book will
display the Address Book where the user can choose a previously saved address
for the Recipient Information. Only
International addresses, APO/FPO/DPO addresses, or Possessions, Territories and
Freely Associated States (PTFAS) addresses may be
selected. NOTE: Possessions, Territories and Freely Associated States (PTFAS) addresses
are listed as Domestic addresses.
TIP
- For users shipping to APO/FPO/DPO or US Possessions,
Territories, and Freely Associated States, the “APO/FPO/DPO and PTFAS” Label
can be used. This label combines all required domestic and customs form
information.
Example: International
4 You may save new addresses to the
Address Book by clicking Save To Address Book (optional).
5 Click Details expander and enter
Package Information. Enter total
weight of the package in pounds and ounces including packaging and shipping
labels. Note: Your total unit weight
should not exceed the package weight. Also, choose the delivery option you
want if, for some reason, your package cannot be delivered; note that these may
result in extra charges. Also, enter or select an Automated
Export System (AES) Exemption or Internal Transaction Number (ITN).
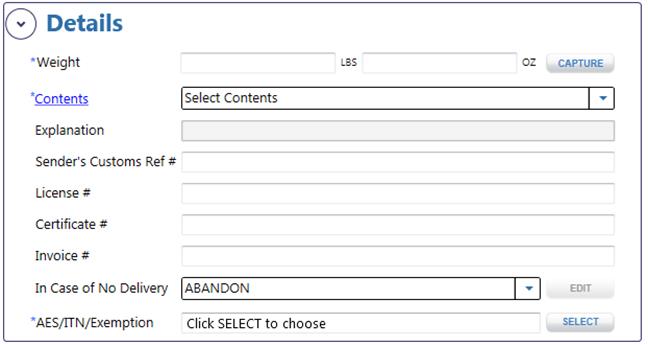
6 For Customs Form 2976A/CP72, the
Census Bureau sometimes requires either an Automated Export Compliance/Internal
Tracking Number/Exemption. The
AES/ITN/Exemption field will be enabled and marked with an * when
required. To provide AES or ITN
information, click the SELECT
button. Either select a commonly used
AES or enter the ITN for the package, or mark the My Package Requires an Export
License box and enter the ITN information.
Automated
Export System Exemption

Internal Transaction Number
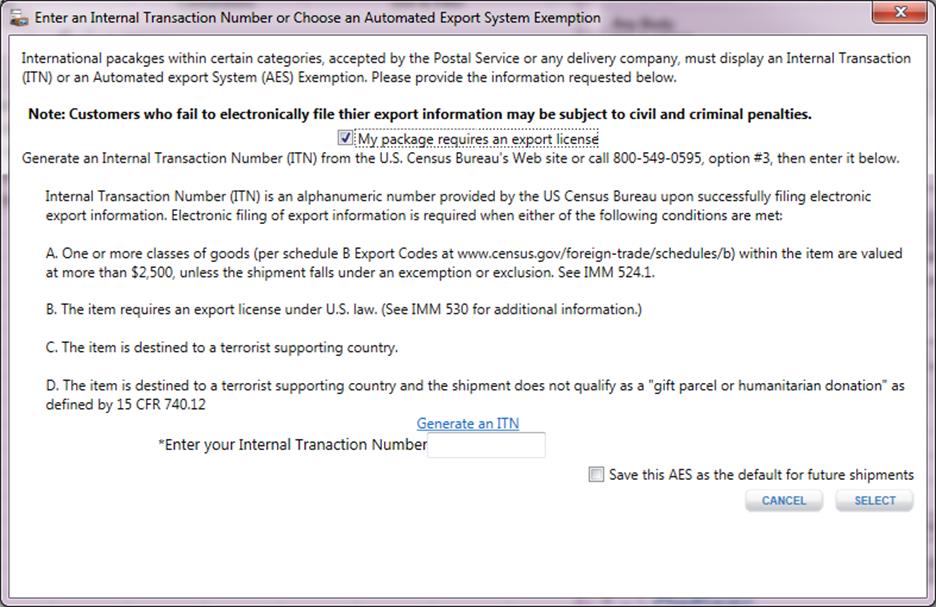
7 Click Items expander and add
the various items in your package by entering a Description, Quantity, Unit Value, and Unit Weight, and clicking Add Item. The item and subsequent items added will be
displayed in the Item Box. Note: The maximum number of items that can be
added to a CP72 form is 30 items.
TIP
- To Delete a
Content Item, select the item in the items table, right-click to view context menu and select Delete Item or click Delete
Item button.
- To Modify a Content Item double-click an item in the items
table, verify that content details
populates in respective fields, and modify information. Prior to re-adding the modified item, user must delete original
item record from item contents table.
-Country of Origin
and HS Tariff # are optional fields and are of use to Commercial Senders
only.
8
Click View Package
Summary expander to preview all entered information. You can also use this
feature as you view the label form.
9 Click on the Click for More
Information hyperlink. This link will display static customs information
related to all customs labels.
10 Click the mailing restrictions, customs information, and mailer responsibilities (applicable and required only if printing
postage).
11 Click Add to Cart to save the label to the shipping cart in order
to print.
12 If you do not wish to add to cart, click the clear all button.
TIP
- See Preferences for
more details on how to immediately have new preferences take effect.
Create an electronic
Merchandise Return Service (MRS) Label
1
Click the Return label button on
the lower navigation or the Shipping Overview navigation under Create->
Create New Shipments.
2
Click Retailer expander and enter your required Retailer Information. Either
manually fill in the required fields in the Retailer Information or click Open
Address Book. Open Address Book will
display the Address Book where the user can choose a previously saved address
to populate the Retailer Information.
Only Retailer addresses may be selected.
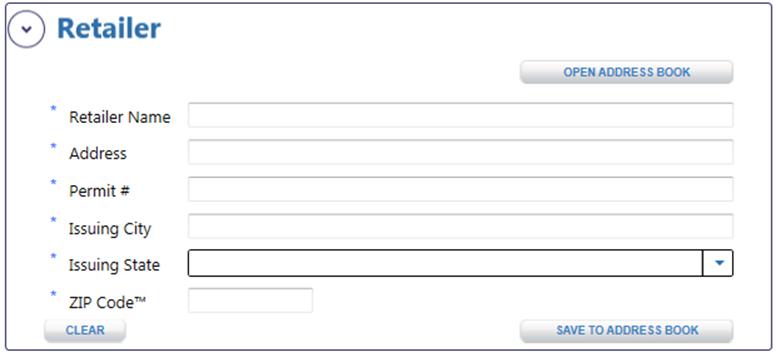
TIP
- The
Permit holder guarantees payment of the proper postage and fees on all returned
merchandise return service (MRS) articles distributed under the permit holder's
MRS permit number. Information about MRS
permits and related advance deposit accounts can be obtained at USPS.com, in DMM 505.3.0,
or from your local Post Office™.
3
Click Postage Due Unit expander and enter the required Postage Due Unit Information. Either
manually fill in the required fields in the Postage Due Unit Information or
click Open Address Book. Open
Address Book will display the Address Book where the user can choose a
previously saved address to populate the Postage Due Unit Information. Only PDU addresses may be selected. The
PDU (“POSTAGE DUE UNIT”) in the delivery address line includes the city, state,
and ZIP Code™ of the postage due unit at the Post Office™ where the permit is
authorized.
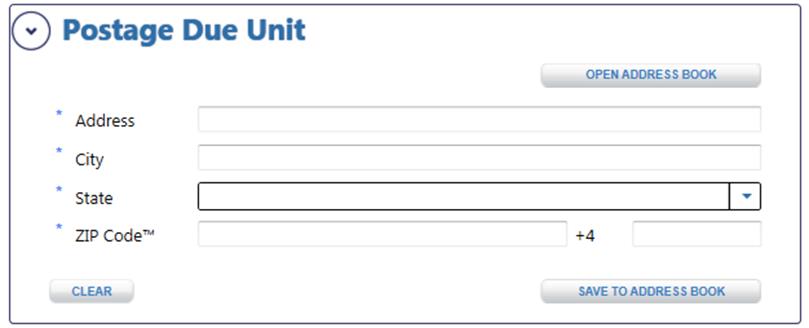
4
Click Customer expander and enter the required Customer Information requesting a parcel return. This information will serve as the Return
Address on the electronic Merchandise Return Service label. If you wish to email the Return Label to your
customer, be sure to enter the customer’s email address. Either manually fill in the required fields in the Customer
Information or click Open Address Book.
Open Address Book will display the Address Book where the user can
choose a previously saved address to populate the Customer Information. Only Domestic or APO/FPO/DPO addresses may be
selected.
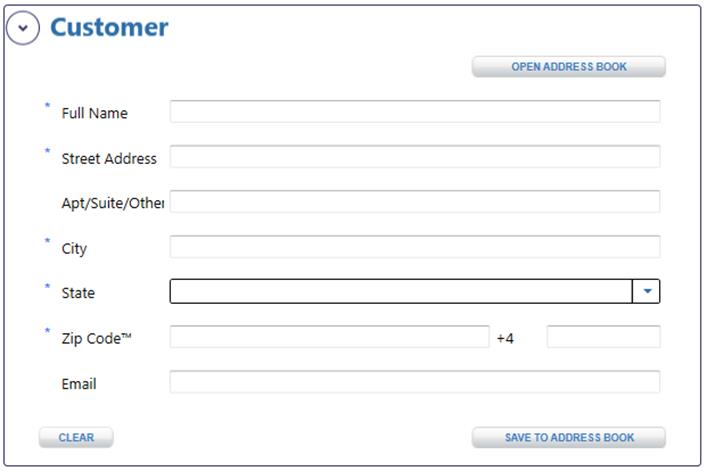
5
Click Package Information expander and
enter Package Information.

6
Click Options expander and enter
any Label
Options that you wish to appear on the electronic Merchandise Return Service
label. You may choose to enter an amount
of insurance coverage desired, a package
identification number, and a return
merchandise authorization (RMA) number (to expedite your inbound returns
processing). The system will calculate
the insurance fee and display it on the label based on the value of contents
you have specified. You may also choose
to apply USPS Tracking®. Note: USPS
Tracking® selected for electronic Merchandise Return Service labels is charged
at the retail price for Package Services parcels. USPS Tracking® for Priority
Mail and First-Class Package Service are at no additional charge. .
Use RMA # in Barcode checkbox and Label Format radio buttons have been added. If the user checks Use RMA # in Barcode, the RMA # would then be substituted for the
Sequential Package ID in the label number (PIC). This option is only available
to those mailers who have obtained and entered their unique Mailer ID during
registration. The Label Format radio
buttons allow any user the ability to print electronic Merchandise Return
Service labels so that the Customer Address appears within the window of two
different types of #10 window envelopes.
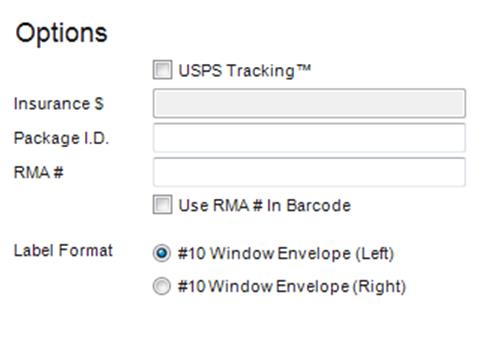
7
Click View Package
Summary expander to preview all entered information. You can also use this
feature as you view the label form.
**Insert screenshot of View Package Summary expander**
8
If you wish to email the Return Label
to the customer, select the Email Label
To Customer radio button and click Submit. If you wish to save the Return Label
in order to store it for a later date, select the Save Label to Cart radio button and click Submit.
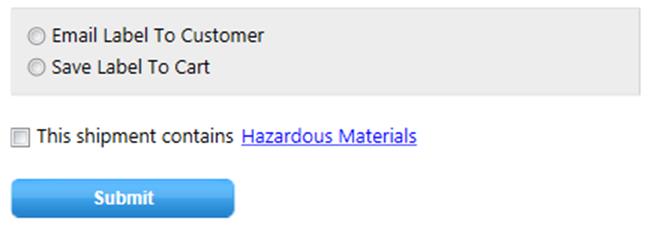
9
If you do not wish to email or save,
click the clear all button.
Note: Open and
Distribute™ Label will not be enabled unless users
have a MID (Mailer Identification) number assigned to their USPS® meter label
solution application. Also, a popup will
open telling users to call ICCC if they attempt to access the Open and
Distribute™ Label page without a MID number.
Note: Instructions
on how to create a permit can be found at http://pe.usps.com/BusinessMail101?ViewName=PermitApplication
1
Select Open and Distribute™ Label from the Create Shipments navigation or the Shipping
Overview navigation under Create-> Create New Shipments.
2
Edit the Sender Information by clicking Edit. This button will
display the Address Book where an existing Sender Address can be modified or a
new Sender Address can be chosen or added.
3 Click Recipient expander and enter
Facility Information. Either manually fill in the required fields in the Facility
Information or click Open Address Book.
Open Address Book will display the Address Book where the user can
choose a previously saved address to populate the Facility Information. Only Open and Distribute™ addresses may be selected.
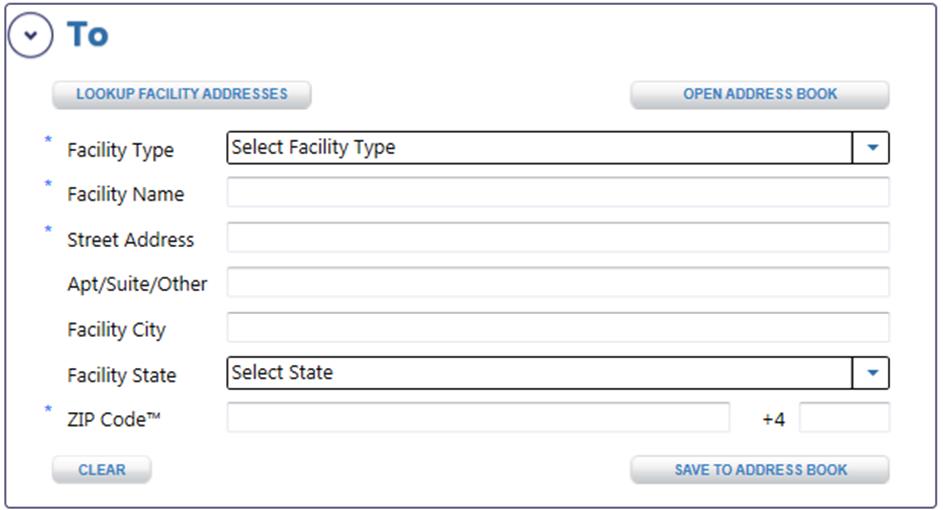
Note: Select the destination Facility Type based on the
mailing contents. If facility information is needed, click the Lookup
Facility Address button and you will be directed to USPS® Facility
Access and Shipment Tracking (FAST®) page. Follow the FAST® instructions that appear when you click the Lookup
Facility Addresses button.
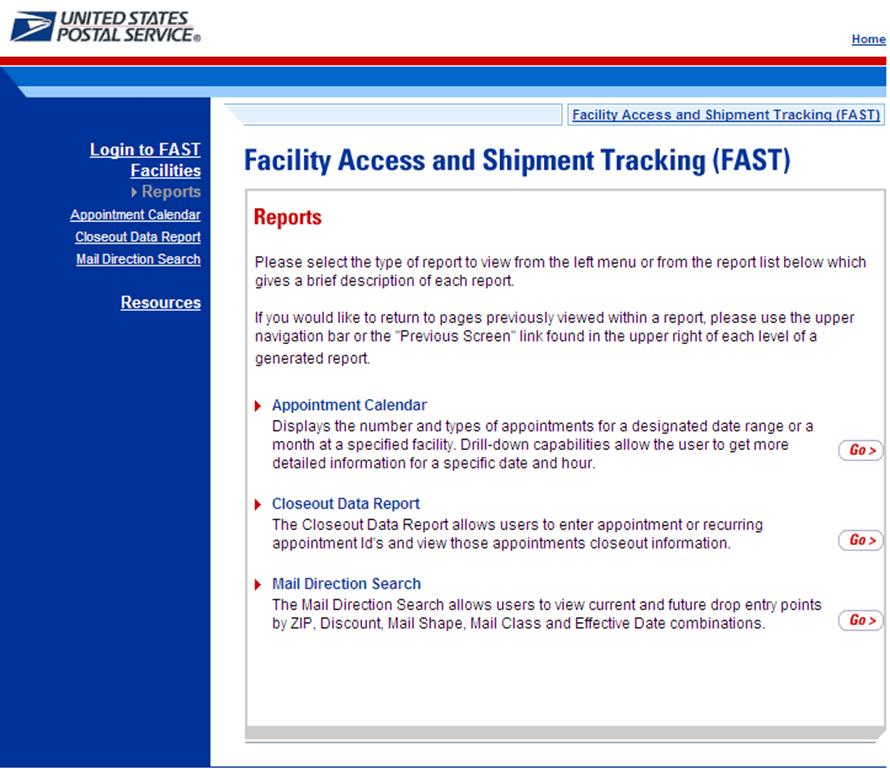
4 You may save new addresses to the Address Book by clicking Save To
Address Book (optional). Open and
Distribute™ addresses can only be used within the Open and Distribute™ label.
5
Click Details expander and enter Package
Information. Enter total weight of the drop shipment package in pounds and
ounces including packaging and shipping labels. Enter Ship Date, Ship From ZIP
Code™ if different from sender ZIP Code™, the mail class of the Open and Distribute™ drop shipment, and the mail class enclosed. If the mail class enclosed
is not listed, choose Other and enter the appropriate text in the Explanation
field. 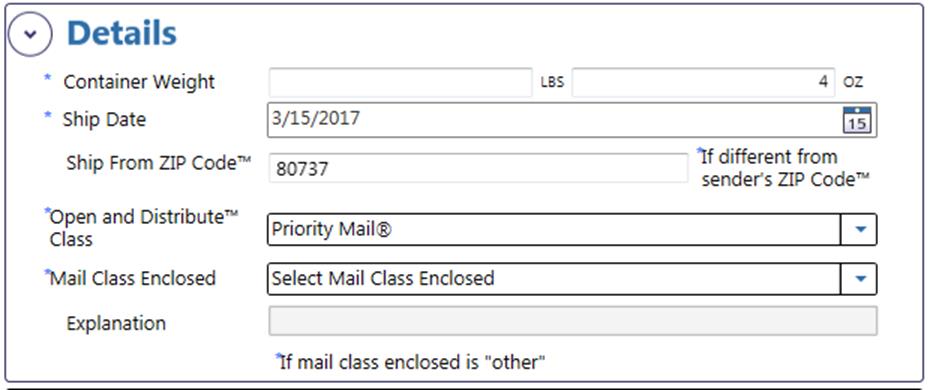
6
Click Options expander and enter Package
Options. If you wish to pay for postage through your Permit, enter the Permit
Number here along with the ZIP Code™ where the permit is
authorized. Check Separate Receipt to print the label and the
receipt on separate pages.
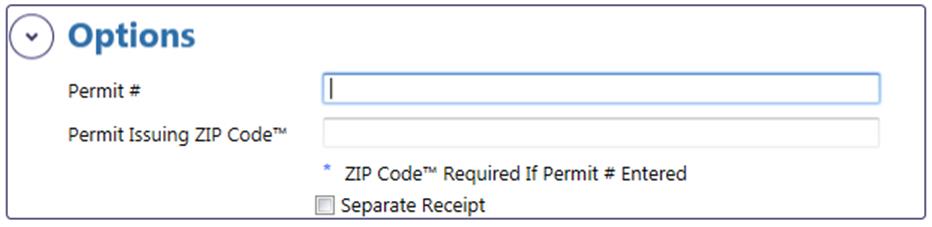
7
Click View Package
Summary expander to preview all entered information. You can also use this
feature as you view the label form.
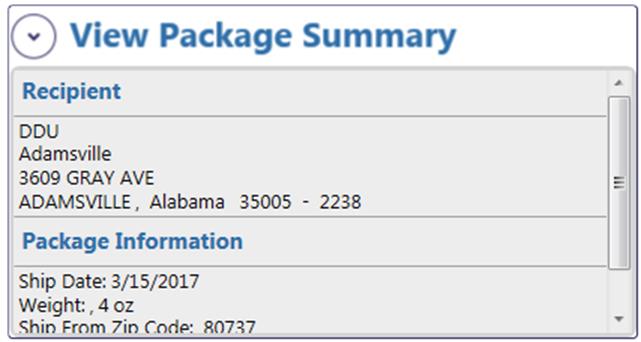
8
Click Calculate to obtain the price for the Open and Distribute™ package.
Click Add to Cart for printing at a later time. Multiple Open and
Distribute™ labels can be created at one time using the Number Of Unique Copies function.
9
From the Shipping Cart, Open and
Distribute™ labels may be printed. Open
and Distribute™ labels can only be printed with other Open and Distribute™
labels. When Printing an Open and
Distribute™ label, the USPS® meter label solution application will
automatically create and print a PS 5630 Form, Confirmation Services
Certification.
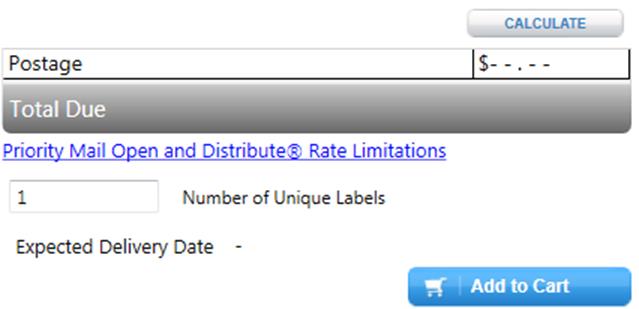
Note: If you wish
to assign multiple labels to the same PS Form 5630 you will need to select all
labels you wish to associate in the Shipping Cart and then click the Print
button.
Urgent Message:
- When you click the Print button in the Shipping Cart tab
for Open and Distribute™ labels,
an electronic file with label information is transmitted to the Postal Service.
Once submitted, there are no means to retrieve the file or remove any of the
labels or label information linked to the file. Please only print labels
intended for use.
For detailed information and frequently asked questions surrounding the
Open and Distribute™ service, please see Troubleshooting.
Create First-Class Mail® Letter Shipments
1
Select First-Class Mail® Letter from the Create
Shipments navigation or the Shipping Overview navigation under
Create->Create New Shipments.
2
Edit the Sender Information by clicking Edit. This button will
display the Address Book where an existing Sender Address can be modified or a
new Sender Address can be chosen or added.
A checkbox to Print the Sender Information for your print job is also
available below the sender address.
3
Click Recipient (To)
expander and enter Recipient
Information. If you wish to manually fill in the required fields in the
Recipient Information, do so. You may
save new addresses to the Address Book by clicking Save To Address Book before proceeding with entering
package information. All domestic addresses will automatically be standardized
to USPS® formatting standards upon performing this action. Once this is complete, you can add the
address to the print job by clicking Add To Job.
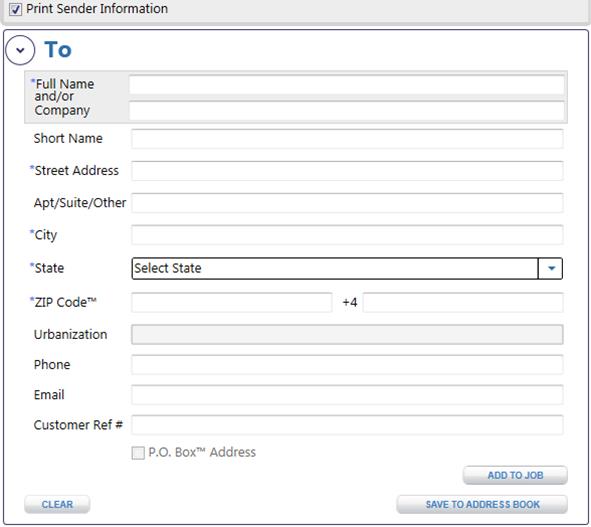
TIP
- For more details on how to Save To Address Book, see Address Book and Create Labels section.
- Also, when you begin typing in the Full Name or a Short
Name, matching full names or short names in the Address book will appear in a
dropdown box. Select the correct
Full Name or Short Name and click tab
in order pre-populate the Recipient field with address information.
4
Click Details
expander and enter Package
Information. Enter the weight of the letter; select the service and
container you wish to use and check the Non-Machinable checkbox if applicable. Note: All label stocks and envelopes
offered in the Stock Type dropdown list are available to purchase from
The Postal Store® (https://shop.usps.com).
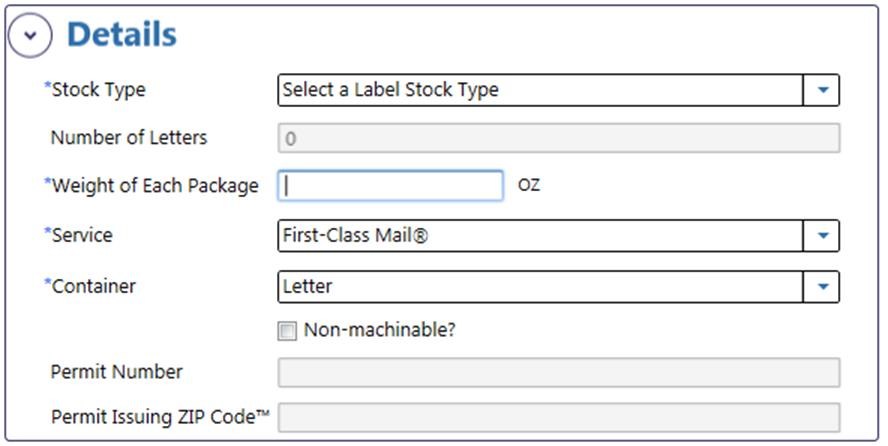
5
Click
Recipients expander and Select Recipients. If you do not wish to manually fill in
the required fields in the Recipient Information, the Recipient section allows
you to click the Open Address Book button. Open Address Book
will display the Address Book where the user can choose a previously saved
address(es) for the Recipient Information.
Only domestic addresses may be selected.
The Remove Address From Job button will allow you to remove any address from the job.
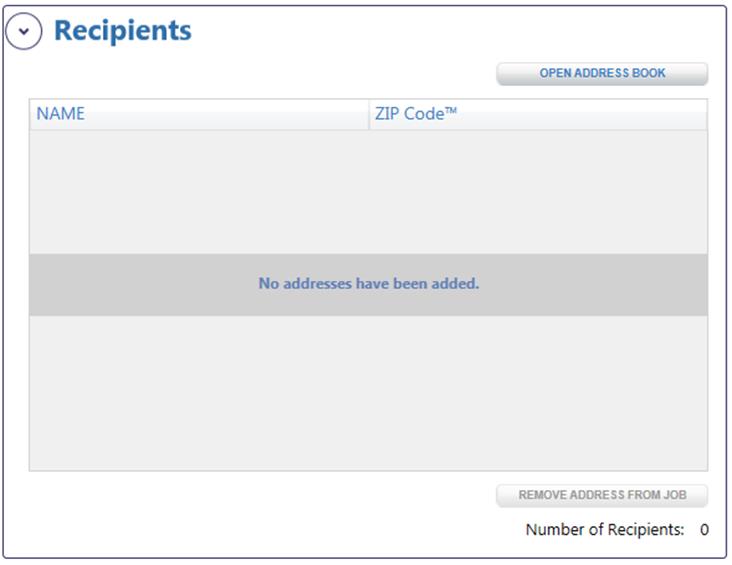
6
Click View Package
Summary expander to preview all entered information. You can also use this
feature as you view the label form.
7
Click Calculate in order to display the postage and service fees with the label you have created.
If there is missing information, you will be prompted to correct error(s) and
re-calculate to obtain prices.
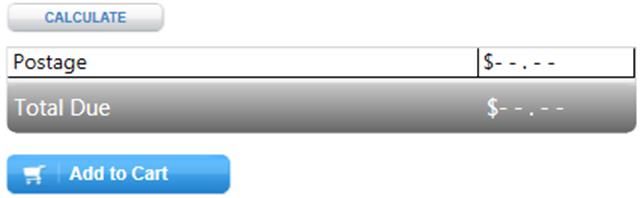
8
Click Add to Cart to save the
label to the shipping cart in order to print.
9
If you do not wish to save to the
shipping cart, click clear all.
TIP
- See Preferences for
more details on how to immediately have new preferences take effect.
Create a Label
Using the Express Checkout Functionality (Only for Domestic, International, APO/DPO/FPO
& PTFAS labels, and Customs Forms)
1 Select the type of label you want to create from the Create
Shipments navigation or the Shipping Overview navigation under Create->
Create New Shipments.
2 Enter recipient address, details about the shipment (including weight,
Ship Date, etc.), any all other requested information on the page and click Express Check-Out.

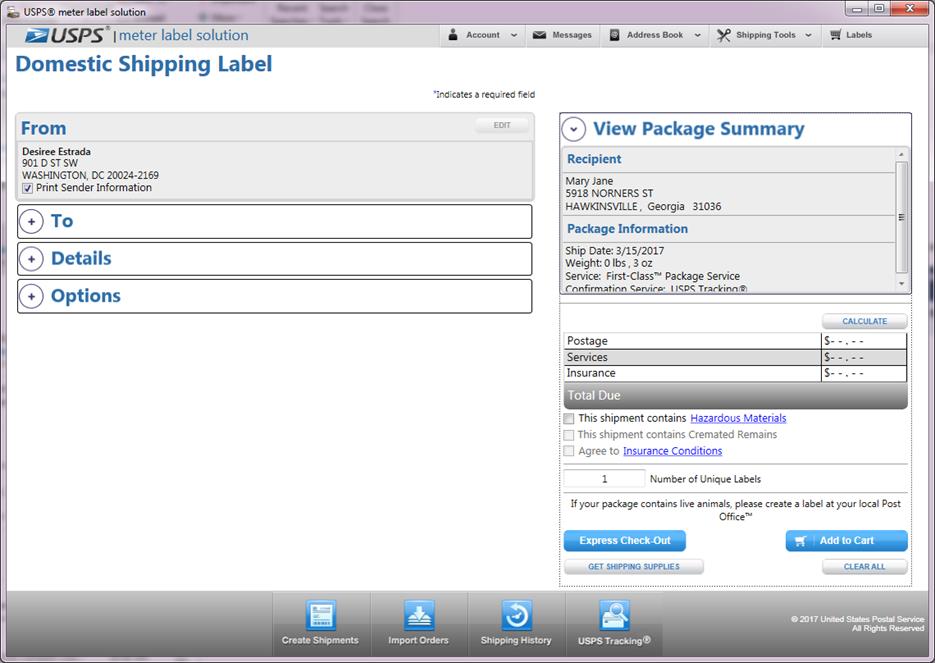
3 The Express Checkout page displays asking you to select your payment
method and indicating details of your shipment including total number of labels
and total cost.
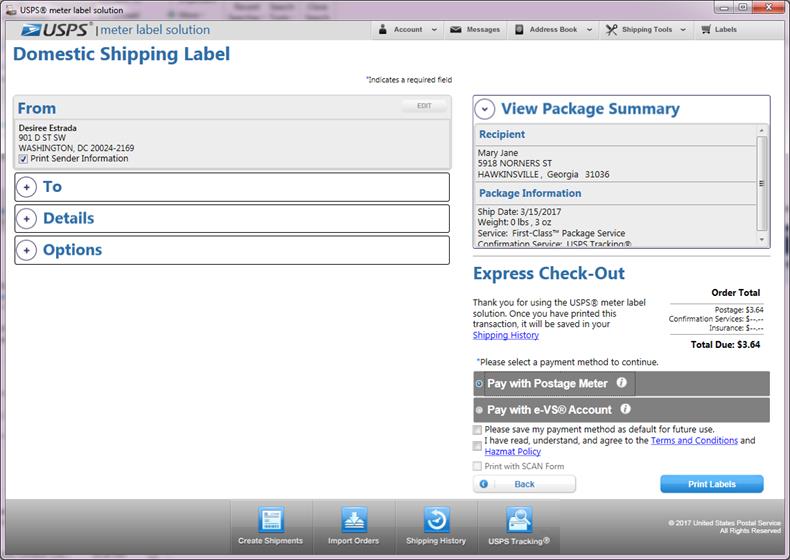
4 Select your payment method, agree to the Terms and Conditions and Hazmat
Policy and click Print Labels. Verify
the Print Wizard – Preparing Labels page will appear. IMPORTANT: 1) Only payment methods stored in your account preferences
(see Preferences for instructions on how to
store payment methods in account) will display as active for selection on the
Thanks for Your Order page. 2) If an invalid meter is stored in your account
preferences, a popup window will display instructing you to correct the meter
information in Payment Option Preferences or select another payment method. 3)
Check the “Please save my payment method as default for future use.” checkbox
if you would like to save the payment method as default selection for future
use.
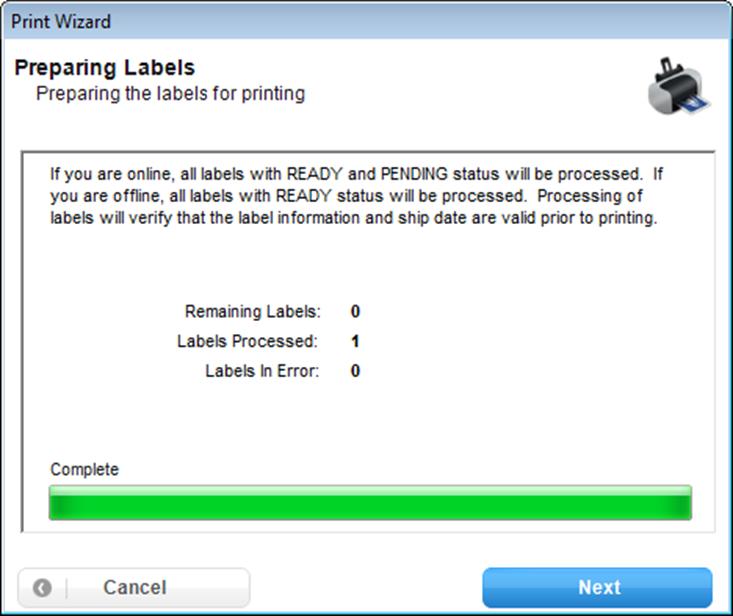
5 Click Next. View the second page of the Print Wizard – Indicating
enhanced print preferences.
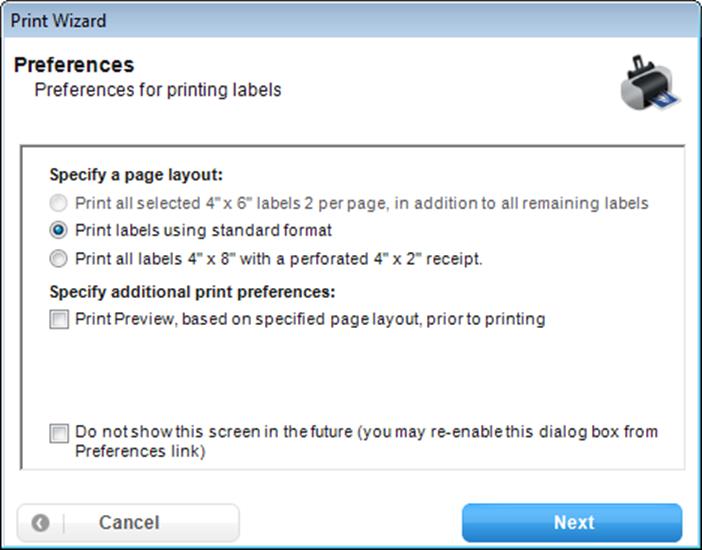
6 Check Next. View the printer name
selection page.
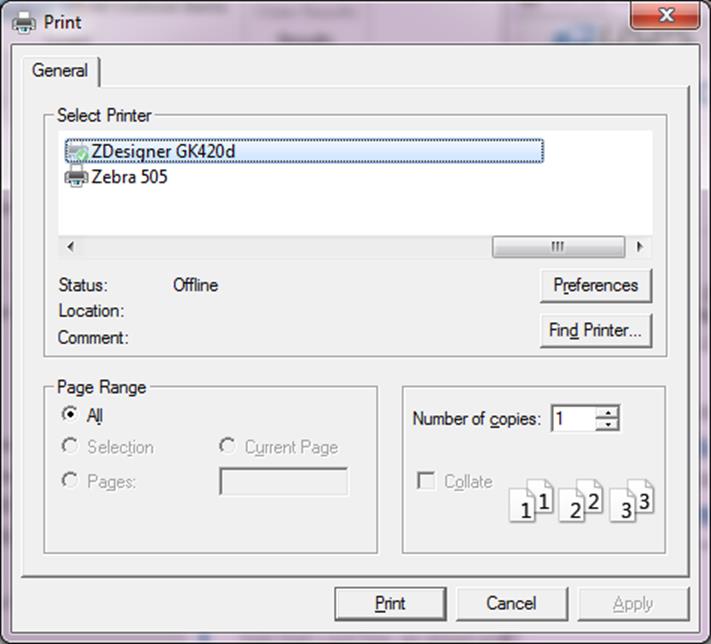
7 Click your printer name and click OK.
A “Save the file as” window opens.
8 Enter a file name for the label and the location you would like it saved
in and click Save. Navigate to the
location you saved the label in and open the file – label displays correctly. View
the Shipping History section and see the label you just printed.
Address Book
Contacts and Create Label
Edit Sender Address
To edit information in current sender
information: (IMPORTANT:
When choosing a sender address, verify that a 10-digit numeric phone number has
been entered as most of the labels will require a phone number when attempting
to the print the label.)
1
Select any label option from the Create Shipments navigation.
2 Click Edit. The Address Book
section will display.
3 Click Edit next to the address
currently in the Sender information.
4 Make changes.
5 Click Save.
OR
To change sender information to an
address stored in address book:
1 Click Edit. The Address Book section will display.
2 Select (i.e., highlight) a different Domestic
address that should be inputted as the Sender Address.
3 Click Use Selected.
Open Address Book
1 On the Create Shipping Label screen, click Open Address Book.
2 Select (i.e., highlight) the address(es) that should be inputted as the
Recipient Address.
3 Click Use Selected.
Save to Address Book
1 Enter the Recipient Information into Create Shipping Label screen.
2 Click Save to Address Book.
TIP
- A unique short
name will automatically be created if no Short Name is entered, based on the
Full Name and/or Company entered.
- All addressed added will be added to default group
“Unassigned”.
- You cannot save addresses OFFLINE because all domestic
addresses must be validated prior to being saved to the Address Book requiring
communication with USPS®.
3 Click Save.
Chapter 8
Address Book
Chapter 8. Address Book
Getting
Started
The Address Book allows you to add, edit, delete, bulk
import/export addresses as well as manage addresses within groups. The search functionality further allows you
to quickly find addresses within the Address Book for use in the application.
Add
an Address
1
Click on the Address Book section
in the upper navigation. The Address Book selections shall appear. You can also
Add New Address through the Shipping Overview navigation under Manage->
Manage and Update Address
2
Click on the Add New Address button
to option.
3
To add a Domestic Address, leave
the default Country as United States,
and fill out all required fields.
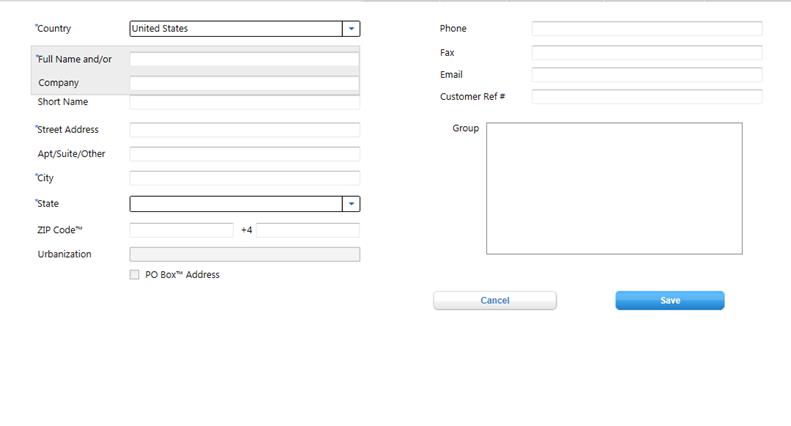
4
Select one or more groups to assign the
address (optional).
TIP
- If no groups are checked or available, the
address will automatically be placed as an Unassigned address.
- To create a
new user defined group, refer to Add New Group section.
5
Click Save to save the new
domestic address to the Address Book. Note: If you decide not to save the
address, make sure to click the Cancel
button to exit the Add a New Address section.
TIP
- All domestic addresses are immediately
validated against the USPS® Address Management database and standardized upon
saving/editing or importing. No invalid domestic addresses will be allowed to
be saved in the USPS® meter label solution Address book.
- The system
will automatically create a Short Name
for the address record if you do not provide one. The Short Name is used as a unique identifier
and cannot be duplicated.
6
To add an International Address,
select a country other than the U.S., and fill out all of the required fields.
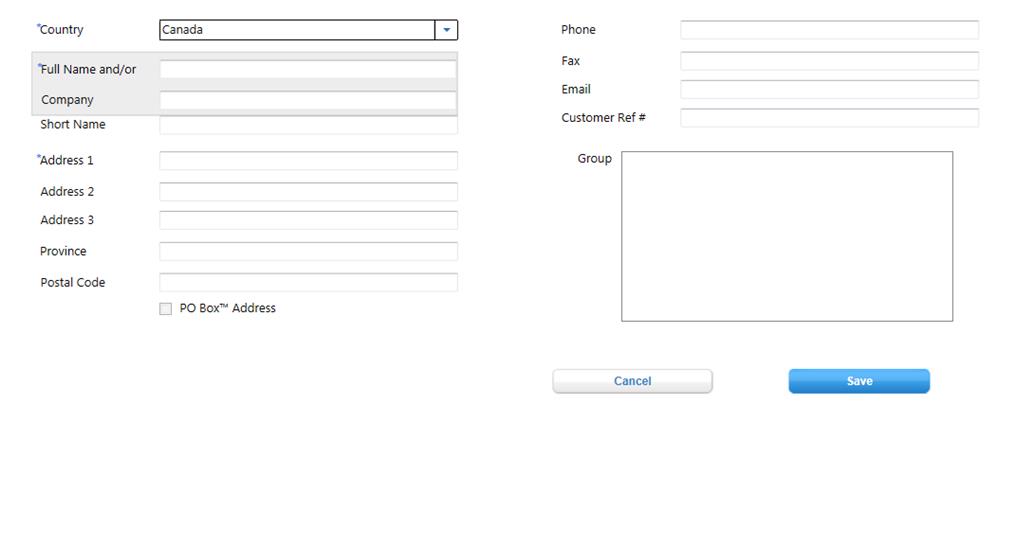
7
Click Save to save the new
international address to the Address Book.
8 Facility addresses are to be used for Open and Distribute™ drop
shipments. Users must use the Save to
Address Book button directly from the Open and Distribute™ Create Shipping
Label view to save facility addresses. Once saved to the address book, a user
can edit the facility address from the Address Book.
9 Retailer and PDU (Postage Due Unit) are to be used for electronic
Merchandise Return Service labels. Users
must use the Save to Address Book
button directly from the Merchandise Return Service label view to save Retailer
or PDU addresses. Once saved to the
address book, a user can edit the Retailer or PDU address from the Address
Book.
Edit
an Address
1
Click on the Address Book
section in the upper navigation. The Address Book selections shall appear. You
can also Add New Address through the Shipping Overview navigation under
Manage-> Manage and Update Address
2
Click on the View All Addresses option from the menu.
3
Click on the Edit button under
the Actions column for the address you want to edit.
4
View the Address Details panel
with pre-populated information.
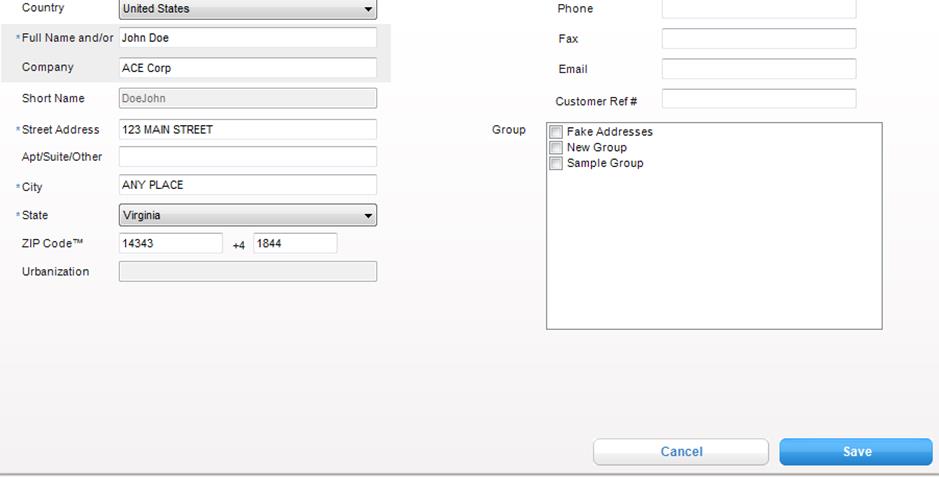
5
Modify the address information as
desired.
6
To change the type of address record
(domestic or international), simply change the selected Country.
7
Click Save to save the edited
address to the Address Book or Cancel to discard changes.
TIP
- All domestic addresses are immediately
validated upon saving/editing or importing addresses. No invalid domestic
addresses will be allowed to be saved in the USPS® meter label solution Address
book.
- If the Country is grayed out, this
indicates that the specific address that you are attempting to edit is
currently being used as the Sender Address in the Create Shipping Label Tab.
Since the Sender address can only be a domestic address, the country cannot be
edited for this address until a new Sender Address is selected.
Delete an Address
1 Click on the Address Book section in the upper navigation. The
Address Book selections shall appear. You can also Add New Address through the
Shipping Overview navigation under Manage-> Manage and Update Address
2 Click on the View All Addresses button.
3 Use the checkboxes in the left most column to select the addresses you
want to permanently delete.
4 Click the DELETE ADDRESS button
to delete the addresses.
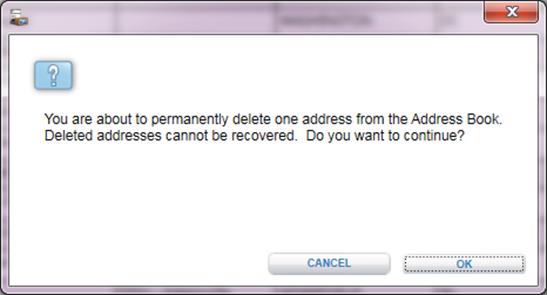
5 Click OK in the confirmation
window. Note: Deleting an address will
permanently delete an address from the application, regardless of how many
groups the address may be a part of.
TIP
- To simply remove an address from a specific
group refer to Manage My
Groups.
Add a New Group
1
Click on the Address Book
section in the upper navigation. The Address Book selections shall appear. You
can also Add New Address through the Shipping Overview navigation under
Manage-> Manage and Update Address
2
Click on the View All Addresses button.
3
Use the checkboxes in the left most
column to select the addresses you want to add to a new group. To select all
addresses, click on the top most checkbox (in the table title row)
4
Click on the Add Group button.

5
Enter a group name and click Save.
6
View the new group in the Show
drop-down. This dropdown allows you to filter your addresses based on
user-defined groups. For more details on how to filter the address book, refer
to View Addresses in a Specific Group section.

7
View the new group in the Groups
selection box in the Address Details panel when adding/editing an
address record (shown in Step 4 of the Edit an Address section above).
Delete
a Group
1 Click on the Address Book section in the upper navigation. The
Address Book selections shall appear. You can also Add New Address through the
Shipping Overview navigation under Manage-> Manage and Update Address
2 Click on the View All Addresses button.
3 Select a Group from the Show drop-down menu to filter address book list.
TIP
- Unassigned group cannot be deleted as this
is the default group that addresses are added to when no specific group has
been specified. In other words, ‘Unassigned’ represents those addresses that are
not assigned to any specific group.
4 Click the delete group button
to delete an existing group. IMPORTANT: This
action DOES NOT permanently delete any addresses. In order to permanently
Delete an Address, see Delete an Address section.
Scenario 1: If you have an address assigned to only one group, please
note that by performing delete a group, the
address will reset this address to unassigned,
as it is not assigned to any user-defined groups.
Scenario 2: If you have an address assigned to more than one group,
please note that by performing delete a
group, the address will remain in the group that was not deleted.
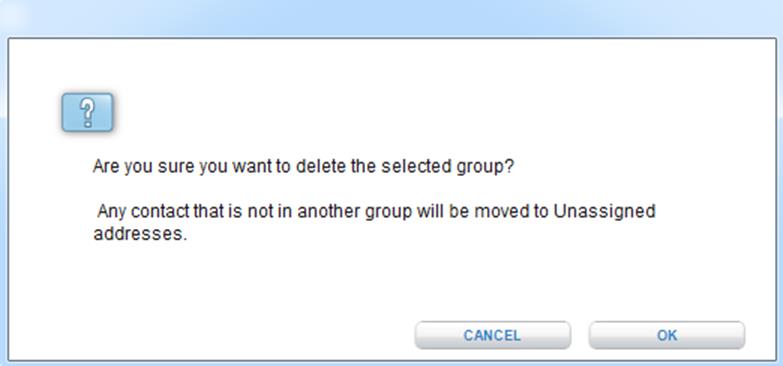
5 Click OK to confirm deletion.
Manage
My Groups
The Manage Addresses section is particularly useful for managing
a large number of addresses at one time.
However, users may also modify group assignments individually by
accessing the address details panel for individual records via the Edit button.
Move an Address
to Another Group
This feature allows users to remove addresses from one
group and/or move them to a new group. This functionality should primarily be
used when dealing with multiple addresses.
1 Click on the Address Book section in the upper navigation. The
Address Book selections shall appear. You can also Add New Address through the
Shipping Overview navigation under Manage-> Manage and Update Address
2 Click on the View All Addresses button.
3
Select a group from the Show drop-down menu to filter the
address book by a specific group. For more
details on how to filter the address book, refer to View Addresses in a Specific Group
section.
4
Check one or more addresses within the group selected
using the checkboxes on the left most column. To select all addresses, click on
the top most checkbox (in the table title row). View the dropdowns for managing your addresses
in the lower right-hand corner of the Address Book panel.

5
Select Move to
from the Select Action drop-down
menu.
6
Select a group from the Address Group drop-down menu. IMPORTANT: Any address that is not assigned to a
user-defined group is listed as an Unassigned
Address. The selected address(es) will be removed
from their group and listed as
Unassigned if ‘Unassigned’ is selected
in the Address Group dropdown.
IMPORTANT: If you wish to simply remove an address from a
particular group, click on the Edit
button in the Address book and uncheck the group in which you wish to
remove the address from. See Edit an Address section for
more details
7
Click Go.
TIP
- The selected address record now no
longer exists in the group for which the table is filtered but does exist in
the group selected in the Address Group drop-down menu. To verify, select the
group name that the address was moved to in the Show dropdown box in the
Address Book.
Add an Address
to Another Group
This feature
allows users to assign an address to multiple user-defined groups in the
address book. Please note:
Address records cannot exist in a user-defined group AND in “Unassigned”
addresses. “Unassigned” is the default
for address records not assigned to any other group?
1 Click on the Address Book section in the upper navigation. The
Address Book selections shall appear. You can also Add New Address through the
Shipping Overview navigation under Manage-> Manage and Update Address
2 Click on the View All Addresses button.
3 Select a group
from the Show drop-down menu to display the addresses within that group. Note: A user-defined group does not include All Addresses or Unassigned.
4
Select one or more addresses from the group selected to
add to an additional group by selecting the corresponding checkbox. To select
all addresses, click on the top most checkbox (in the table title row). View
the Manage Addresses section in the lower right-hand corner of the
Address Book panel.
5
Select Add to
from Select Action drop-down menu.
6
Select a group from the Address Group drop-down menu.
TIP
- Any address that is not assigned to a
user-defined group is considered unassigned. If an address is moved to Unassigned, the address will be removed
from all groups that it was previously assigned to.
7 Click Go.
TIP
- The selected address record now
exists in the user defined group for which the table is filtered AND in the
group selected in the Address Group drop-down menu.
View
Addresses in a Specific Group
Show (i.e., filter) Addresses within a Group
1 Click on the Address Book section in the upper navigation. The
Address Book selections shall appear. You can also Add New Address through the
Shipping Overview navigation under Manage-> Manage and Update Address
2 Click on the View All Addresses button.
3 Select a group from the Show drop-down menu in order to view addresses in
a specific group selected.
Search
Address Book
Search Addresses
1 Click on the Address Book section in the upper navigation. The
Address Book selections shall appear. You can also Add New Address through the
Shipping Overview navigation under Manage-> Manage and Update Address
2 Click on the View All Addresses button.
3 Verify that the show dropdown displays a view of addresses in a specific
group of the records you wish to conduct your search on.
4 Verify that ALL is selected under the Search For dropdown to ensure that
ALL addresses within the selected group in the Show dropdown are displayed.

5 Enter a keyword in the Search For textbox.
6 Select a column name in the Field Name drop-down to specify a specific
column to search.

7 Click Filter. Only addresses
that match the search criteria will display in the Address Book table.
IMPORTANT: In order to clear the filter to view All Addresses, please conduct the
following steps:
1 Clear out Search For text.
2 Select All Columns in Search dropdown.
3 Select All Addresses in the Show dropdown.
4 Select All link below the Search For box.
5 Click Go next to the All Columns dropdown.
Filter by Letter
1 Click on the Address Book section in the upper navigation. The
Address Book selections shall appear. . You can also Add New Address through
the Shipping Overview navigation under Manage-> Manage and Update Address
2 Click on the View All Addresses button.
3 Click a letter link to view all addresses with a Full Name that begins with that letter.
TIP
- If a letter is disabled it means that there
are no addresses in the address book where the Full Name begins with that
letter.
Import Addresses
1 Click on the Address Book section in the upper navigation. The
Address Book selections shall appear. You can
also Add New Address through the Shipping Overview navigation under Manage->
Manage and Update Address
2 Click on the Import Addresses button.
3 Export your addresses from another application or create your own .csv file.
4
On the Address
Import Wizard popup, you are able to choose to import
CSV or Microsoft Access® formatted files. Note: You can only store 25 imports at a
time. Go to the Preferences hyperlink to
delete extra imports.
5
Once you have selected your
data source type, click the Next button.
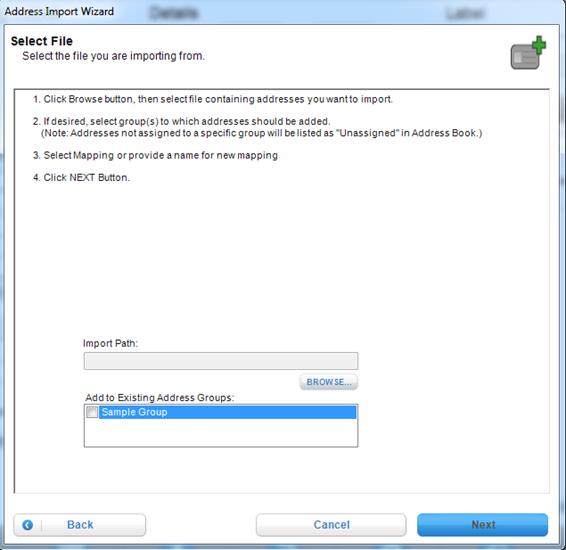
6
On the Select Import File,
select File Path using the Browse button.
a.
If you wish to add your
imported addresses to an existing address group, please check on the address
group checkbox.
7
Click the Next button.
8
(Certain files types only)
On the Select a mapping page, you may select to create a new or select an
existing mapping for the import. If you
select a New Mapping, you must enter a mapping name.
a.
If you selected an Existing
Import, the Select a mapping page will default to show the previously used
mapping for the import. You can still
choose to create a new one or select a different existing mapping.
9
Click the Next button.

10
(Certain files types only)
On the Mapping Page, you can align the CSV file column names with the USPS®
meter label solution application fields
that match. The USPS® meter label
solution application will automatically match columns that have identical names
to their respective Shipping Label Field.
You may also enter a value into the Default Value, which will fill any
blank cell in that column with the default value. Fields with Asterisks (*) are required.
a.
If you selected an Existing
Mapping, the columns will be aligned as the Existing Mapping had them. The columns are still editable.
11
Click the Next button.
12
View the import summary window, which details how many
records were successful imported (added and/or overwritten)/and which address
failed import.
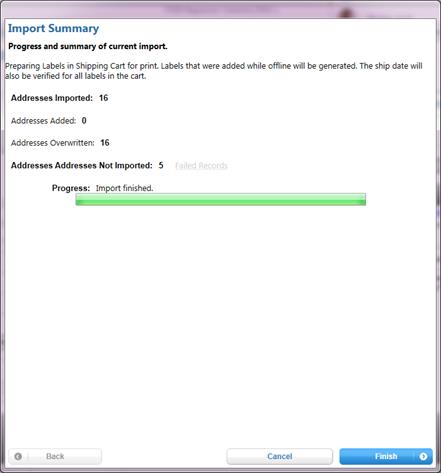
TIP
- If an address
is imported with a duplicate Short Name as an address that currently exists in
the application, the system will overwrite the existing address. The number of overwritten addresses will be displayed
in the Import Summary window.
- All domestic addresses imported will
be validated. Any invalid domestic addresses will NOT be imported into the
Address Book. In order to identify which lines of your .csv file failed to
import, see View Failed Import Address Section
13 Click the Finish button to return to the Address Book. Note: It is
recommended to disable the ‘Enable Verbose Application Log’ checkbox once all
import actions are completing for better performance.
View
Failed Addresses
1
After the import process is complete, click on the Failed
Records hyperlink. The Failed Records pop-up will appear.
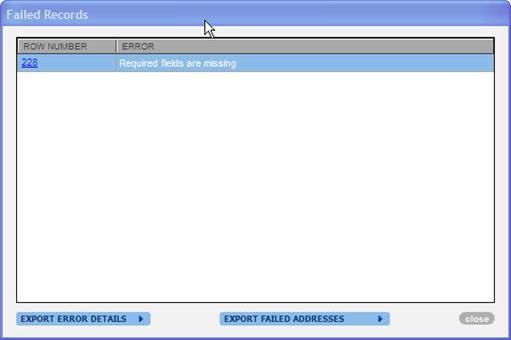
2
To view the address related to each error on the screen,
click on any of the row number hyperlinks.
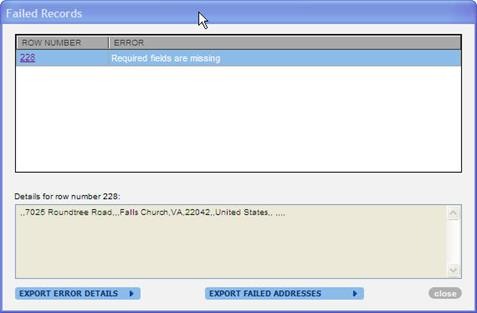
3a
To export the error log (a text file version of the errors
on the screen) click on the Export Error
Details button.
Description: The Error Details allows you to easily identify
which rows in your original .csv file failed, the reasons why they failed, and the address
information associated with each failed record.
a. Enter in a name
and a directory to save the error log and click Save.
b. View
confirmation pop-up that confirms that your error log has been written to a
file. Click Close.
c. Open error log
in a text pad application to view details on which records failed
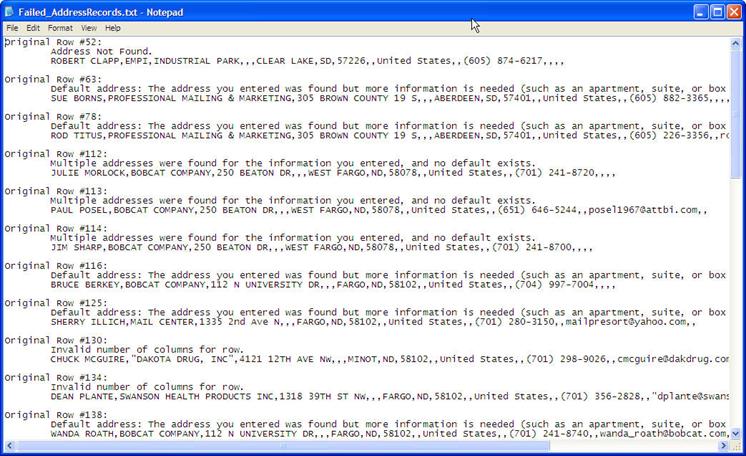
3b
To export ONLY failed address records into a NEW .csv
file, click Export Failed Addresses.
Description: The Export Failed Addresses
allows you to easily create a new .csv file of ONLY failed addresses that you
can work on to correct the missing information detailed on the screen and
re-import easily into your Click-N-Ship® for Business address book
a. Enter in a name
and directory to save the .csv file with exported addresses and click Save.
b.
View confirmation pop-up that confirms that your .csv file
has been written to your desktop. Click Close.
c. Open .csv file,
correct errors and re-import.

4
Click Close.
Export Addresses
1
Click on the Address Book
section in the upper navigation. The Address Book selections shall appear. You can also Add New Address through the Shipping
Overview navigation under Manage-> Manage and Update Address
2
Click on the Export Addresses button.
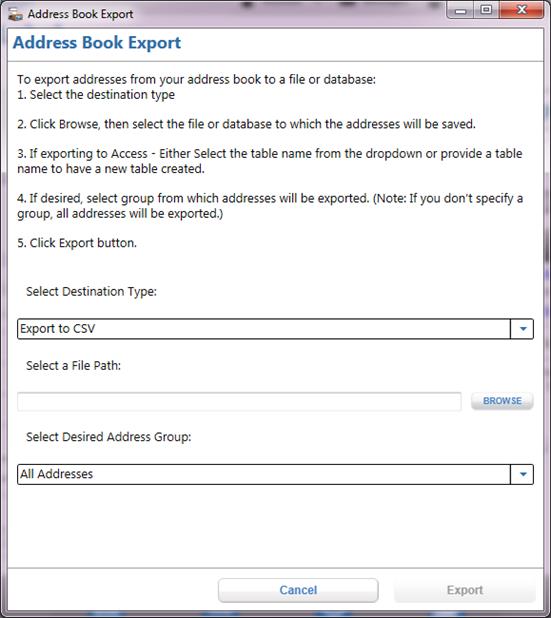
3
Click the Browse button to choose a file path for
the exported file and type in the new
file name for your exported desired address list.
4
Click Save File. Make
sure the file path is displayed in the ‘Select a File Path’ text box.
5
In the Select Desired Address Group drop-down menu,
select All Addresses or a specific
address group to export records from a specific group.
6
Click the Export button to export the records into
a .csv file.
TIP
- If replacing an existing file, make
sure the .csv file is not open upon trying to export addresses. The system will
throw an error message if the file is in use.
- Exporting
addresses is recommended prior to deleting addresses for archiving purposes. In
order to delete addresses after archiving, refer to the Delete
Address section for
instructions.
- Open and
Distribute™ facility
addresses will not be exported by the USPS® meter label solution application.
7
Follow
the chosen file path to view the .csv file containing the exported address
records. All exported files can be re-imported into the application using the
import instructions in the .csv format detailed in the Import
Address
section above. Note: As long as the Short
Name remains the same, modifications to the export file will overwrite the
original record upon re-importing.
Chapter 9
Shipping Cart
Chapter 9.
Shipping Cart
In this introduction to shipping cart, you’ll learn how to do the
following:
ONLINE connection status:
·
Print READY labels.
·
Print PENDING labels.
·
Close SCAN Form with this Shipment PENDING labels.
·
Save as Pending SCAN FORM PENDING labels.
·
Edit labels.
·
Update the Date the label will be printed.
OFFLINE connections status:
·
Edit labels.
Getting Started
The Shipping
Cart provides a venue where labels and forms can be stored for printing at a
later date. From the shipping cart, a user can preview a label, edit a label,
and view errors on a label. Refer to the Detailed Description of Shipping Cart
Status below for more information.
Detailed Description of Shipping Cart Status
In
order to view ALL labels with the respective statuses below, take advantage of
the Show dropdown on the upper right hand corner of the Shipping Cart which
allows you to filter all records based on a specific status.
READY: Represents a label that is ready to be printed.
PENDING: Label has not
been processed, print will validate label information.
•
If a label is added to the Shipping
Cart while the user is OFFLINE, the label will always be set to PENDING status. In order to successfully print
labels in PENDING status, ONLINE status is required.
ERROR: Represents a label that has errors that need to be corrected prior to
reprocessing and printing.
•
Upon printing a PENDING label, the
system will set the label to ERROR status if an error is encountered while
processing the label.
For more
information related to the Shipping Cart actions available, refer to the
Shipping Cart Actions instructions below.
Shipping
Cart Actions
- Edit: This
action gives the users the ability to remove the label from the Shipping
Cart and repopulate the original information into the create label page
for editing.
- Delete: This
action gives users the ability to remove label(s) from the Shipping
Cart. Deleting a label(s) will
permanently remove that label. This
action is available to all labels.
- Update Date: This
action gives users the ability to update the printing date for label(s) in
the Shipping Cart. Doing this will
cause the updated labels to have a status of PENDING.
Edit Label
1 Click on the Label tab on the upper right hand side of the
application. The Shipping Cart side tab will display. You can also access the
Shipping cart page through the Shipping Overview navigation under Manage->
Manage Pending Shipments.
2 Click the Edit button net to a
label.
3 View the confirmation pop-up window, which explains that upon editing the
label, the label will be removed from the shipping cart and re-populated in the
label view for editing. Click OK.
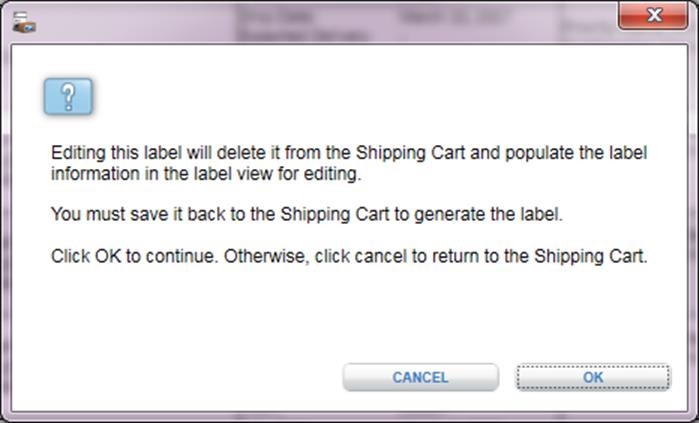
4 View the label page you wish to edit (based on the label type) with
pre-populated information in the fields.
5 Modify the information as necessary.
6 Click the Add to Cart button
to add the edited label back into the Shipping Cart.
Print
Labels from Shipping Cart
1 Click on the Label tab on the upper right hand side of the
application. The Shipping Cart side tab will display. You can also access the
Shipping cart page through the Shipping Overview navigation under Manage->
Manage Pending Shipments.
2 Select the label you wish to print using the checkbox. IMPORTANT:
Labels can only be printed when ONLINE.
3
Click Check-Out and Print. View
the Print Wizard – Updating Postage rates.
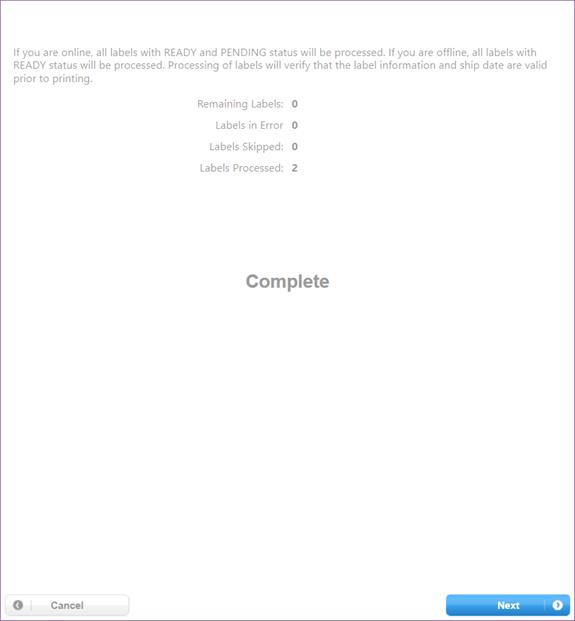
4
Click Next. View the Thanks for
Your Order page asking you to select your payment method and indicating details
of your shipment including total number of labels and total cost.
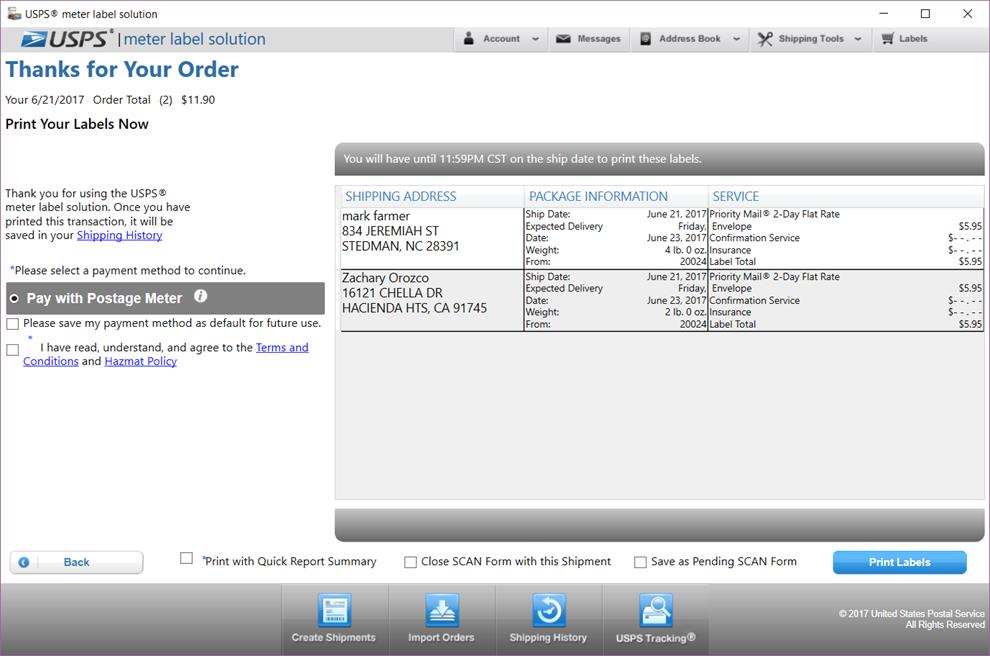
5
If you wish to have a SCAN Form (PS Form 5630) included
with your label, click on the Close SCAN
Form with this Shipment checkbox.
IMPORTANT: The Close SCAN Form with this Shipment checkbox will
only be enabled if the following conditions are met:
a.
If one label is
selected from the Shipping Cart:
i. The selected label is in the
"Pending" state and
ii. The selected label is an "Open and
Distribute™" label and
iii. All
selected labels have the same Ship Date and
iv. All labels
must have the same Sender or Ship From ZIP Code™
1.
If a label has a "Ship From" ZIP Code™ that will be used as the ZIP code™
2.
If not, use the label's "Sender" ZIP
Code™.
b.
If two or more labels are selected from the
Shipping Cart:
i. All selected labels are in the
"Pending" state and
ii. All "Ship Dates" match and
iii. All ZIP Code™(s) match and
1.
If a label
has a "Ship From" ZIP Code™, match against that.
2.
If not,
use the label's "Sender" ZIP Code™.
iv. All selected labels are one of the following
four types:
1.
Domestic.
2.
International.
3.
Customs
Form 2976/CN22.
4.
Customs
Form 2976A/CP72.
6
If you wish to save the label(s) in a Pending SCAN Form,
click on the Save as Pending SCAN Form checkbox.
IMPORTANT: The Save to SCAN Form checkbox will only be enabled if
the following conditions are met:
c.
If one label is
selected from the Shipping Cart:
i. The selected label is in the
"Pending" state and
ii. The selected label is an "Open and
Distribute™" label and
iii. All
selected labels have the same Ship Date and
iv. All labels
must have the same Sender or Ship From ZIP Code™
1.
If a label has a "Ship From" ZIP Code™ that will be used as the ZIP code™
2.
If not, use the label's "Sender" ZIP
Code™.
d.
If two or more labels are selected from the
Shipping Cart:
i. All selected labels are in the
"Pending" state and
ii. All "Ship Dates" match and
iii. All ZIP Code™(s) match and
1.
If a label
has a "Ship From" ZIP Code™, match against that.
2.
If not,
use the label's "Sender" ZIP Code™.
iv. All selected labels are one of the following
four types:
1.
Domestic.
2.
International.
3.
Customs
Form 2976/CN22.
4.
Customs
Form 2976A/CP72.
TIP
- The “Save as
Pending SCAN Form” checkbox will save SCAN Forms as Pending SCAN Form. This
capability provides users the ability to manage and associate labels to a SCAN
Form after labels have been printed and allow users to close out shipments at
the end of the day. If the “Save as Pending SCAN Form” checkbox was not
selected prior to printing, the labels can still be added to a Pending SCAN
Form through the Shipping Dashboard. For
more information, See Create a New Pending
SCAN Form.
7 Select your
payment method, agree to the Terms and Conditions and Hazmat Policy and click Print
Labels. Verify the Print
Wizard – Preparing Labels page will appear. IMPORTANT: 1) Only payment methods
stored in your account preferences (see Preferences for
instructions on how to store payment methods in account) will display as active
for selection on the payment method selection page. 2) If an invalid meter is
stored in your account preferences, a popup window will display instructing you
to correct the meter information in Preferences (Payment Options) or select
another payment method. 3) Check the “Please save my payment method as default
for future use.” checkbox if you would like to save the payment method as
default selection for future use. 4) Click the “Print with Quick Report
Summary” checkbox if you would like to print a Quick Report Summary.
TIP
- If any of the
labels cannot be processed because they are in ERROR, a message will display
asking whether or not you wish to continue processing all remaining labels.
Once remaining labels are processed, the statuses of all the labels in the shipping
cart will be updated. In the Label section, click on the ERROR status to view
and fix the error.
8
Click Next. View the second page
of the Print Wizard – Indicating enhanced print preferences.
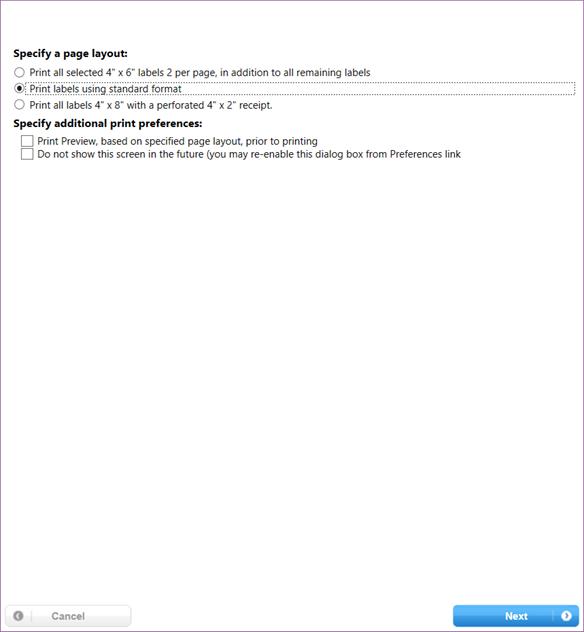
9
Click Next. View the second page
of the Print Wizard – Indicating enhanced print preferences.
a.
Print labels normally – This means that all labels selected
will print back to back and include all pages (inc. separate receipt, if
indicated, mailing instructions pages, etc.)
10
Check do not show checkbox if you do not wish
to every print two 4x6 labels per page or
print preview labels prior to printing.
(optional)
TIP
- Once checking ‘do not show’ checkbox,
users can always re-enable the ability to specify enhanced print preferences
for each print job by going to Preferences link – General tab.
11
Check Next. View either print preview dialog box or print dialog box.
a.
On the print preview dialog box, click
the print icon on the top in order to complete print job.
b.
On the print dialog box, click the OK
button in order to complete print job.
12 View the Shipping History section to see the list of shipping
labels that successfully printed.
Delete
From Shipping Cart
1 Click on the Label tab on the upper right hand side of the
application. The Shipping Cart side tab will display. You can also access the
Shipping cart page through the Shipping Overview navigation under Manage->
Manage Pending Shipments.
2 Check one or more labels for deletion.
TIP
- In order to quickly
check one or more labels, see Shortcuts for more
instructions.
3 Click Delete.
4 View Delete Shipping Cart record confirmation module. Click OK.
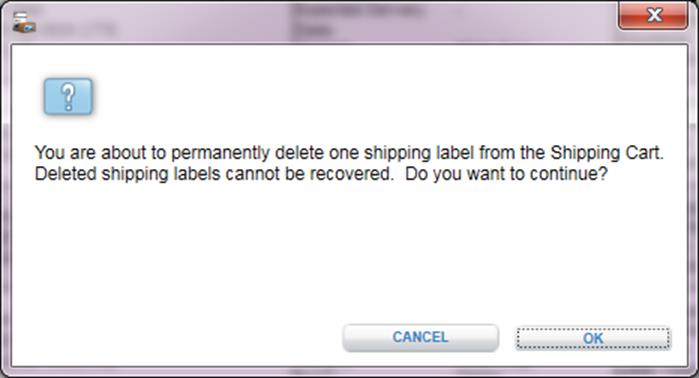
Chapter 10
Import Orders/Labels and Tracking Numbers
Chapter 10. Import Orders/Labels and Tracking Numbers
Import
New Orders / Labels
1
Click the Import
Orders button on the bottom navigation or the Shipping Overview
navigation under Create-> Batch Process Orders.
2
Click on either Import from XML
File, Import from CSV File, Import from Microsoft Access® or Import from eBay®
options. Note: You can only store 25 imports at a time. Go to the Preferences hyperlink to delete
extra imports if needed.
3
On the Select Import File,
select a Label Import File Type, Data Source Name, and a File Path using the
Browse button.
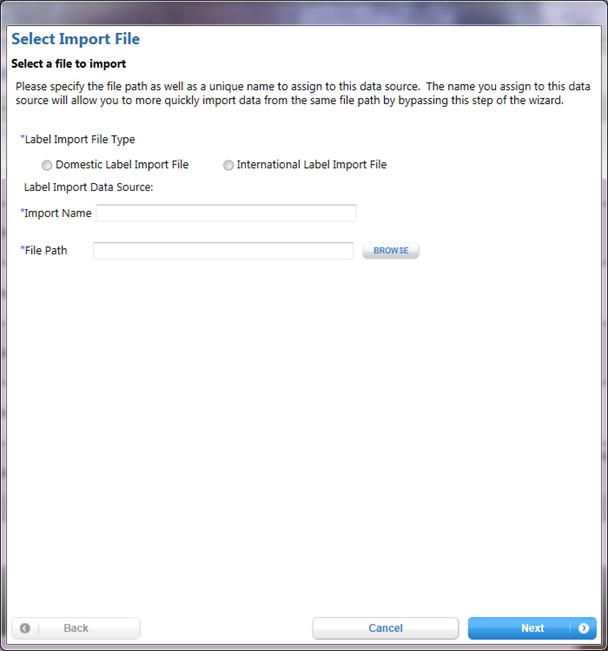
4
Click the Next button. Note: For XML files, clicking NEXT navigates you to the Summary page, step 10.
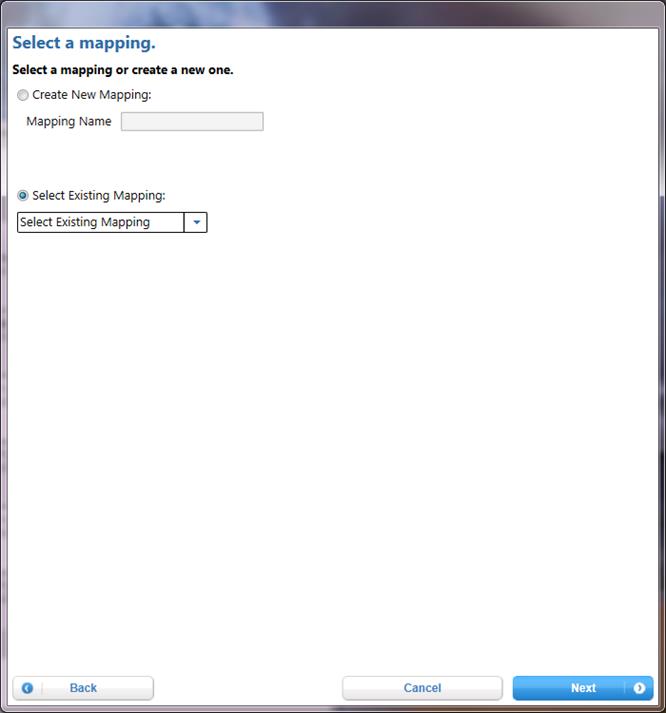
5
(Certain files types only)
On the Select a mapping page, you may select to create a new or select an
existing mapping for the import. If you
select a New Mapping, you must enter a mapping name.
6
Click the Next button.
Domestic Example:
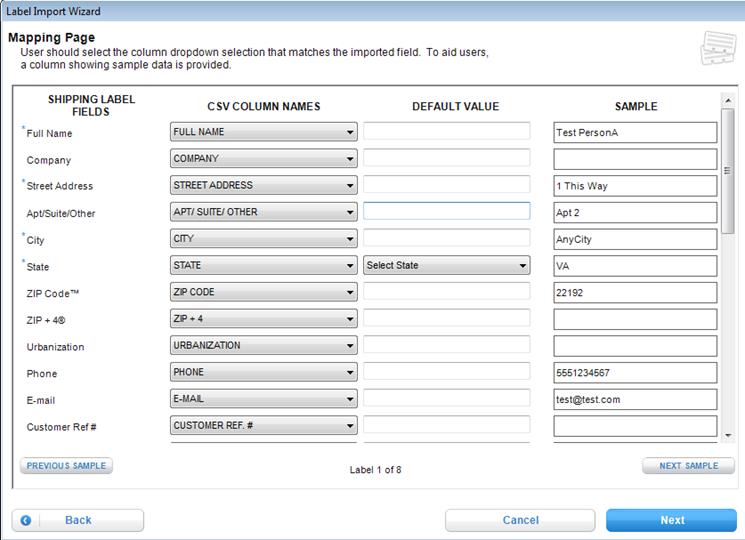
International Example:
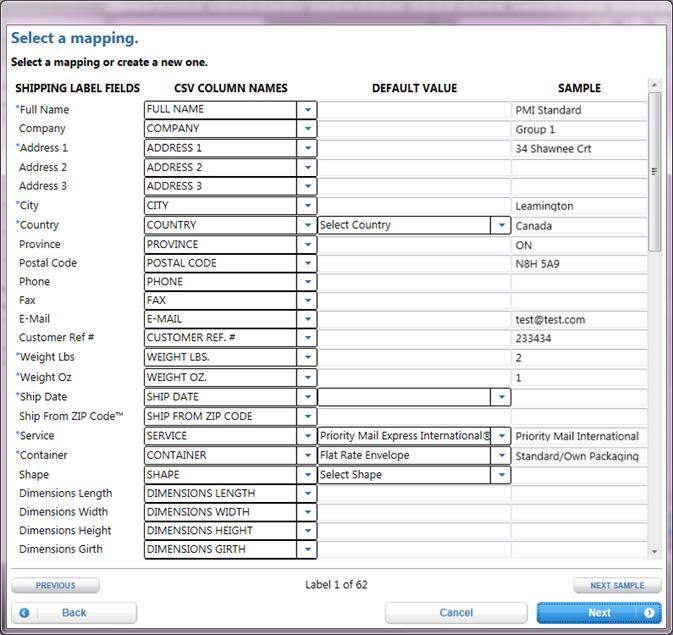
7
On the Mapping Page, you can
align the CSV or Microsoft Access®
files column names with the USPS® meter label solution fields that match. Shipping Assist will automatically match
columns that have identical names to their respective Shipping Label
Field. You may also enter a value into
the Default Value, which will fill any blank cell in that column with the
default value. Fields with Asterisks (*)
are required.
8
Click the Next button.
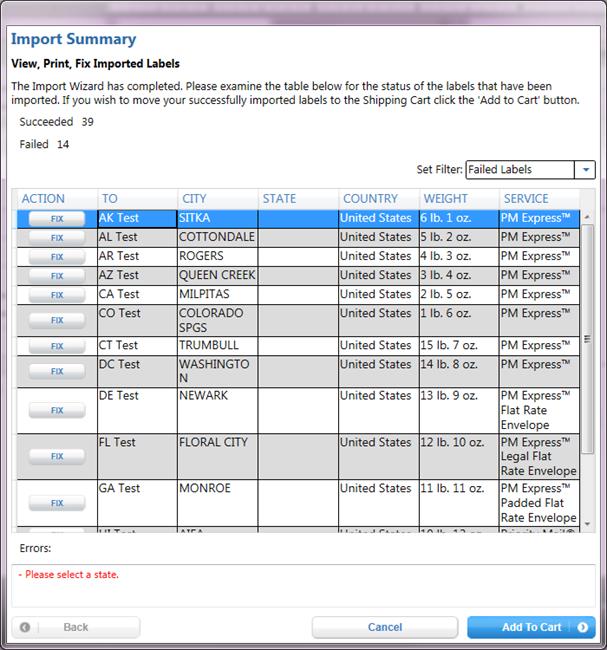
9
The Import Summary page
allows you to view a count of failed and successful labels, view All,
Successful, and Failed labels, Fix/Modify labels, view the errors in failed
labels, Save the Imported Labels by clicking Add to Cart.
a.
There is a count of the
successful and failed label imports. You
can also change the Filter to view
All Labels, Successful Labels, and Failed Labels.
b.


c.
When a Failed label is highlighted,
the system will list the errors for the label.

d.
To Modify a successful label or Fix a failed label, click the Modify or Fix button. This will open a popup with the fields
listed. Edit the incorrect fields. Fields that must be corrected are marked with
red text. Note: The system will not allow you to fix or modify a label if a field
is left incorrect.
Domestic Example:

International Example:
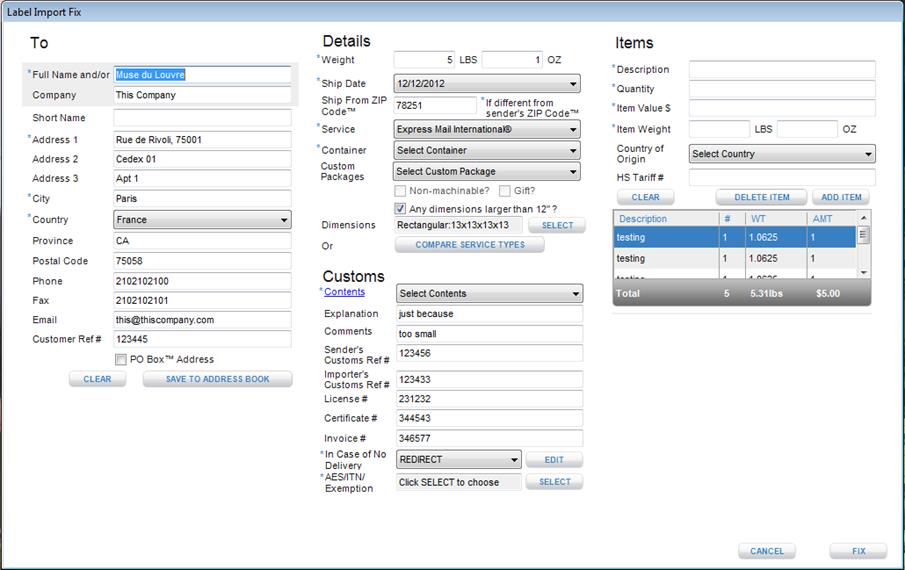
e.
The Summary page also gives
the option to Save the labels to the Shipping
Cart. Failed labels will not be printed
or moved to the Shipping Cart. Note: If USPS® meter label solution software
is offline, the Print option will not be available.


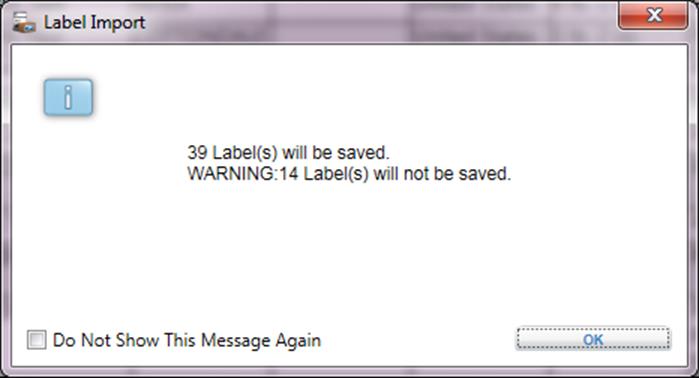
Import
eBay®
Labels
1
Click the Import
Orders button on the bottom navigation or the Shipping Overview
navigation under Create-> Batch Process Orders.
2
Click on the Import from
eBay® option. Note:
You can only store 25 imports at a time.
Go to the Preferences hyperlink to delete extra imports.
3
Once you have selected
either a new or existing data source type, click the Next button.
4
On the Set Up Your eBay® Import screen, enter an
Import Name as well as your eBay UserID.
5
Click the Next button. Note: For existing imports, NEXT navigates you to the Summary page, step 11.
6
On the Set Up eBay® Access screen, click on the
eBay® Authentication Page
link.
7
On the Set Up eBay® Access screen, click on the
eBay Authentication Page link.
8
Once the new pop-up appears,
enter your eBay® User ID
and Password. Once this is complete,
click on the Sign In button.
9 On the Link your eBay®
account to United States Postal Service®
screen, click on the I Agree button.
10 Click on the Close button on the confirmation pop-up.
11 On the Select Transactions to import screen, select the
checkboxes of all of the labels you wish to import.
12
Click the Next button.
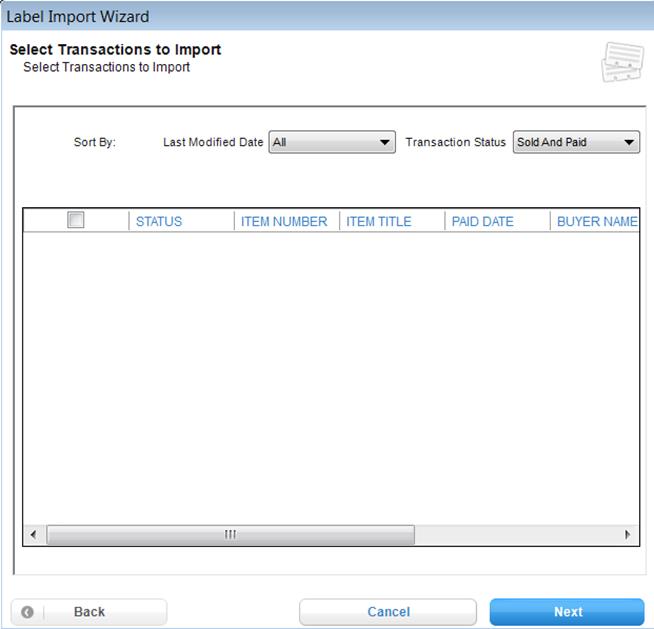
13
The Import Summary page
allows you to view a count of failed and successful labels, view All,
Successful, and Failed labels, Fix/Modify labels, view the errors in failed
labels, Save the Imported Labels by clicking Add to Cart.
a.
There is a count of the
successful and failed label imports. You
can also change the Filter to view
All Labels, Successful Labels, and Failed Labels.
b. 

c.
When a Failed Label is
highlighted, the system will list the errors for the label.
d.
To Modify a successful label or Fix a failed label, click the Modify or Fix button. This will open a popup with the fields
listed. Edit the incorrect fields. Fields that must be corrected are marked with
red text. Note: The system will not allow you to fix or modify a label if a field
is left incorrect.
e.
The Summary page also gives
the option to Save the labels to the Shipping
Cart. Failed labels will not be printed
or moved to the Shipping Cart. Note: If USPS® meter label solution software
is offline, the Print option will not be available.
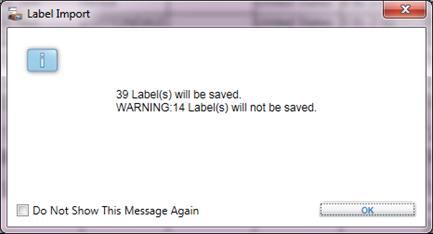
Import Existing Orders / Labels
1
Click the Import
Orders button on the bottom navigation or the Shipping Overview
navigation under Create-> Batch Process Orders.
2
Click the Use Existing
Import option.
3 Select which file you want to import from the Select
Existing Data Source table
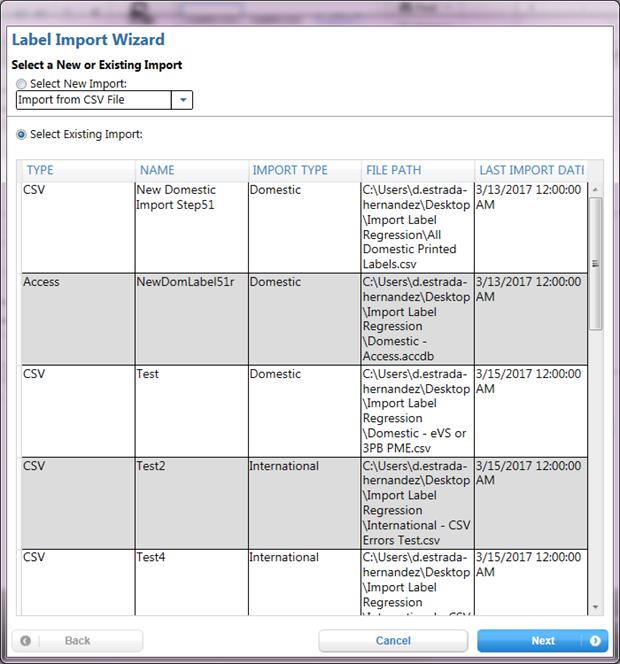
4 On the Select Import File the Data Source Name and File
Path will be pre-populated, but editable.
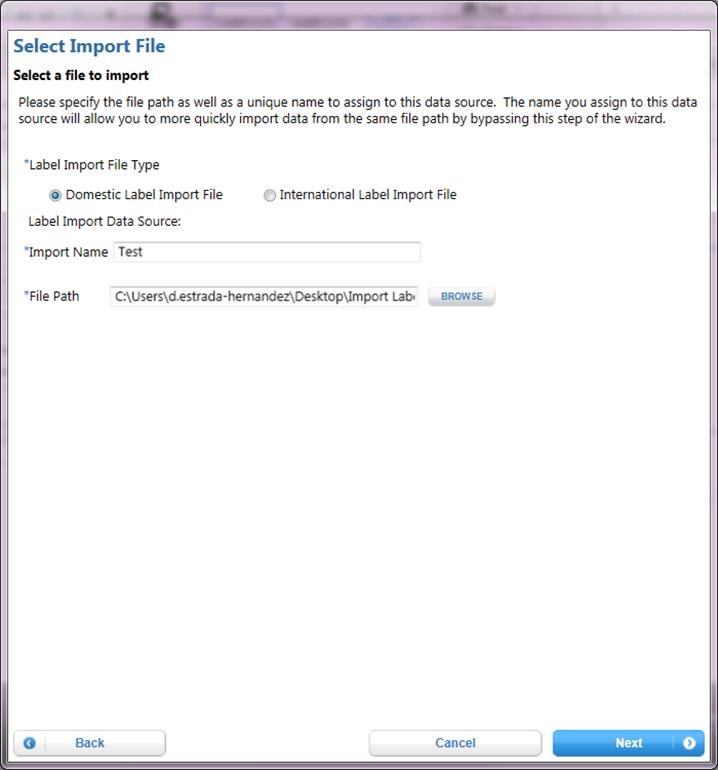
5
Click the Next button. Note: For XML files, clicking NEXT navigates you to the Summary page, step 10.
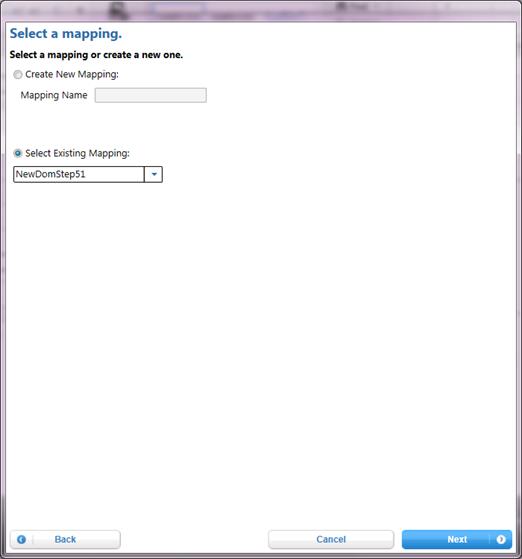
6
(Certain files types only)
On the Select a mapping page, you may select to create a new or select an
existing mapping for the import. If you
select a New Mapping, you must enter a mapping name
a.
If you selected an Existing
Import, the Select a mapping page will default to show the previously used
mapping for the import. You can still
choose to create a new one or select a different existing mapping.
7
Click the Next button.
Domestic Example:
International Example:
8
(Certain files types only)
On the Mapping Page, you can align the CSV file column names with the USPS®
meter label solution fields that match. USPS® meter label solution software will
automatically match columns that have identical names to their respective
Shipping Label Field. You may also enter
a value into the Default Value, which will fill any blank cell in that column
with the default value. Fields with
Asterisks (*) are required.
9 If you selected an Existing Mapping, the columns will be
aligned as the Existing Mapping had them.
The columns are still editable.
10
Click the Next button.
11
The Import Summary page
allows you to view a count of failed and successful labels, view All,
Successful, and Failed labels, Fix/Modify labels, view the errors in failed
labels, Save the Imported Labels by clicking Add to Cart.
a.
There is a count of the
successful and failed label imports. You
can also change the Filter to view
All Labels, Successful Labels, and Failed Labels.
b.


When a Failed label is highlighted, the system will list
the errors for the label:
c.
To Modify a successful label or Fix a failed label, click the Modify or Fix button. This will open a popup with the fields
listed. Edit the incorrect fields. Fields that must be corrected are marked with
red text. Note: The system will not allow you to fix or modify a label if a field
is left incorrect.
Domestic Example:

International Example:

d.
The Summary page also gives
the option to Save the labels to the Shipping
Cart. Failed labels will not be printed
or moved to the Shipping Cart. Note: If USPS® meter label solution software
is offline, the Print option will not be available.

Import Tracking Numbers
1
Click the USPS
Tracking® button on the bottom navigation or the
Shipping Overview navigation under Track. The Track & Confirm page
displays.
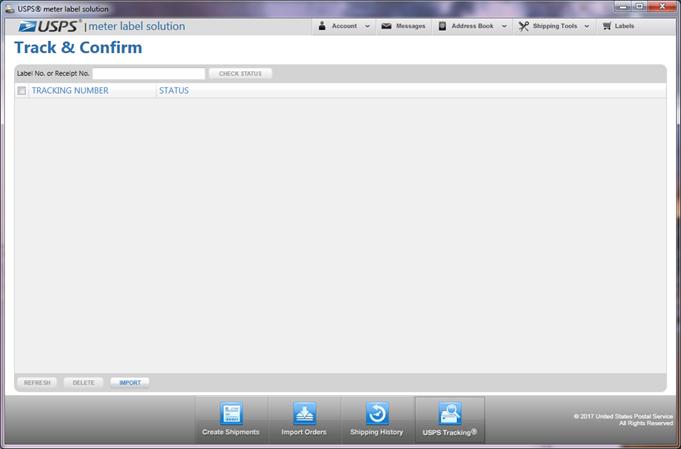
2
Click the IMPORT button. The Tracking Number Import Wizard window opens.
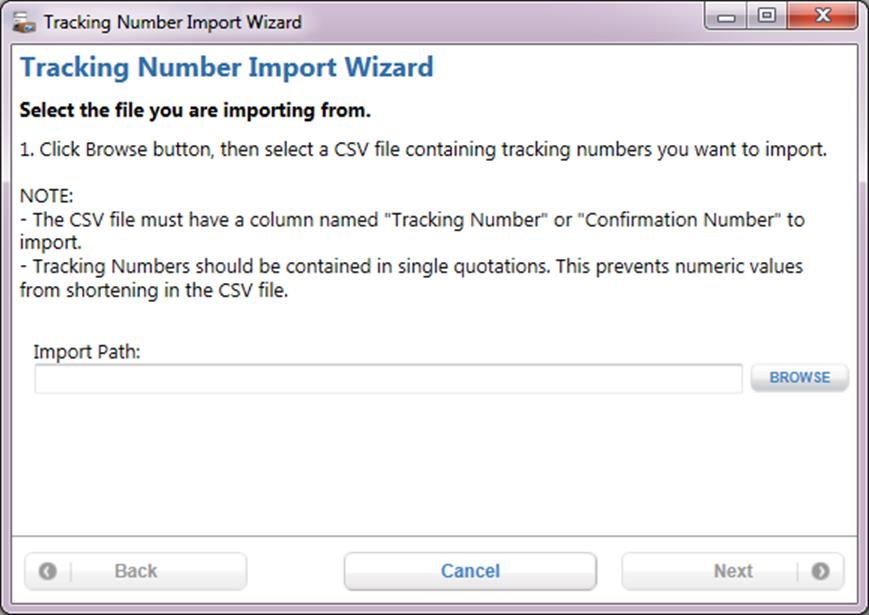
3 Click the BROWSE… button
and select the file you wish to import the tracking numbers from.
4 Click the Next button. The
Import Summary window opens showing the progress and summary of the import. 
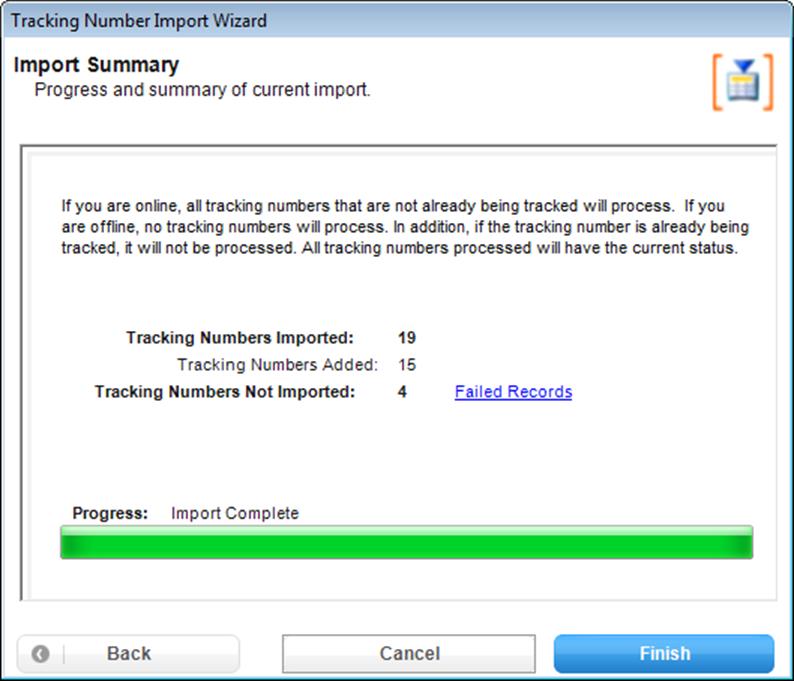
5
Click on the Finish button. A popup window opens displaying the number of
tracking number(s) added.
6
Click the OK button. The Track & Confirm page displays the imported
tracking numbers and their status. 
Chapter 11
Database
Management
Chapter 11. Database Management
In this introduction to
Database Management, users will learn how to configure a data source, how to
edit that configuration, and the capabilities of the External Database Access homepage.
Getting
Started
If a user has not
selected a data source, the following table offers insight into various data
sources. After the user has selected a
data source, proceed to the corresponding section. Configuration steps of each data source are
listed alphabetically.
|
File Type
|
Description
|
Currently Supported?
|
|
Flat File
|
A database stored as
an ordinary unstructured file.
|
.csv (comma separated
values)
|
|
.XLSX, .XLS
|
Open XML spreadsheet
file format used with Microsoft Excel.
|
Microsoft Excel
|
|
Relational Database
|
Collective set of
multiple datasets organized by tables, records, and columns.
|
Microsoft Access,
MySQL, SQL Server
|
When connecting a data
source for the first time, the user will be directed through the following
progression of pages: (1) External Database Connectivity, (2) Create or Use
Existing External Database Mapping, (3) External Database Mapping, and (4)
External Database Access. The graphic on the left side of the page will keep
you informed as to where you are in the configuration process.
1
Click the Database
Management button on the bottom navigation bar and
select “Configure Data Source” from the pop-up context menu. This will navigate
the user to the “External Database Connectivity” page.
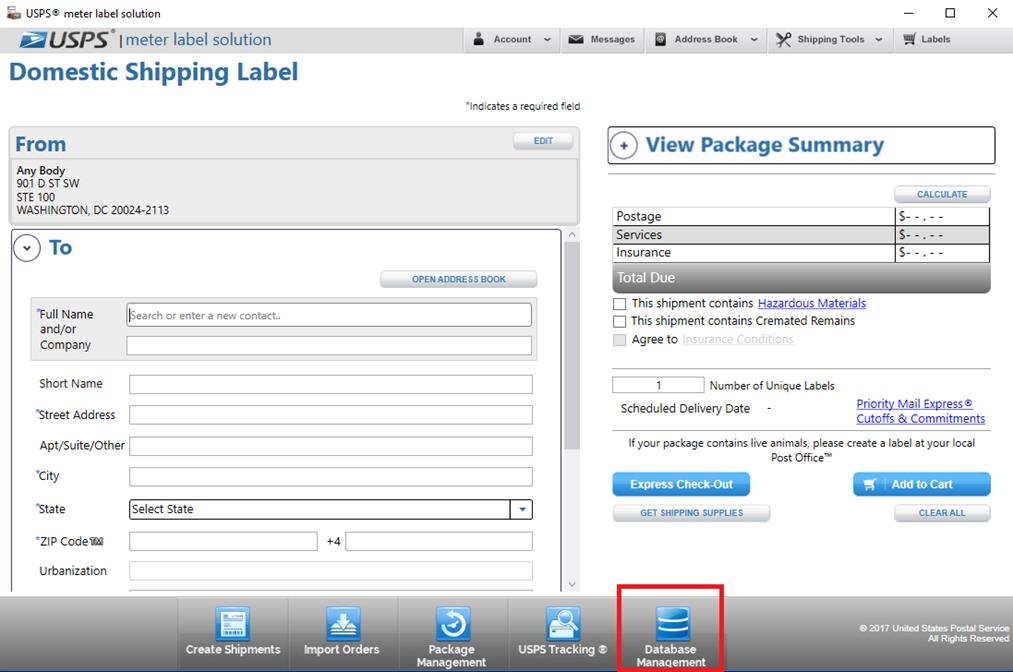
2
On the “External Database
Connectivity” page, click the Configure DSN button on the upper right portion of the page. This will
navigate the user to the “ODBC Data Source Administrator (32-bit)” popup.


3
On the “ODBC Data Source
Administrator (32-bit)” popup, click the Add… button. This will
navigate the user to the “Create New Data Source” popup.

4 Select “Microsoft Access Driver (*.mdb, *.accdb)”. If this driver does not appear, the user will
need to download it. The download is
available here: https://www.microsoft.com/en-us/download/details.aspx?id=13255
5 After selecting the appropriate driver, click the Finish button.
6 On the “ODCB Microsoft Access Setup” popup, name your data
source in the “Data Source Name:” textbox. Click the Select… button located on the left side toward the middle of the
popup, which will navigate the user to the “Select Database” popup.
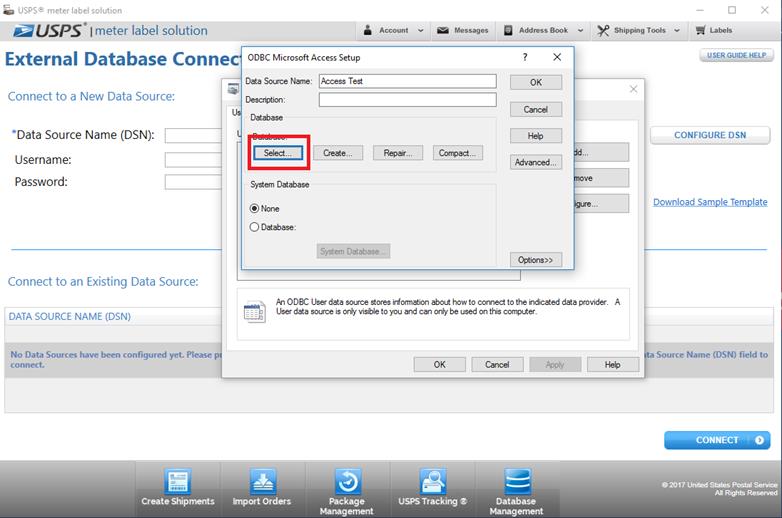
7 On the “Select Database” popup, navigate to the desired
Access file. Click the OK button.
This will navigate the user back to the “ODBC Data Source Administrator
(32-bit)” window.
8 On the “ODBC Data Source Administrator (32-bit)” window,
click the OK button. This will close the
ODBC Data Sources administrator and navigate the user back to the “External
Database Connectivity” page.
9 On the “External Database Connectivity” page, type the data
source name from step 6 in the “*Data Source Name:” textbox. If the database
has a username and password associated with it, enter each within their
respective fields. CAUTION: Most Access databases, even if password
protected, do not have a username. As
such, the user should only enter the password before proceeding to step 10.
10 Click the Connect button in
the lower right corner of the page. A successful connection will prompt a
confirmation stating, “Connection Successful. Select a Database below.”
11 Select a database from the “Select a Database” dropdown in
the lower left corner of the page. Click the Next button. This will
navigate the user to the “Create or Use an Existing External Database Mapping”
page.
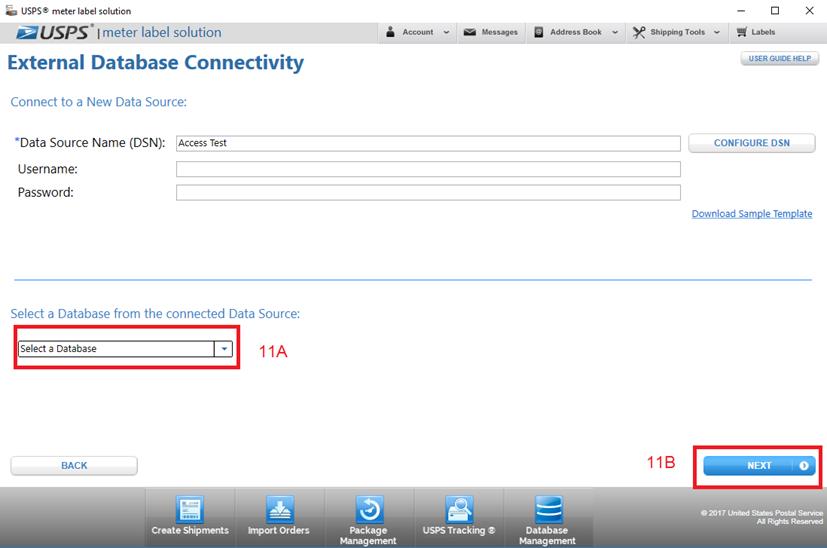
12 On the “Create or Use Existing External Database Mapping”
page, name the mapping by typing it in the “Name:’ textbox. Click the Create Mapping button in the lower right corner of the page. This will
navigate the user to the External Database Mapping page.


13 On the External Database Mapping page, select the
appropriate table from the Available External Database Tables dropdown. The list grid will populate with fields from
the connected data source.
14 If a user would like to define a primary key, highlight the
appropriate field in from the “Available External Database Fields” list
grid. After highlighting the field,
click the Define Primary Key button.

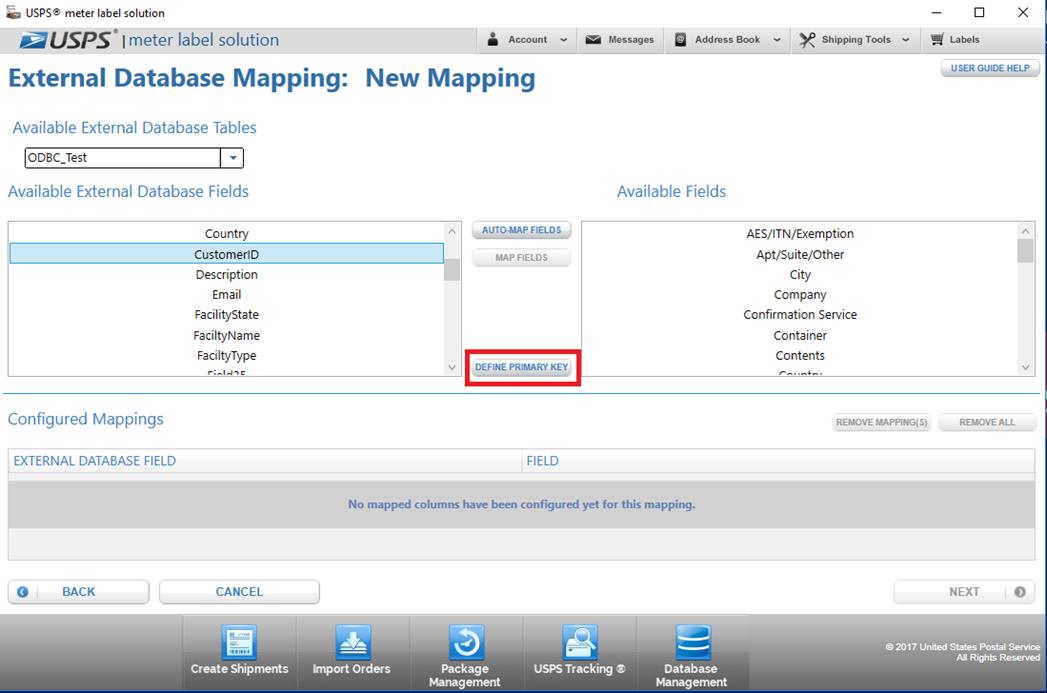
15 If a user would like to map multiple fields at once, click
the Auto-Map
Fields button. This process saves the user time by mapping
Available External Database Fields to similarly named Available Fields.

16 If a user would like to map fields individually, select a
field from the Available External Database Fields list grid, select an
associated field from the Available Fields list grid, and click the Map
Fields button.
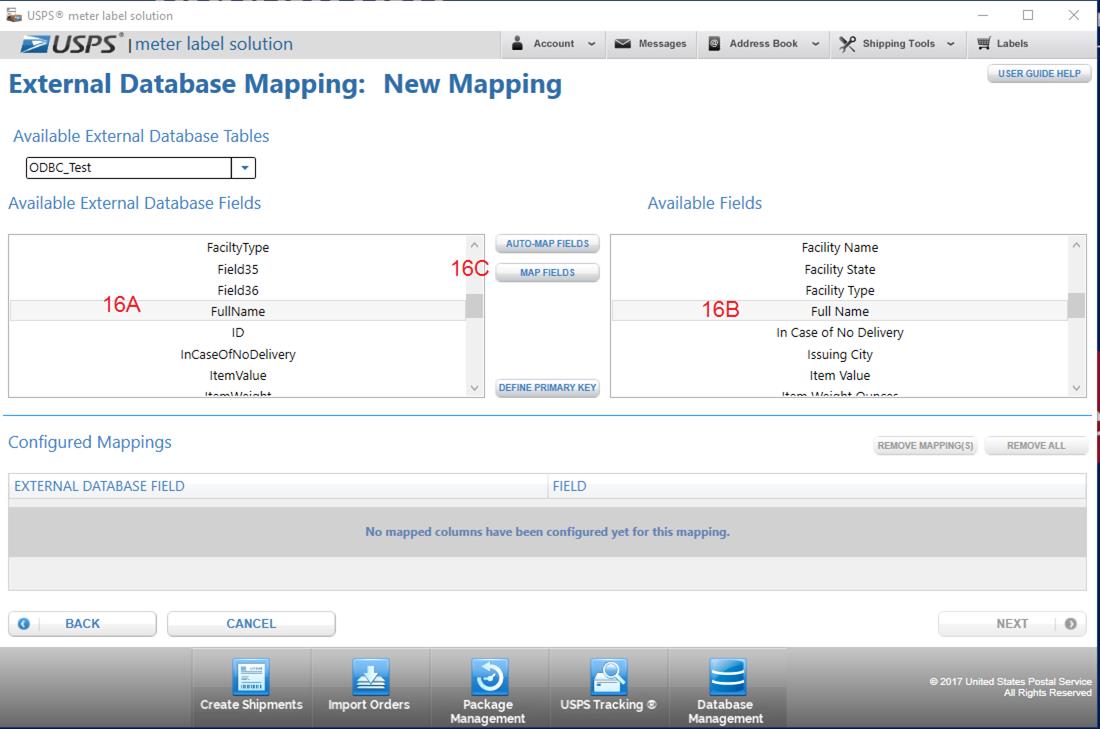
17 If a user would like to delete a mapping, select a mapping
from the Configured Mappings data grid and click the Remove
Mapping(s) button. A user can also delete all
mappings by clicking the Remove All button.
This will remove the mapping(s) from the configured mappings and re-populate
the fields in their respective list grids.
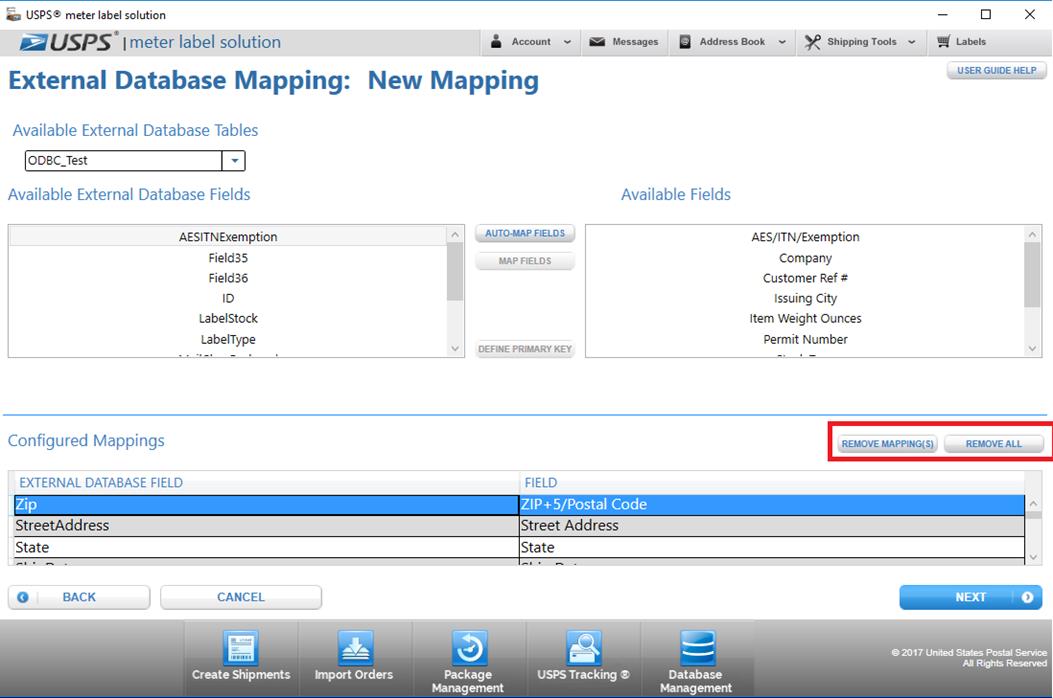
18 After mapping has been completed, click the Next button in the lower right corner of the page. This will
navigate the user to the External Database Access page.
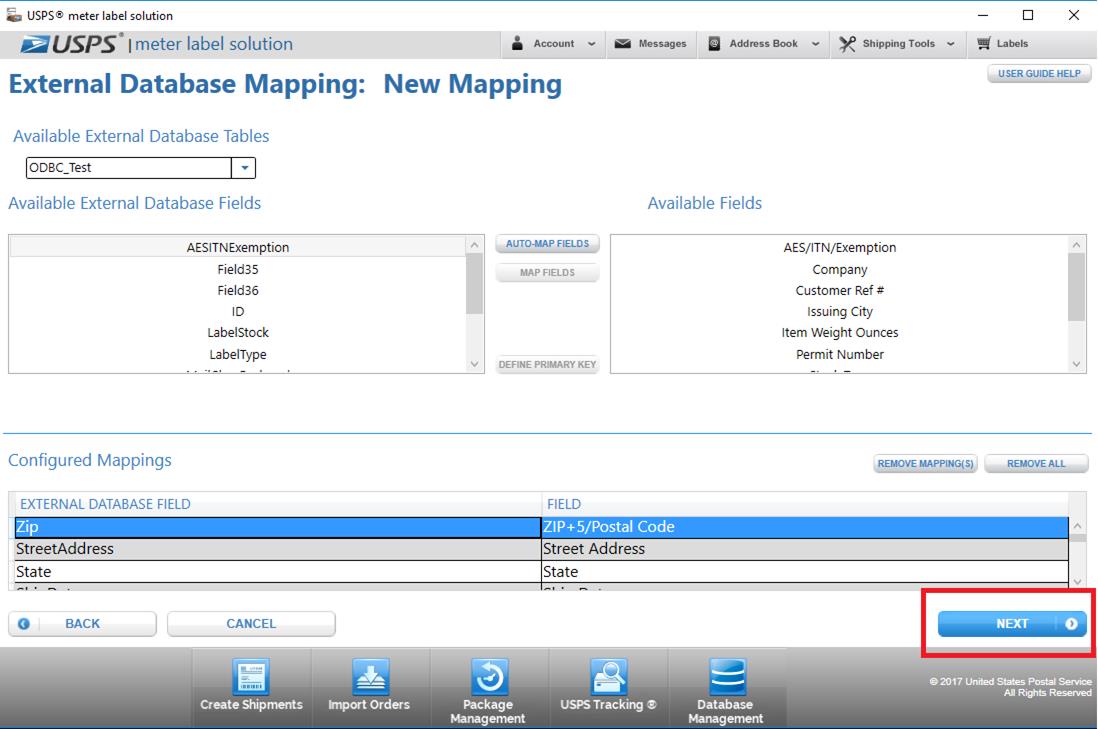
19 On the External Database Access page, users can search
their database, allowing them to auto-populate various label types.
20 To search for a customer, begin typing their name in the
“Search Database:” textbox. From the
indexed dropdown, select that customer.


21 Upon selecting the customer, their shipping information will
populate the External Database Contact section in the upper left portion of the
page. If that same contact is also
within the MLS Address Book, it will populate the Address Book section on the
right side of the page.
22 To track that customer’s shipments, click a tracking number
from the list grid on the lower half of the page.
23 To populate a label, select the desired label type from the
“Select Label” dropdown. This will
navigate the user to that label type with the auto-populated shipping
information for the customer.
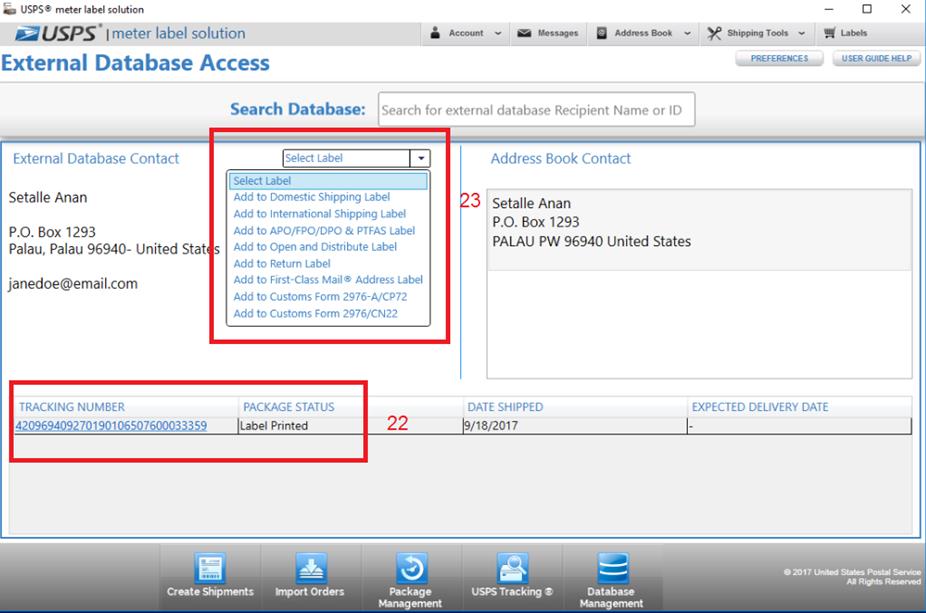
1 Click the Database Management button on the bottom navigation bar and select “Configure
Data Source” from the pop-up context menu. This will navigate the user to the
“External Database Connectivity” page. 
2
On the “External Database
Connectivity” page, click the Configure DSN button on the upper right portion of the page. This will
navigate the user to the “ODBC Data Source Administrator (32-bit)” popup.


3 On the “ODBC Data Source Administrator (32-bit)” popup,
click the Add… button. This will navigate the user to the “Create
New Data Source” popup.
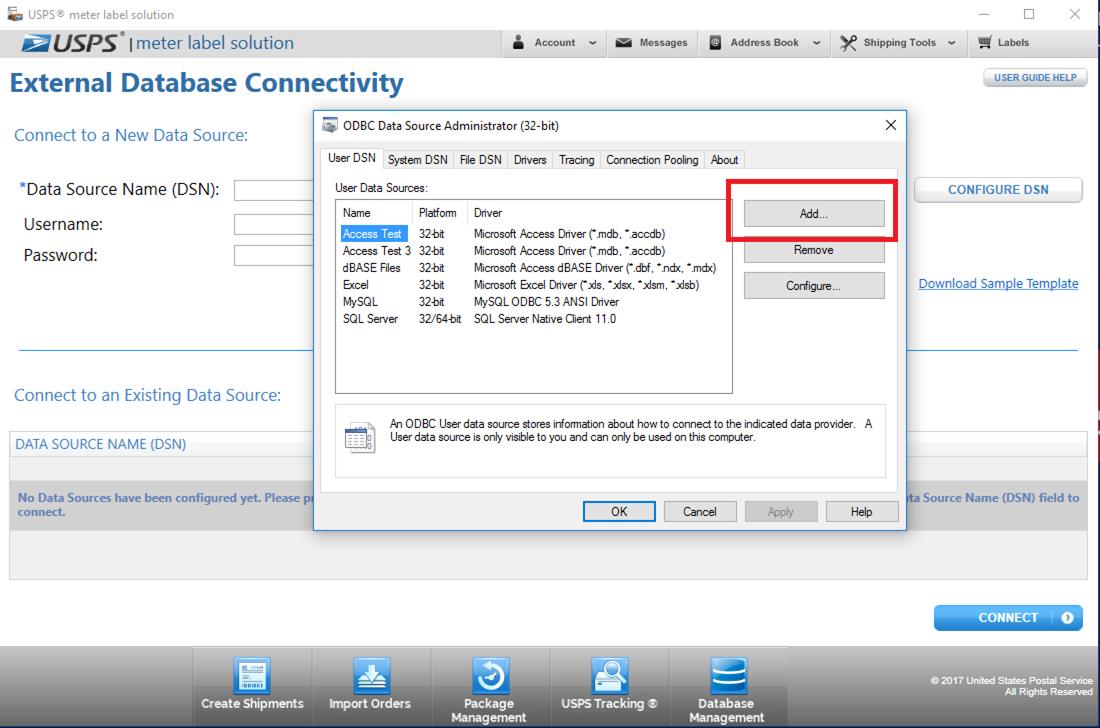
4 On the “Create New Data Source” popup, select “Microsoft
Access Text Driver (*.csv, *.txt)”. If
this driver does not appear, the user will need to download it. The download is available here: https://www.microsoft.com/en-us/download/details.aspx?id=13255
5 Click the Select Directory… button in the middle of the “ODBC Text Setup” popup. This will
navigate the user to the “Select Directory” popup.
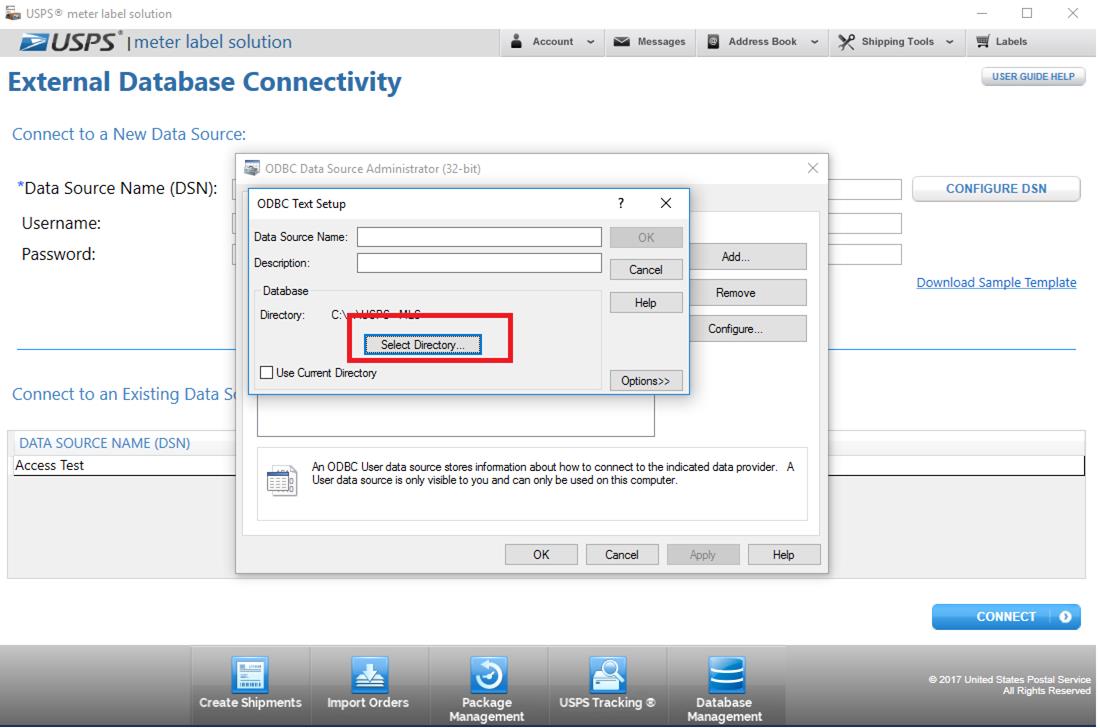
6 In the “Select Directory” popup, select the appropriate
directory within the list grid on the right. The user will need to name the
file and click the OK button.
This will take the user back to the ODBC Text Setup window.
7 Click the OK button.
This will navigate the user back to the “ODBC Data Source Administrator
(32-bit)” window.
8 On the “ODBC Data Source Administrator (32-bit)” window,
click the OK button. This will close the
ODBC Data Sources administrator and navigate the user back to the “External
Database Connectivity” page.
9 On the “External Database Connectivity” page, type the data
source name from step 6 in the “*Data Source Name:” textbox. Click the Connect button in the lower right corner of the page. A successful
connection will prompt a confirmation stating, “Connection Successful. Select a
Database below.”
10 Select a database from the “Select a Database” dropdown in
the lower left corner of the page. Click the Next button. This will navigate the user to the “Create or
Use an Existing External Database Mapping” page.
10B A A
|
|
10AA
|
|


11 On the “Create or Use Existing External Database Mapping”
page, name your mapping by typing it in the “Name:’ textbox. Click the Create Mapping button in the lower right corner of the page. This will
navigate the user to the External Database Mapping page.
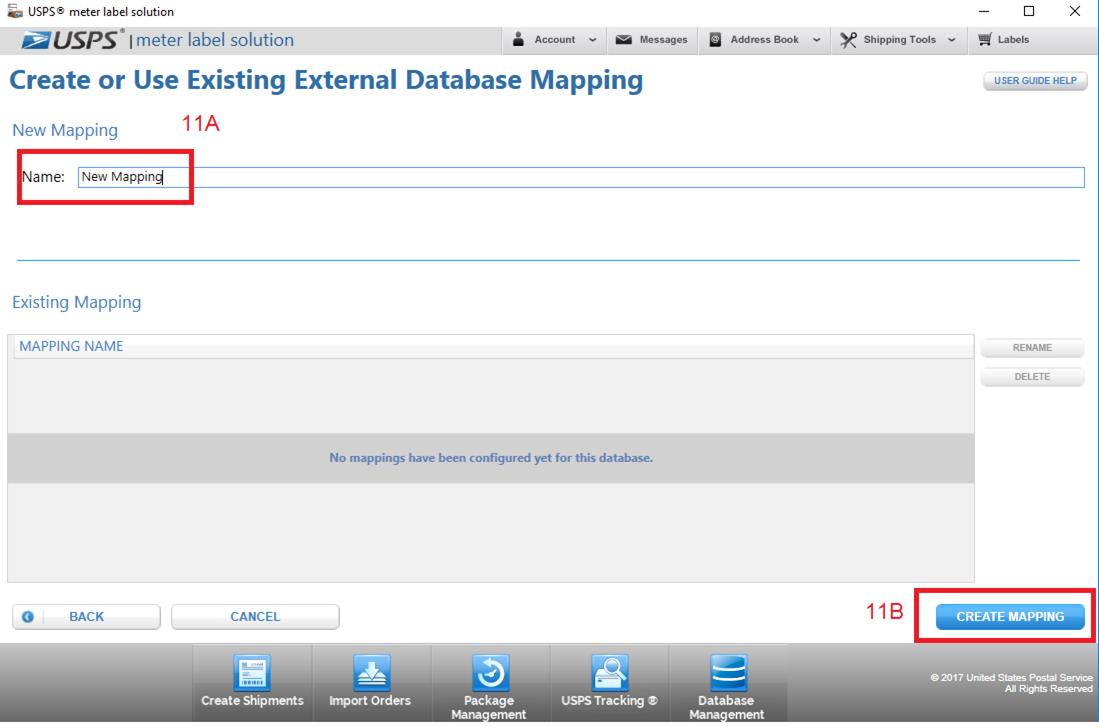
12 On the External Database Mapping page, select the
appropriate table from the Available ODBC Database dropdown. The list grid will populate with fields from
the connected data source.
13 If a user would like to define a primary key, highlight the
appropriate field in the ODBC list grid.
After highlighting the field, click the Define Primary Key button.
13BA
|
|
13AA
|
|
12A
|
|


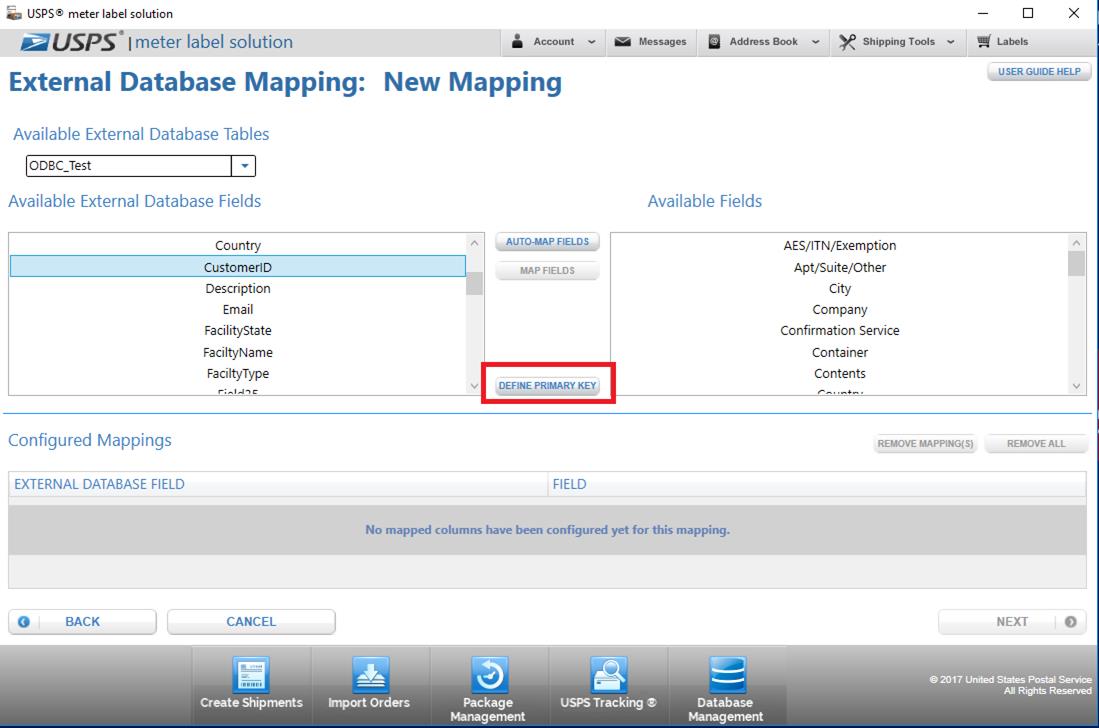
14 If a user would like to map multiple fields at once, click
the Auto-Map
Fields button. This process saves the user time by mapping ODBC
fields to similarly named MLS fields.
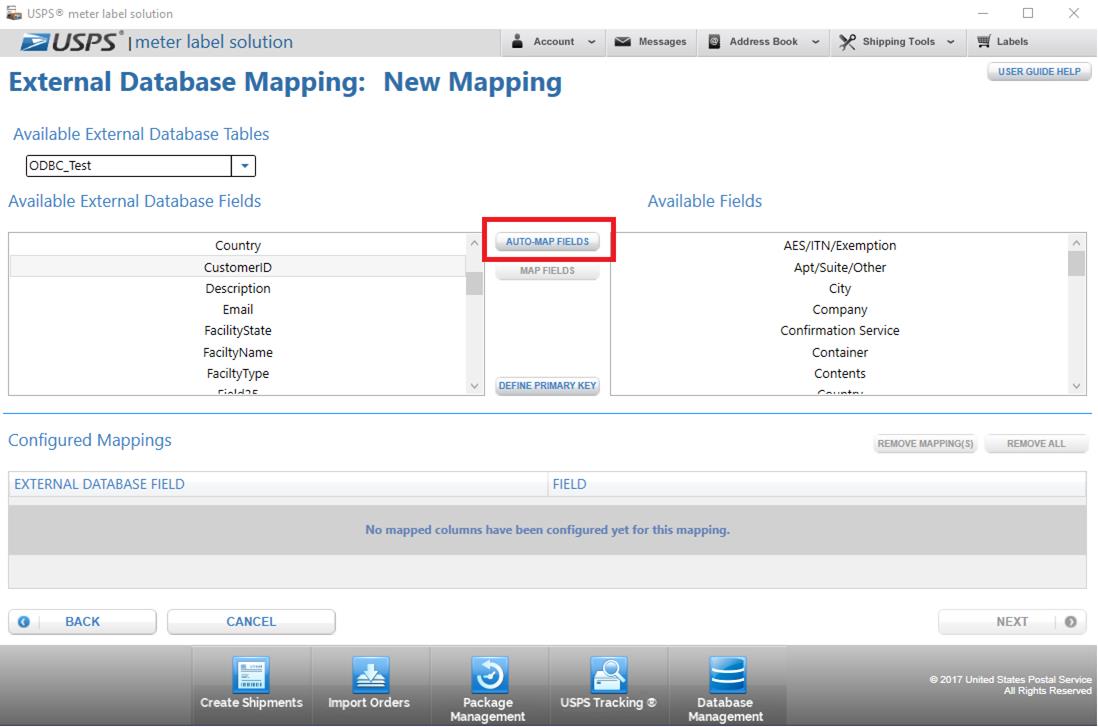
15 If a user would like to map fields individually, select a
field from the ODBC fields list grid, select an associated field from the MLS
fields list grid, and click the Map Fields button.
15C
A
|
|
15BA
|
|
15AA
|
|


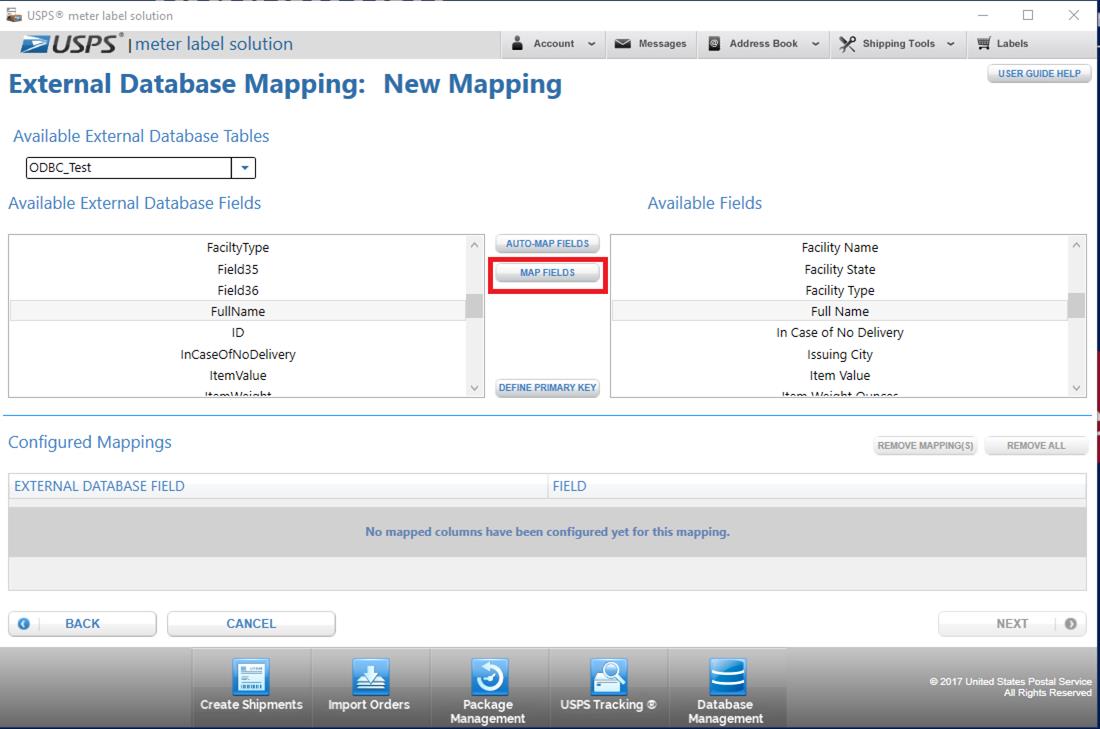
16 If a user would like to delete a mapping, select a mapping
from the Configured Mappings data grid and click the Remove
Mapping(s) button. A user can also delete all
mappings by clicking the Remove All button.
This will remove the mapping(s) from the configured mappings and re-populate
the fields in their respective list grids.
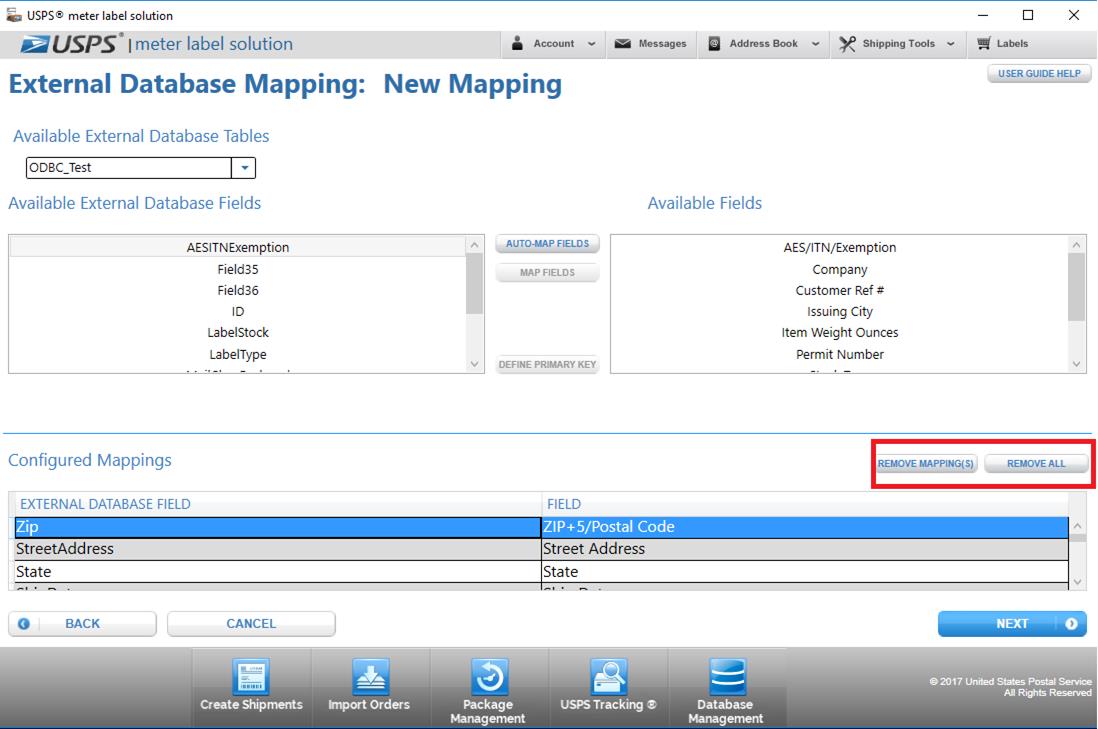
17 After mapping has been completed, click the Next button in the lower right corner of the page. This will
navigate the user to the External Database Access page.
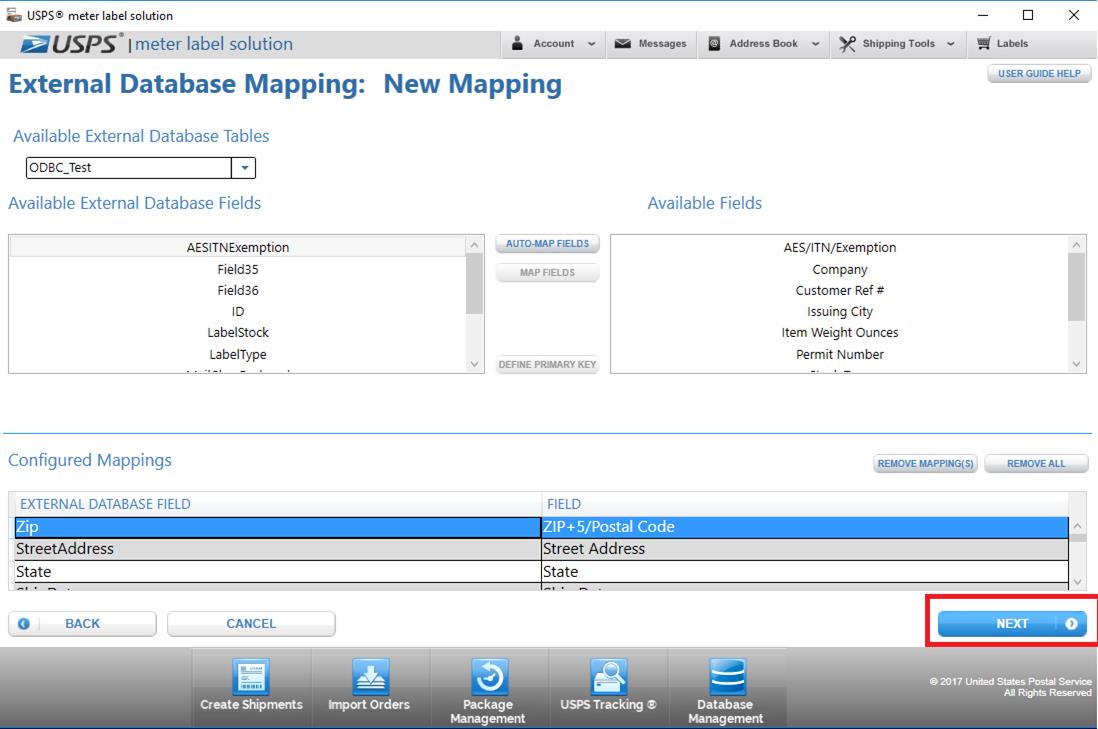
18 On the External Database Access page, users can search
their database, allowing them to auto-populate various label types.
19 To search for a customer, begin typing their name in the
“Search Database:” textbox. From the
indexed dropdown, select that customer.
Upon selecting the customer, their shipping information will populate
the External Database Contact section in the upper left portion of the page. If that same contact is also within the MLS
Address Book, it will populate the Address Book Contact in the upper right
portion of the page.

20 To track that customer’s shipments, click a tracking number
from the list grid on the lower half of the page.
21 To populate a label, select the desired label type from the
“Select Label” dropdown. This will
navigate the user to that label type with the auto-populated shipping
information for the customer.
21A
|
|
20A
|
|


1
 Click the Database Management button on the bottom navigation bar and select “Configure
Data Source” from the pop-up context menu. This will navigate the user to the
“External Database Connectivity” page.
Click the Database Management button on the bottom navigation bar and select “Configure
Data Source” from the pop-up context menu. This will navigate the user to the
“External Database Connectivity” page. 
2
On the “External Database
Connectivity” page, click the Configure DSN button on the upper right portion of the page. This will
navigate the user to the “ODBC Data Source Administrator (32-bit)” popup.


3
On the “ODBC Data Source
Administrator (32-bit)” popup, click the Add… button. This will
navigate the user to the “Create New Data Source” popup.

4 Select “Microsoft Excel Driver (*.xls, *.xlsx, *.xlsm,
*.xlsb)”. If this driver does not
appear, the user will need to download it.
The download is available here: https://www.microsoft.com/en-us/download/details.aspx?id=13255
5 On the “ODCB Microsoft Excel Setup” popup, name your data
source in the “Data Source Name:” textbox. Click the Select
Workbook… button to select the appropriate
workbook.
6 Click the OK button.
This will navigate the user back to the “ODBC Data Source Administrator
(32-bit)” window.
7 On the “ODBC Data Source Administrator (32-bit)” window,
click the OK button. This will close the
ODBC Data Sources administrator and navigate the user back to the “External
Database Connectivity” page.
8 On the “External Database Connectivity” page, type the data
source name from step 5 in the “*Data Source Name:” textbox.
9 Click the Connect button in
the lower right corner of the page. A successful connection will prompt a
confirmation stating, “Connection Successful. Select a Database below.”
10 Select a database from the “Select a Database” dropdown in
the lower left corner of the page. Click the Next button. This will
navigate the user to the “Create or Use an Existing External Database Mapping”
page.
10A
A
|
|

10BA
|
|

11 On the “Create or Use Existing External Database Mapping”
page, name your mapping by typing it in the “Name:’ textbox. Click the Create Mapping button in the lower right corner of the page. This will
navigate the user to the External Database Mapping page.
11AA
|
|

11BA
|
|


12 On the External Database Mapping page, select the
appropriate table from the Available External Database Tables dropdown. The
list grid will populate with fields from the connected data source.

13 If a user would like to define a primary key, highlight the
appropriate field in the Available External Database Fields grid. After highlighting the field, click the Define
Primary Key button.
13AA
|
|
13BA
|
|

14 If a user would like to map multiple fields at once, click
the Auto-Map
Fields button. This process saves the user time by mapping
External Database Fields to similarly named Available Fields.

15 If a user would like to map fields individually, select a
field from the ODBC fields list grid, select an associated field from the MLS
fields list grid, and click the Map Fields button.
14CA
|
|
14BA
|
|

14AA
|
|

16 If a user would like to delete a mapping, select a mapping
from the Configured Mappings data grid and click the Remove
Mapping(s) button. A user can also delete all
mappings by clicking the Remove All button.
This will remove the mapping(s) from the configured mappings and re-populate
the fields in their respective list grids.

17 After mapping has been completed, click the Next button in the lower right corner of the page. This will
navigate the user to the External Database Access page.

18 On the External Database Access page, users can search
their database, allowing them to auto-populate various label types.
19 To search for a customer, begin typing their name in the
“Search Database:” textbox. From the
indexed dropdown, select that customer.

20 Upon selecting the customer, their shipping information
will populate the External Database Contact section in the upper left portion
of the page. If that same contact is
also within the MLS Address Book, it will populate the Address Book Contact in
the upper right portion of the page.

21 To track that customer’s shipments, click a tracking number
from the list grid on the lower half of the page.
22 To populate a label, select the desired label type from the
“Select Label” dropdown. This will navigate
the user to that label type with the auto-populated shipping information for
the customer.
23A
|
|
22A
|
|


1
Click the Database
Management button on the bottom navigation bar and
select “Configure Data Source” from the pop-up context menu. This will navigate
the user to the “External Database Connectivity” page.

2
On the “External Database
Connectivity” page, click the Configure DSN button on the upper right portion of the page. This will
navigate the user to the “ODBC Data Source Administrator (32-bit)” popup.


3
On the “ODBC Data Source
Administrator (32-bit)” popup, click the Add… button. This will
navigate the user to the “Create New Data Source” popup.


4 Select “MySQL ODBC 5.3 ANSI Driver”. If this driver does not appear, the user will
need to download it. The download is
available here: https://dev.mysql.com/downloads/connector/odbc/5.1.html
5 After selecting the driver, click the Finish button.

5A
|
|

4A
|
|
6 On the “MySQL Connector/ODBC Data Source Configuration”
popup, name your data source in the “Data Source Name:” textbox.
7 Ensure the “TCP/IP Server:” radio button is selected. This should be the default.
8 Enter the username and password. The username and password
are those you have set within MySQL. From the Database dropdown, select the
desired database. Click the Test button. A popup will confirm a successful connection.
7
A
|
|
8A
A
|
|
8B
A
|
|

9 On the “ODBC Data Source Administrator (32-bit)” window,
click the OK button. This will close the
ODBC Data Sources administrator and navigate the user back to the “External
Database Connectivity” page.
10 On the “External Database Connectivity” page, type the data
source name from step 1 in the “*Data Source Name:” textbox. Click the Connect button in the lower right corner of the page. A successful
connection will prompt a confirmation stating, “Connection Successful. Select a
Database below.”

11 Select a database from the “Select a Database” dropdown in
the lower left corner of the page. Click the Next button. This will
navigate the user to the “Create or Use an Existing External Database Mapping”
page.
11A
A
|
|

11B
A
|
|

12 On the “Create or Use Existing External Database Mapping”
page, name your mapping by typing it in the “Name:’ textbox. Click the Create Mapping button in the lower right corner of the page. This will
navigate the user to the External Database Mapping page.
12A
A
|
|

12B
A
|
|

13 On the External Database Mapping page, select the
appropriate table from the Available External Database Tables dropdown. The list
grid will populate with fields from the connected data source.


14 If a user would like to define a primary key, highlight the
appropriate field in the Available External Database Fields grid. After highlighting the field, click the Define
Primary Key button.

14A
A
|
|
14B
A
|
|

15 If a user would like to map multiple fields at once, click
the Auto-Map
Fields button. This process saves the user time by mapping
Available External Database Fields to similarly named Available Fields.

16 If a user would like to map fields individually, select a
field from the Available External Database Fields list grid, select an
associated field from the Available Fields list grid, and click the Map
Fields button.

16A
A
|
|

16C
A
|
|

16B
A
|
|

17 If a user would like to delete a mapping, select a mapping
from the Configured Mappings data grid and click the Remove
Mapping(s) button. A user can also delete all
mappings by clicking the Remove All button.
This will remove the mapping(s) from the configured mappings and re-populate
the fields in their respective list grids.

18 After mapping has been completed, click the Next button in the lower right corner of the page. This will
navigate the user to the External Database Access page.

19 On the External Database Access page, users can search
their database, allowing them to auto-populate various label types.
20 To search for a customer, begin typing their name in the
“Search Database:” textbox. From the
indexed dropdown, select that customer.


21 Upon selecting the customer, their shipping information
will populate the External Database Contact section in the upper left portion
of the page. If that same contact is
also within the MLS Address Book, it will populate the Address Book Contact in
the upper right portion of the page.
22 To track that customer’s shipments, click a tracking number
from the list grid on the lower half of the page.
23 To populate a label, select the desired label type from the
“Select Label” dropdown. This will
navigate the user to that label type with the auto-populated shipping information
for the customer.
23A
|
|

22A
|
|

1
Click the Database
Management button on the bottom navigation bar and
select “Configure Data Source” from the pop-up context menu. This will navigate
the user to the “External Database Connectivity” page.


2
On the “External Database
Connectivity” page, click the Configure DSN button on the upper right portion of the page. This will
navigate the user to the “ODBC Data Source Administrator (32-bit)” popup.


3
On the “ODBC Data Source
Administrator (32-bit)” popup, click the Add… button. This will
navigate the user to the “Create New Data Source” popup.


4
Select “SQL Server Native
Client 11.0”. The driver should be installed with the installation of SQL
Server. However, if you need to download
the driver, it is available here: https://docs.microsoft.com/en-us/sql/connect/odbc/microsoft-odbc-driver-for-sql-server.
5
After selecting the driver,
click the Finish button. This will
navigate the user to the “Create a New Data Source to SQL Server” popup.
5A
|
|
4A
|
|

6 In the “Create a New Data Source to SQL Server” popup, name
your data source in the “Name:” textbox.
In the “Server:” textbox, type in your server name, which will be found
in Microsoft SQL Server Management Studio’s Object Explorer as pictured in the
red box below:


7 Click “Finish”. This
will navigate the user to the “ODBC Microsoft SQL Server Setup” popup.

8 On the “ODBC Microsoft SQL Server Setup” popup, click test
data source. Click “OK”. This will close the popup and navigate the user back
to the “ODBC Data Source Administrator (32-bit)” window.

9 On the “ODBC Data Source Administrator (32-bit)” window,
click the OK button. This will close the
ODBC Data Sources administrator and navigate the user back to the “External
Database Connectivity” page.
10 On the “External Database Connectivity” page, type the data
source name from step 6 in the “*Data Source Name:” textbox. Click the Connect button in the lower right corner of the page. A successful
connection will prompt a confirmation stating, “Connection Successful. Select a
Database below.”

10BA
|
|

11 Select a database from the “Select a Database” dropdown in
the lower left corner of the page. Click the Next button. This will
navigate the user to the “Create or Use an Existing External Database Mapping”
page.
11AA
|
|

11BA
|
|


12 On the “Create or Use Existing External Database Mapping”
page, name your mapping by typing it in the “Name:’ textbox. Click the Create Mapping button in the lower right corner of the page. This will
navigate the user to the External Database Mapping page.

12AA
|
|

12BA
|
|


13 On the External Database Mapping page, select the
appropriate table from the Available External Database Tables dropdown. The list grid will populate with fields from
the connected data source.


14 If a user would like to define a primary key, highlight the
appropriate field in the Available External Database Fields listgrid. After highlighting the field, click the Define
Primary Key button.
14AA
|
|

14BA
|
|

15 If a user would like to map multiple fields at once, click
the Auto-Map
Fields button. This process saves the user time by mapping
Available External Database Fields to similarly named Available Fields.
16 If a user would like to map fields individually, select a
field from the Available External Database Fieldslist grid, select an
associated field from the Available Fields list grid, and click the Map
Fields button.
16AA
|
|

16CA
|
|
16BA
|
|
17 If a user would like to delete a mapping, select a mapping
from the Configured Mappings data grid and click the Remove
Mapping(s) button. A user can also delete all
mappings by clicking the Remove All button.
This will remove the mapping(s) from the configured mappings and re-populate
the fields in their respective list grids.

18 After mapping has been completed, click the Next button in the lower right corner of the page. This will
navigate the user to the External Database Access page.

19 On the External Database Access page, users can search
their database, allowing them to auto-populate various label types.
20 To search for a customer, begin typing their name in the
“Search Database:” textbox. From the
indexed dropdown, select that customer.


21 Upon selecting the customer, their shipping information
will populate the External Database Contact section in the upper left portion
of the page. If that same contact is
also within the MLS Address Book, it will populate the Address Book Contact in
the upper right portion of the page.

22 To track that customer’s shipments, click a tracking number
from the list grid on the lower half of the page.
23 To populate a label, select the desired label type from the
“Select Label” dropdown. This will
navigate the user to that label type with the auto-populated shipping
information for the customer.
22 A A
|
|

23A
|
|


Once a user has completed a configuration it is accessible
upon restarting the application. The
user will need to complete the following steps.
1 Click the Database Management button on the bottom
navigation bar and select “Configure Data Source” from the pop-up context
menu. This will navigate the user to the
“External Database Connectivity” page.


2 Select a Data Source
on the bottom half of the page under the “Connect to An Existing Data Source”
section. Once selected, the user should
click “Connect”.
2AA
|
|


2BA
|
|
3 After connecting to the data source, select the desired
database from the dropdown on the left side.
Click Next. This will navigate
the user to the Create or Use Existing External Database Mapping page.
3AA
|
|

3BA
|
|
4 On the Create or Use Existing External Database Mapping
page, select the Mapping. Click Edit
Mapping.

5 This will navigate the user to the External Database
Mapping Page. If a user would like to
edit mappings, it can be done here.
Otherwise, click Next to proceed to the External Database Access page.

6 The user will be able to search the external database,
track customer information, and auto-populate labels from the page.


Chapter 12
Shipping History
Chapter 12. Shipping History
In this introduction to Shipping History, you’ll learn how to do the
following:
ONLINE connection status:
·
Recreate previously printed Label
or Form.
·
Create electronic MRS Label (applies to domestic, APO/FPO/DPO and
Possessions, Territories and Freely Associated States (PTFAS), or First-Class
Mail® Letter labels only).
·
Reprint a PS Form 5630, Confirmation
Services Certification
·
Delete printed labels.
·
Check Status of
Packages.
·
Filter Labels in Shipping History table based on
general tracking status.
·
Search Shipping History.
OFFLINE connections status:
- Recreate
previously printed Label or Form.
- Create electronic MRS Label (applies to
domestic, APO/FPO/DPO and Possessions, Territories and Freely Associated
States (PTFAS), or First-Class Mail® Letter
labels only and must be online to email or print).
- Delete printed labels.
- Display only Labels In Shipping History table based on general tracking
status.
- Search Shipping
History.
Getting
Started
The Shipping
History page shows you all labels and forms that have been printed within the USPS®
meter label solution application, based on the user selected purge history
information. It allows you to recreate previously printed labels/forms (with a
new label/receipt number), create Electronic Merchandise Return Service labels,
pay for and re-print labels, and track the status of shipments. In addition,
you can schedule free Package Pickup requests for package(s) that were printed
via USPS® meter label solution software. By default, each row in the Shipping
History table displays a summary view of a printed label. To view detailed
information about a label, click on DETAILS
under the Expand column for that label.
Search
1
Click on Package Management button on the bottom navigation and select Shipping History or the
Shipping Overview navigation under View-> View Shipping Activity.
2
Enter search criteria in the Search for
textbox.

3
Select a specific column from the in dropdown to search within (optional).
4
Click Filter. The Filter popup window opens displaying the
Show and Sort by dropdowns. Note: To clear the search click Clear.
Advanced Filtering
1
Click on the Advanced Filtering link. The Shipment Filtering Options popup
window will display.

2
Enter search criteria in the Search for
textbox.
3
Select a specific column from the In dropdown to search within (optional)
4
In the Show
dropdown, select a specific group (based on tracking status) that you want
to filter by. In the Sort by dropdown, select the option that you want
the filtering results to be sorted by.
5
Click FILTER
to apply the filtering option selections and return the results. The popup
window will close. Note: To clear all filter and sort options (including any
existing filtering prior to the Advanced Filtering link being clicked), click Clear.
To close the popup without changing any existing filtering, click Cancel.
Check
Status of Packages
1
Click on Package Management button on the bottom navigation and select Shipping History or the
Shipping Overview navigation under View-> View Shipping Activity.
2 Click on the hyperlinked tracking number under the Status column.
3 User will be navigated to the USPS Tracking® Results web page where the detailed package status is
displayed.
IMPORTANT: the time at which the status was last updated is indicated by the
“Tracking status last updated:” line located towards the bottom of the Shipping
History page.
Display
Labels for a Specific Status
1
Click on Package Management button on the bottom navigation and select Shipping History or the
Shipping Overview navigation under View-> View Shipping Activity.
2
Select a status from the Show dropdown
in order to display labels based on a specific status the Shipping History
table. Note: Verify that Search is clear if you wish to view all labels in a
particular status. Statuses
include the following below:
LABEL PRINTED: This represents a label that has been printed but whose package label
information has not been transferred to USPS®.
Once the tracking number has been acknowledged by the USPS® mailing system, you will notice that the status column
for a particular record will change to ELECTRONIC SHIPPING INFO RECEIVED.
Although the detailed status has changed, the label will still display when
filtering the Shipping History table by LABEL PRINTED, as the package has still
not been transferred to USPS®.
PRE-SHIPMENT: This represents all Product Tracking System (PTS) scan event status that
imply that a package has been provided to the Postal Service but the package
has not yet been processed through the USPS network. For more details regarding
the delivery, refer to the view track details instructions.Delivered
ACCEPTED: This represents all PTS scan event status that imply that a package has
been physically tendered to the Postal Service. For more details regarding the delivery, refer
to the view track details instructions.
IN-TRANSIT: This represents all PTS scan event status that imply that a package is
on the move to its final destination. For more details regarding where
specifically a package is within the system, refer to the view track details instructions.
ALERTS: This represents all PTS scan event status that imply that there is an
issue or a delay in the shipment of the package. For more details regarding the
delivery, refer to the view track details instructions.
DELIVERED: This represents all PTS scan event status that imply that a package has
successfully reached its final destination. For more details regarding the
delivery, refer to the view track details instructions.
Reship
/ Recreate Label
Assumption: A label has already been
printed via the Create Shipping Label view or via Shipping Cart. For further
instructions on how to add a label to the shipping cart, refer to Create Shipping Label section.
1
Click on Package Management button on the bottom navigation and select Shipping History or the
Shipping Overview navigation under View-> View Shipping Activity.
2
Click on the Select Action dropdown
from the ACTIONS column and select Ship
Again.
3
All
information that was detailed in the printed label is transferred into the
respective label page. Note: New PIC
and new price will be attained for this label.
Reprint a Label
Note: Applies to labels that have already been printed using e-VS® as
payment method.
1
Click on Package Management button on the bottom navigation and select Shipping History or the
Shipping Overview navigation under View-> View Shipping Activity.
2
Select the label(s) you would like to
reprint by clicking the checkboxes.
3
Click on the REPRINT button located towards the bottom of the page and follow
the steps until the end to reprint the label.
Re-Create PS Form 5630,
Confirmation Services Certification, (SCAN
Form)
IMPORTANT: PS Form 5630 is required for all Open
and Distribute™ shipments.
1
Click on Package Management button on the bottom navigation and select Shipping History or the
Shipping Overview navigation under View-> View Shipping Activity.
2
Click on an Open and Distribute™ label or label printed with a SCAN Form .
3
Right click
the label or Click on the “Select Action” drop down menu.
4
Click Reprint
SCAN Form.
Create Electronic
Merchandise Return Service (MRS) Label
IMPORTANT: A MRS permit account
and an advance deposit account must be established to pay return postage using merchandise
return service. Contact your local Post Office™ for more information. Assumption:
A domestic label has already been created and you have a MRS Permit Number with
USPS®. For further instructions on how to add a domestic label to
the shipping cart, refer to Create Shipping Label section.
1 Click on Package Management button on the bottom navigation and select Shipping History or the
Shipping Overview navigation under View-> View Shipping Activity.
2 Click on the Action column and
select Create MRS label.
3 All information that was detailed in the domestic label is transferred
into an electronic MRS form for printing/emailing. The original label will NOT
be removed from the Shipping History table.
Delete
Printed Labels
1 Click on Package Management button on the bottom
navigation and select Shipping History or the Shipping Overview navigation
under View-> View Shipping Activity.
2 Select one or more labels using the checkboxes on the left most end of
the page.
3 Click Delete or right click to view context menu and click Delete
package record(s). The
record(s) will be permanently removed from the Shipping History table.

Export Shipping History
1 Click on Package Management button on the bottom
navigation and select Shipping History or the Shipping Overview navigation
under View-> View Shipping Activity.
2 Select one or more labels using the checkboxes on the left most end of
the page.
3 Click Export and choose a file
path and file name for the export
4 Click Continue and select the
columns that you wish to be included in the export
5 Click Export and when the
export has successfully completed, click Finish
TIP
- Users can
save a default selection of the columns they wish to export. This is done by
selecting “Save as Default” on the Review Shipping History Export screen. The
next time the user exports their shipping history, their default column
selections will be
Return Label Tracking Numbers to eBay
1 Click on Package Management button on the bottom
navigation and select Shipping History or the Shipping Overview navigation
under View-> View Shipping Activity.
2 Check the checkbox of all of the eBay® labels you want to update.
3
Click on UPDATE EBAY® button.
4 Check the checkbox of all of the eBay® labels you want to update.
5
Click on UPDATE button.
Chapter 13
User
Reporting
Chapter 13. User Reporting
In this chapter you will learn how to create reports on labels created
using CNSB. This functionality allows you to apply various filters such that
your report contains only the data you need.
In order to generate a report, you may navigate to the Shipping History page
and click CREATE A REPORT. You may
also select the Create a Report option from the Shipping Tools menu or the
Shipping Overview navigation under View-> View Available Shipping Tools. These
options are shown on the figures below.

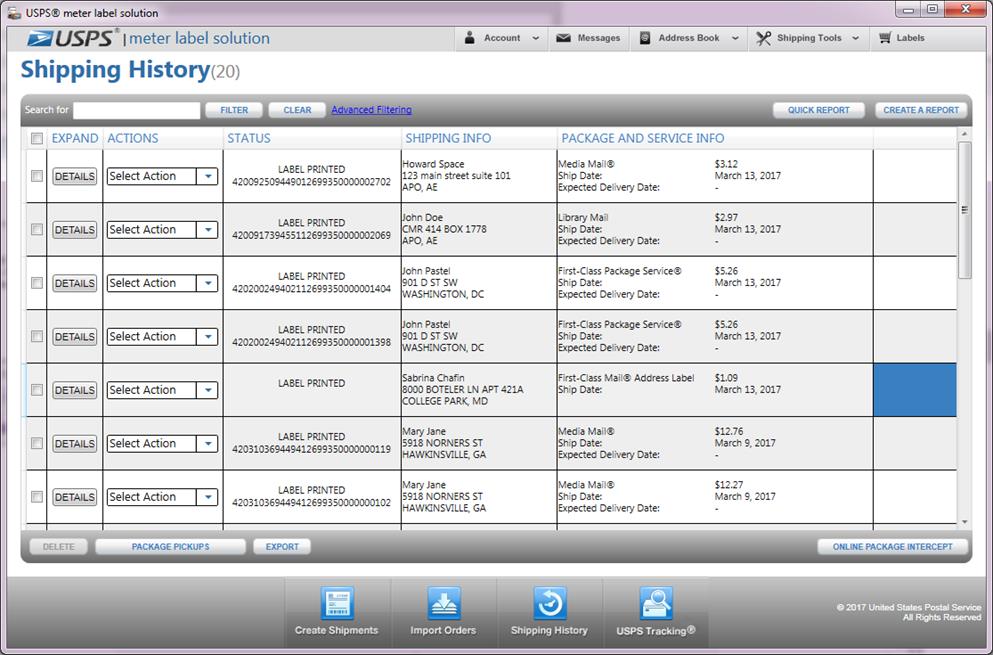

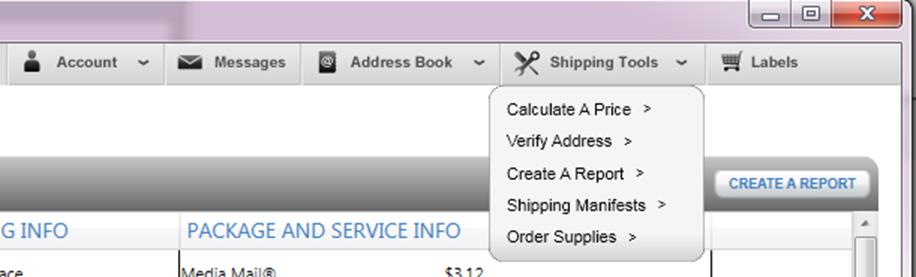

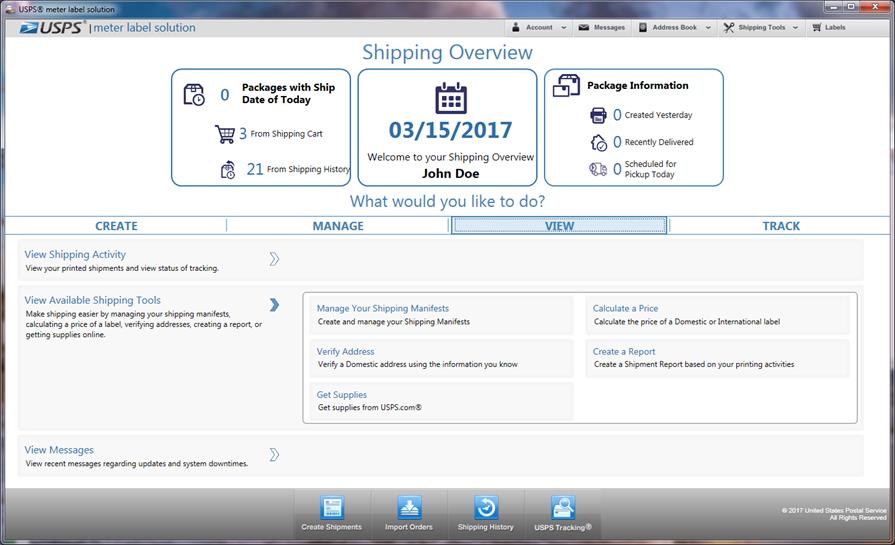
When you click the CREATE A REPORT
button from the Shipping History page or select the Create a Report option
from either the Shipping Tools menu or the
Shipping Overview navigation under View-> View Available Shipping Tools, a
Generate Report page opens displaying various options for customizing the
report you want. The figure below shows the Generate Report page.
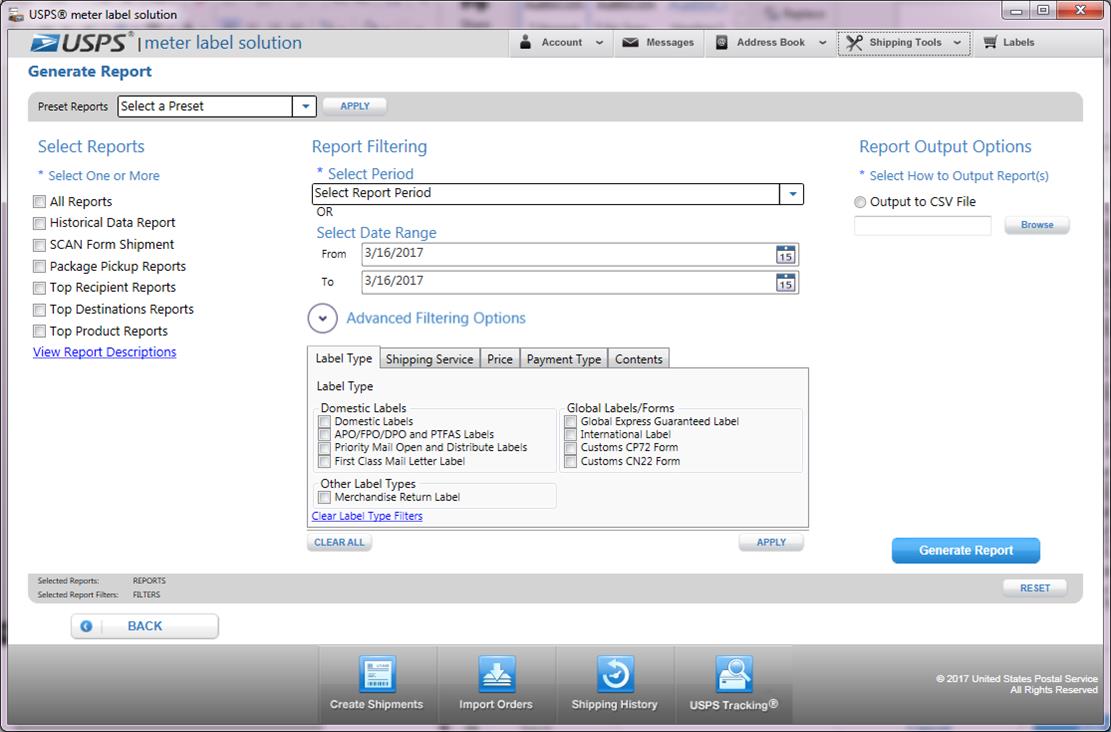
Customizing Your Report:
The Select Reports section on the Generate Report page allows you to
select the types of reports you would like to generate. For a description of
each type of report, click on the View Report Descriptions link.
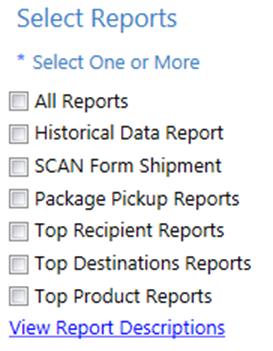
You may also apply various types of filters to limit the information in
the report only to what you need. The “Select a period” dropdown allows you to specify
how far back in the past you want the data to be from (e.g. the past 6 months).
You may also enter custom date ranges by checking the “Select a specific date
range” checkbox and entering past dates in the “From” and “To” boxes.
You may further filter the report by various criteria listed as links in
the Advanced Filtering Options list under the Report Filtering section. The
options are: by label type(s), by shipping service(s), by price, by payment
type(s), and by content type(s). You may click on these options and specify
your selection in the pop-up window that opens.
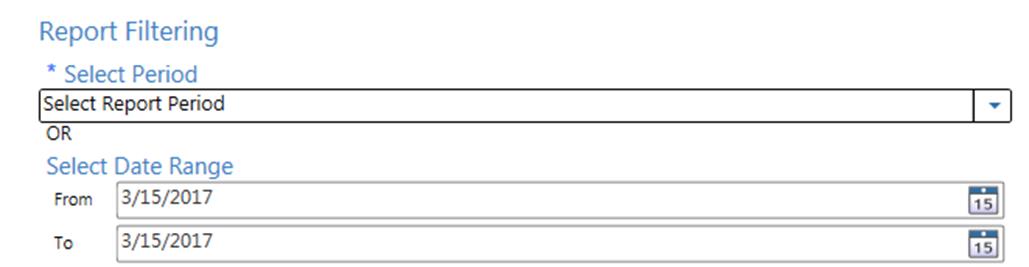
Filtering
by Label Type:
When you click on the “By Label Type(s)” link, the pop-up window below
opens displaying checkboxes for the various label types you may select as
filtering criteria. The label types are organized in three categories: Domestic
Labels, Global Labels/Forms, and Other Label Types.
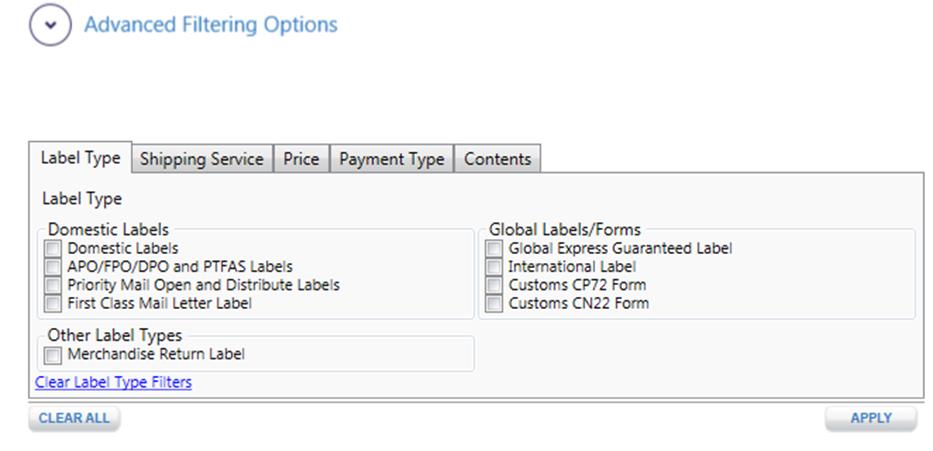
Filtering by Shipping
Service(s):
When you click on the “By Shipping Service(s)” link, the pop-up window
below opens displaying checkboxes for the various shipping service(s) you may
select as filtering criteria. The checkboxes are organized in three categories:
Products, Services, and Package Type.
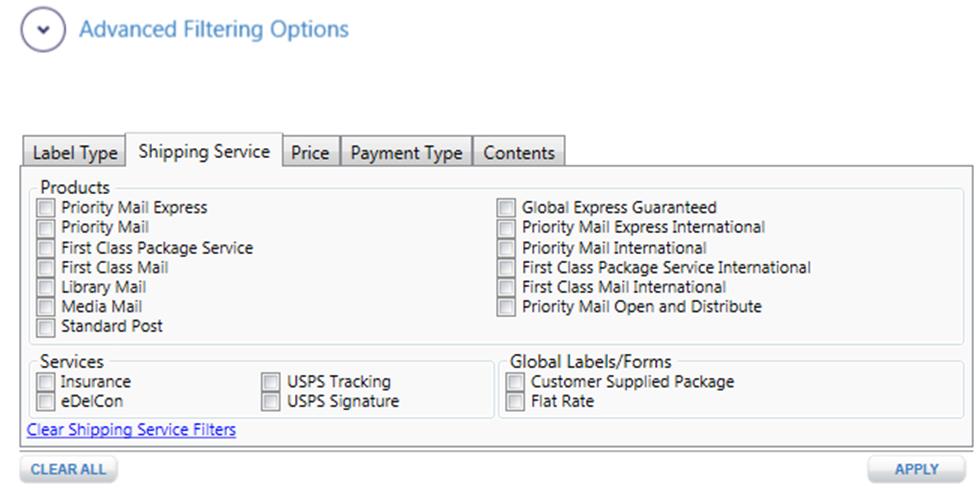
Filtering by Price:
When you click on the “By Price” link, the pop-up window below opens
displaying a dropdown that allows you to select the cost of shipping. The
“Retail” checkbox allows you to specify if it was cost was retail price. You
may also enter a custom price range by entering a minimum and maximum value in
the Minimum and Maximum fields, respectively.
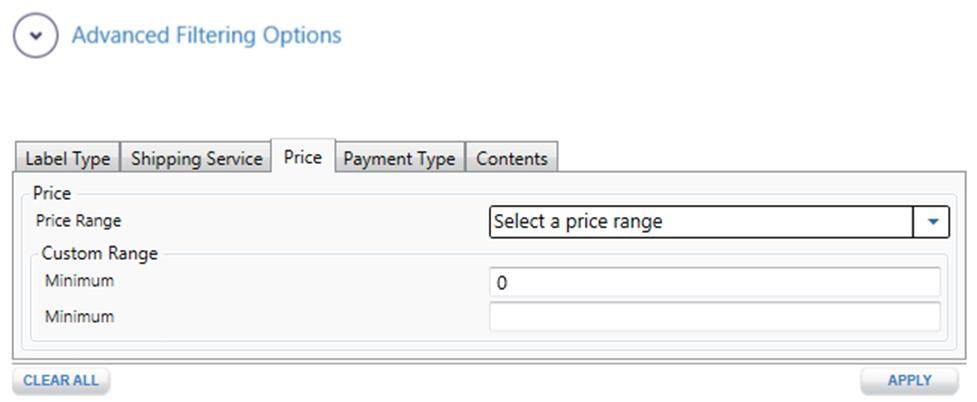
Filtering by Payment Type:
When you click on the “By Payment Type” link, the pop-up window below
opens displaying checkboxes for the various payment types you may select as
filtering criteria.
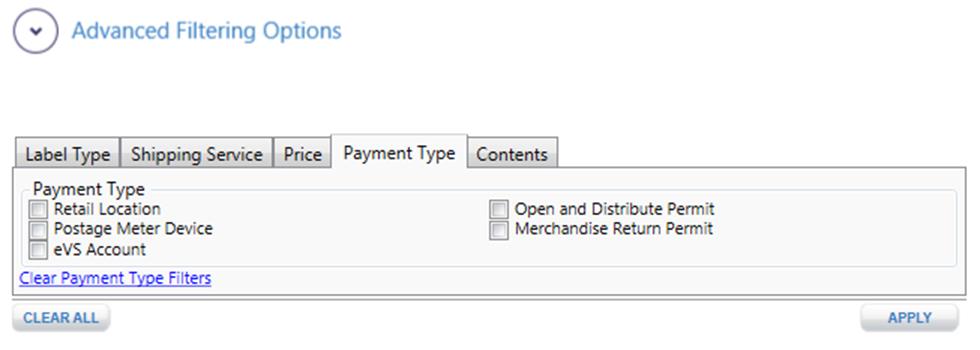
Filtering by Content Type(s):
When you click on the “By Content Type(s)” link, the pop-up window below
opens displaying checkboxes for the various content types you may select as
filtering criteria.
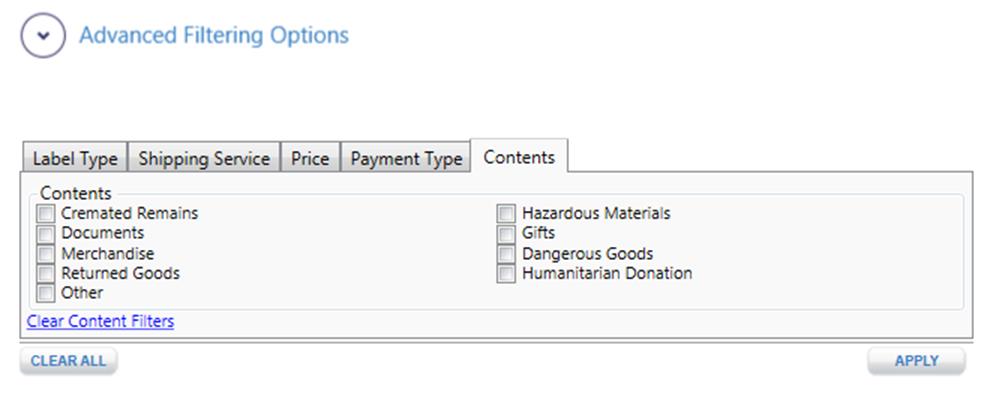
The third section on the Generate Report page, Report Output Options,
allows you to select how you want to output the information in the report. As
shown in the figure below, it allows you to output to a CSV file. If you select
the Output to CSV File option, you will need to specify the name you would like
to give the file and where you would like to save it by clicking Browse… button.
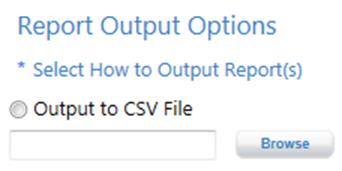
Generating the Report
Once you select your filtering options on the Generate Report page, click
on the Generate Report button.

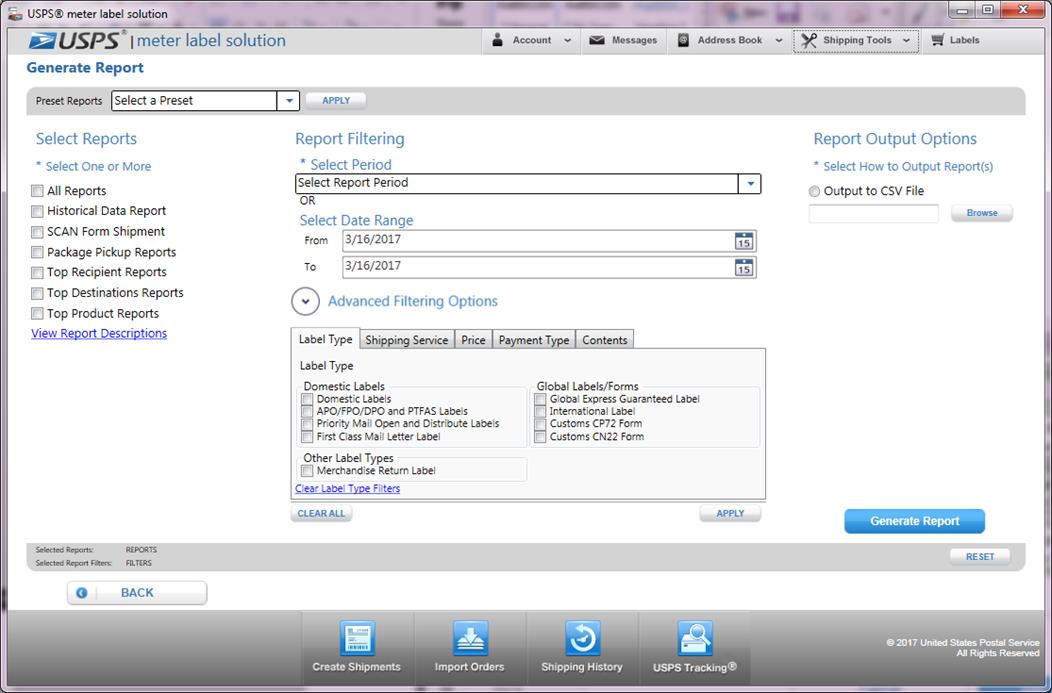
One the example above, Output to Screen was selected from the report
output options. When the Generate Report button is clicked, the report is
generated in the Report Viewer window as shown below:
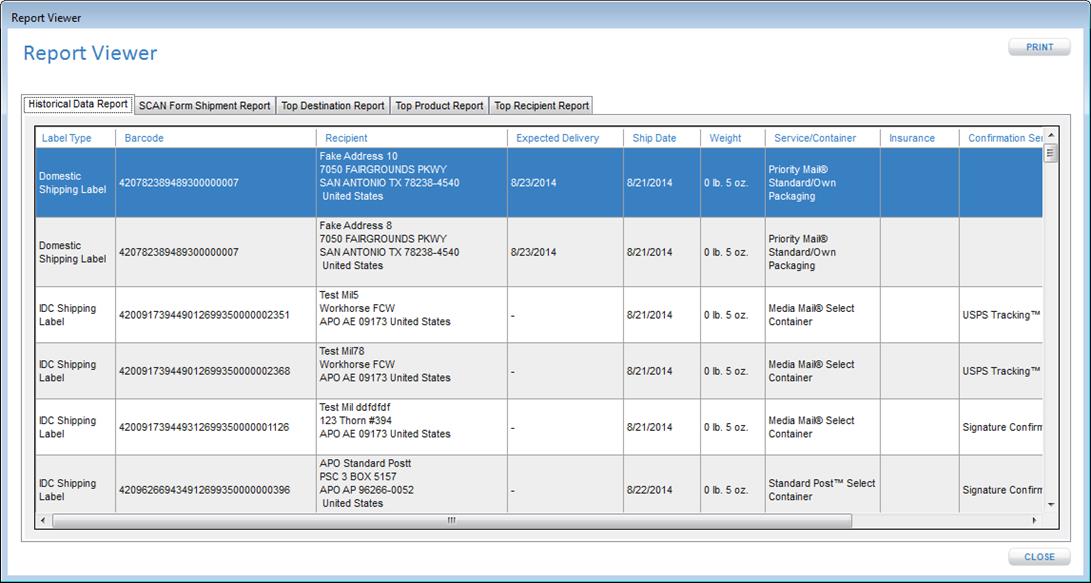
Quick Report Summary
Instead of entering filtering criteria every time, you may use the Quick Report
Summary functionality to generate a report based on filtering criteria saved in
the application preferences. The preference selections are made by clicking on
the Account tab at the top of the page and selecting Preferences from the menu
or through the Shipping Overview navigation under Manage-> Manage and Update
Account Settings. Once on the preferences page, choose Shipping History from
the list on the left and then select User Reporting tab (shown on the figure
below).
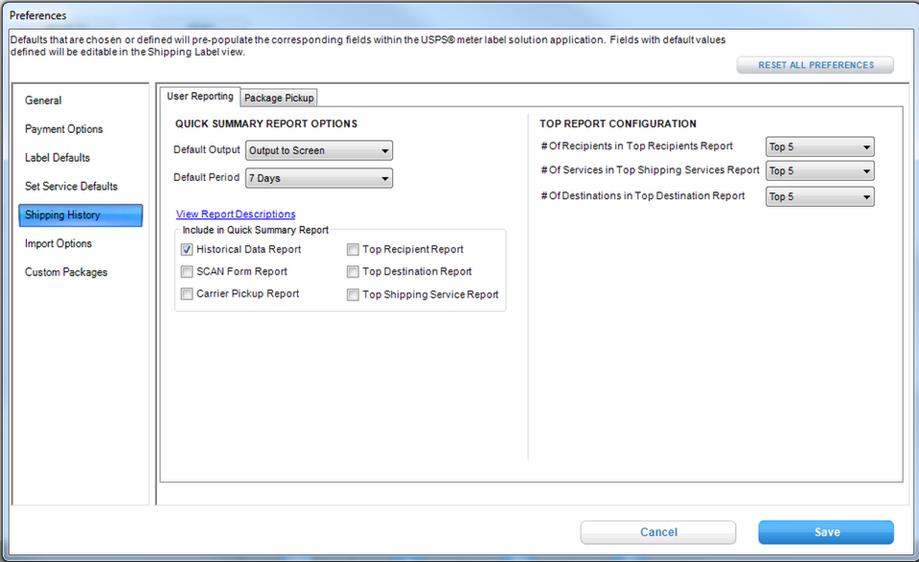
The Quick Summary Report Options selection page allows you to specify the
type(s) of report(s) you want included, the output type, and period of time to
be used by default when you generate a report using the Quick Report Summary
functionality.
To generate a report using the Quick Report Summary functionality, navigate
to the Shipping History module (located at the bottom of the page or the Shipping Overview navigation under View->
View Shipping Activitiy) and click on the Quick Report Summary button shown on
the figure below.

Chapter 14
Package Pickup
Chapter 14. Package Pickup
In this introduction to Package Pickup, you’ll learn how to do the
following:
ONLINE connection status:
·
Schedule a Package Pickup request.
·
Modify or edit a Package Pickup request.
·
Cancel a Package Pickup request.
·
Cancel and Reschedule a Package Pickup request.
Getting
Started
The purpose of the
schedule Package Pickup feature is to allow you to schedule a pickup of
packages from a designated location by a postal mail carrier, rather than having
to bring your packages to the Post Office™.
Schedule
Package Pickup
1 Click Shipping History button on the bottom navigation or the
Shipping Overview navigation under View-> View Shipping Activity.
2 Check one or more labels for next day Package Pickup. IMPORTANT:
At least one domestic Priority Mail
Express®, domestic Priority Mail®, First-Class Package Service®, First-Class Package Return® Service, Global Express Guaranteed®, Priority Mail Express International®,
Priority Mail International®, or First-Class Package International Service®
mailpiece is required in order to schedule Package Pickup. To add your First-Class
Mail® (parcel),
First-Class Package Service® and Package
Services labels to an open Package Pickup request, check the labels and click Add to Package Pickup. Note: Labels can
only be added/removed from Package Pickup upon scheduling or rescheduling.
Scheduling or Rescheduling Package Pickup does not guarantee a specified collection.
TIP
- Items bearing a Customs
2976/CN22 forms or Customs 2976-A/CP72 forms cannot be part of Package Pickup
if the item is paid with only postage stamps, the customs forms are
handwritten, the forms are not computer-generated, or for any item for which
the customs data was not electronically transmitted .
3 Click Create New Package Pickup. Note: For additional information on next day
Package Pickup view USPS.com® Package Pickup (http://www.usps.com/shipping/carrierpickup/welcome.htm) link for more details per free, next day Package
Pickup.
TIP
- To add labels to Package Pickup request,
check the label from the Shipping History table and click Add to Package Pickup. Note: Labels can only be added to/removed
from Package Pickup upon scheduling or rescheduling. Scheduling or Rescheduling
Package Pickup can only be scheduled for the next regular mail delivery day.
- To remove labels from Package Pickup,
select the label from the Packages in Package Pickup table and click Remove from Package Pickup.
- Tracking
Details is not available while in Package Pickup mode.
4 Enter the Package Pickup Address information in the Package Pickup
Details or click Open Address
Book.
5 Enter the Package Pickup location information in the Package Pickup
Details. The pickup location of the packages is associated with your next day Package
Pickup request. You may want to give further description to your carrier in the
Special Instructions section text box if Other
is selected.
6 Click Schedule Package Pickup. Once
scheduled, all packages will appear in the Shipping History table with a
confirmation number. IMPORTANT: Please
note that the collection date cannot be specified upon scheduling and
cannot be modified without rescheduling
the Package Pickup request. Collection dates are determined by the Next Scheduled Delivery Date available. Both the collection date and
confirmation number are displayed after
successfully scheduling Package Pickup.
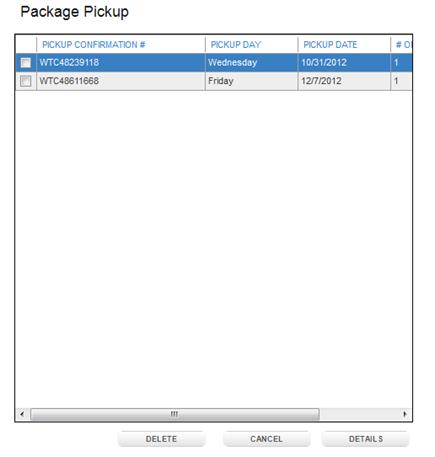
7 A Package Pickup confirmation
number for packages in your collection will
be available from the Shipping History table. Note: To hide the Package
Pickup panel, click on hide Package
Pickup
Edit
Package Pickup
1 Click Shipping History button on the bottom navigation or the
Shipping Overview navigation under View-> View Shipping Activity.
2 Click Show Package Pickups.
3 Check a scheduled Package Pickup.
4 Click Show Package Pickup Details
or right-click and click Show
Package Pickup Details.
5 Edit the PACKAGE PICKUP LOCATION
and/or SPECIAL INSTRUCTIONS information. Only the collection location and special instructions can be
changed. If you wish to add/remove packages or modify pickup address, refer to
Cancel and Reschedule Package Pickup instructions.
6 Click Modify Package Pickup. IMPORTANT: Package
Pickup requests can only be modified/cancelled prior to 2AM CST of the day of collection.
Cancel
Package Pickup
1 Click Shipping History button on the bottom navigation or the
Shipping Overview navigation under View-> View Shipping Activity.
2 Click Show Scheduled Pickups.
3 Check the Package Pickup that is to be canceled.
4 Click Cancel Package Pickup or
right click and select Cancel Package
Pickup.
5 Click Cancel from the popup
box.
6 The canceled Package Pickup request will be removed from the Scheduled Package
Pickup table. IMPORTANT: Package Pickup requests can only be
cancelled or location pickup can be modified prior to 2AM CST of the day of
pickup.
TIP
- To cancel
multiple Package Pickup requests, select the Package Pickup records and click
the Cancel Package Pickup(s) button
at the bottom of the Package Pickup screen
Cancel
and Reschedule Package Pickup
1 Click Shipping History button on the bottom navigation or the
Shipping Overview navigation under View-> View Shipping Acitivity.
2 Click Show Scheduled Pickups.
3 Check the Package Pickup request that is to be rescheduled.
4 Click Cancel Package Pickup.
5 Click the Cancel and Reschedule
from the popup box. IMPORTANT: Clicking Cancel and Reschedule does in fact first Cancel the Package Pickup
request and sets up a new Package Pickup request to be re-scheduled. Please
note that upon rescheduling a Package Pickup request, a NEW confirmation will
be created.
6 Add/Remove Packages as desired (optional).
7 Modify Package Pickup Address and/or Package Pickup Location (optional). Note: Collection address and
location will default to what is indicated in preferences and note what was
previously populated.
8 Click Schedule Package Pickup.
9 The rescheduled Package Pickup date will appear in the Package Pickup
table. IMPORTANT: Collection
date cannot be specified upon modifying Package Pickup requests. The collection
date is determined based on the Next
Scheduled Delivery Date available and will be displayed after successfully
scheduling a Package Pickup request.
Chapter 14
Shipping Tools and Track and Confirm Tool
Chapter 15. Shipping Tools and Track and Confirm Tool
In this introduction to shipping tools, you’ll learn how to do the following:
ONLINE connection status:
·
View Domestic Prices/Service Commitments and APO/FPO/DPO restrictions.
·
View International Prices/Service Commitments, international mailing
conditions, maximum
weight/dimensions allowed to a specific country, etc.
·
Track and Confirm packages printed both inside and
outside USPS® meter label solution software.
·
Conduct an Address lookup, ZIP Code™ lookup, and/or City/State lookup.
Getting
Started
With the
Address Lookup feature you can verify an address, look up a ZIP Code™ for any given city/state, or look up a city/state using any given ZIP
Code™. You can check the status of a mailing by entering a label or receipt
number using the track packages feature.
The Service Prices Calculator allows the user to compare service options,
delivery times, and prices for Domestic or International packages. All
information entered in Shipping Tools will only be maintained within a single
session.
Calculate
a Price (Domestic)
1 Click Shipping Tools upper
navigation and select Calculate a Price. You can also use the Shipping Overview
navigation to access the Calculate a Price page, under View->View Available
Shipping Tools.
2 Enter all required fields.
TIP
- Enter optional confirmation service and/or value of contents to obtain
fees associated with confirmation service and insurance respectively.
3 Click Calculate Rates.
Example: Calculate a
Price Page (Domestic)
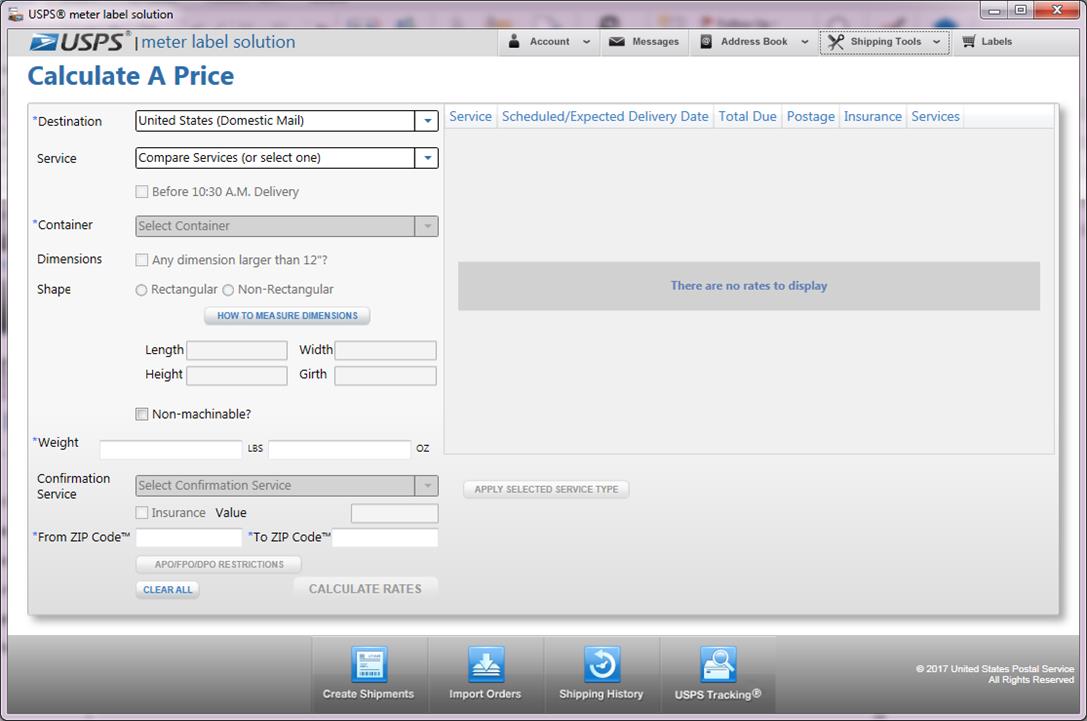
The following information is returned as you scroll over:
SERVICE: This column displays the service names that are associated with the
domestic prices.
SCHEDULED/EXPECTED DELIVERY DAYS: This column details the scheduled/expected delivery
dates and days for all services based on the Ship Date, Weight, and origin and
destination ZIP Code™(s).
TOTAL DUE: This column details the total due (i.e., LABEL TOTAL) including all
postage, fees, and insurance associated with a particular service.
POSTAGE: This column details the postage associated with a particular service.
INSURANCE: This column details the insurance fee associated with a particular
service based on the Value of Contents.
CONFIRMATION SERVICE: This column details the confirmation service fees for an online label.
Confirmation service is required when creating a domestic label via the USPS®
meter label solution application, except for Priority Mail Express® service. USPS
Tracking® is included at no additional charge when using Priority Mail® or First-Class Mail®
(parcels only) when generating your own labels via the USPS® meter label
solution application.
4 Click APO/FPO/DPO restrictions
to see mailing conditions regarding military addresses (if applicable button will be enabled). On the labels, you MUST
agree to APO/FPO/DPO restrictions prior to printing or saving this label to the
shipping cart if the Recipient address is a military address.
Calculate
a Price (International)
1 Click Shipping Tools upper
navigation and select Calculate a Price. You can also use the Shipping Overview
navigation to access the Calculate a Price page, under View->View Available
Shipping Tools.
2
Select a Destination country.
3 Enter all required fields.
TIP
- In order to view the max weight for a specific country, enter ‘1 LBS’
in the weight field and click calculate
rate. Then, scroll over to view max weight for the specific country
selected.
4 Click Calculate Rates.
Example: Calculate a Price Page (International)
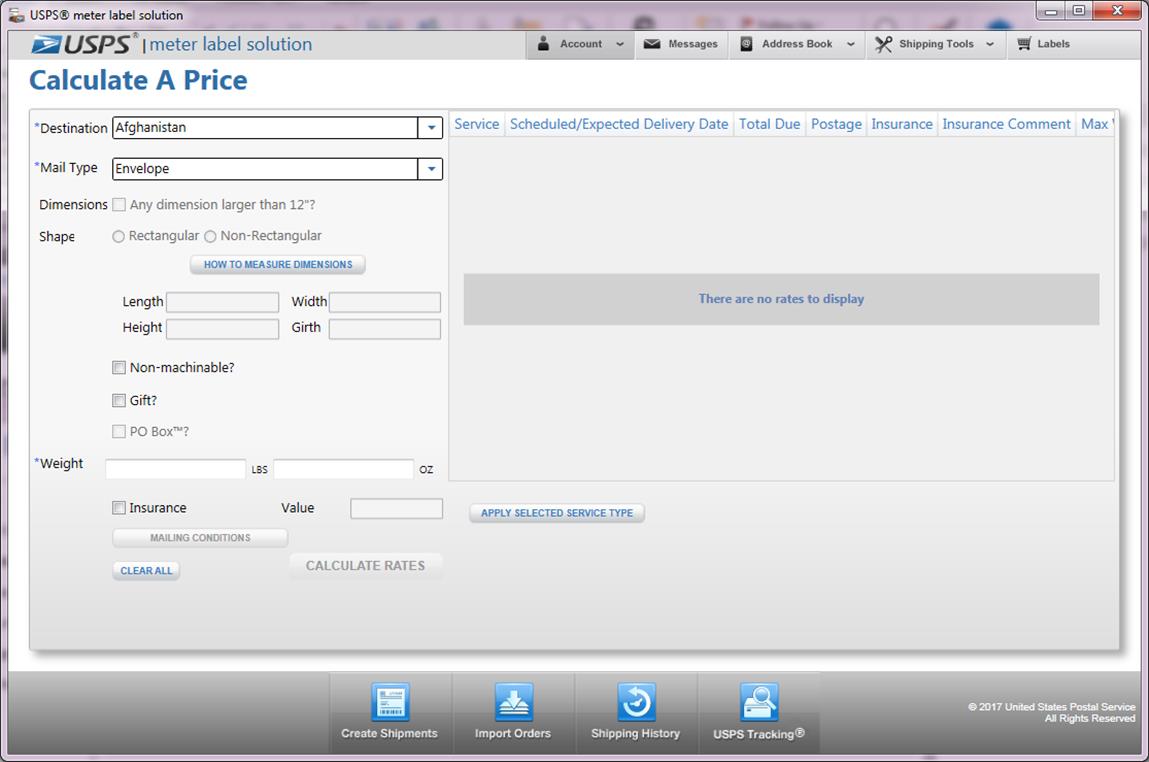
The following information is returned as you scroll over:
SERVICE: This column displays the service names associated with international prices.
SCHEDULED/EXPECTED DELIVERY DATES: This column details the scheduled/expected
delivery dates and days for services based on the Ship Date, Weight, and destination
country.
TOTAL DUE: This column details the total due (i.e., LABEL TOTAL) including all
postage and insurance associated with a particular service and the information
provided.
POSTAGE: This column details the postage associated with a particular service
and the information provided.
INSURANCE FEE: This column details the insurance fee associated with a particular
service and the information provided.
INSURANCE COMMENT: This column details the insurance details associated with a particular
service and the information provided.
MAX WEIGHT: This column details maximum package weight allowed to the specified
destination country.
DIMENSIONS: This column details maximum package dimensions allowed to specified
destination country.
ORDINARY INDEMNITY: This column details the ordinary indemnity associated with a Priority
Mail International® label. Uninsured Priority Mail International® parcels include indemnity against
loss, damage, or missing contents. Coverage is calculated based on the weight
of the parcel or the value of the contents, whichever is less. You can purchase
insured mail service if available for an additional fee. Additional insurance
limits vary by country. When international insurance is purchased, it replaces
indemnity coverage. Individual country prohibitions and restrictions apply.
Indemnity and insurance is not available for Priority Mail International Flat Rate
Envelopes or Small Flat Rate Priced Boxes.
5 Select mailing conditions to
view the required customs forms, restrictions and prohibitions for each
country. IMPORTANT:
Click Calculate to be able to access
mailing conditions. ONLINE connectivity is required.
Verify
Address
Verify/Standardize
Address
1 Click Shipping Tools upper
navigation and select Verify Address. You can also use the Shipping Overview
navigation to access the Verify Address page, under View->View Available
Shipping Tools.
2 Enter Address Information (as much as known).
3
Click Find. A validated address will be returned and
displayed in all CAPS.
Lookup a City
and State
1 Click Shipping Tools upper
navigation and select Verify Address. You can also use the Shipping Overview
navigation to access the Verify Address page, under View->View Available
Shipping Tools.
2 Enter a ZIP Code™ in Address
Information.
3
Click Find. A valid city/state will populate based on the
ZIP Code™ entered.
Lookup a ZIP
Code™
1 Click Shipping Tools upper
navigation and select Verify Address. You can also use the Shipping Overview
navigation to access the Verify Address page, under View->View Available
Shipping Tools.
2 Enter Street Address.
3 Enter a City.
4 Enter a State
5
Click Find. A valid ZIP Code™ will populate based on the Address Lookup. Note: If an Apt/Suite/Other has not been entered and is needed the system
will throw a message indicating that additional information is required for a
valid address, but will proceed to populate the correct ZIP Code™. Street Address must be provided to lookup a ZIP Code™, as multiple ZIP Code™(s) can exist for a specific city and state combination.
Track
and Confirm Tool
Track Packages
1 Click Track and Confirm Tool tab
on the lower navigation main tab or the Shipping Overview navigation under
Track.
2 Enter the Label No. or Receipt No. field. Note: There should be no spaces or dashes.
3 Click Check Status. The last USPS® delivery scan event will display. For detailed
information about the last scan event, and all scans related to your barcode(s),
click on the tracking number
hyperlink.
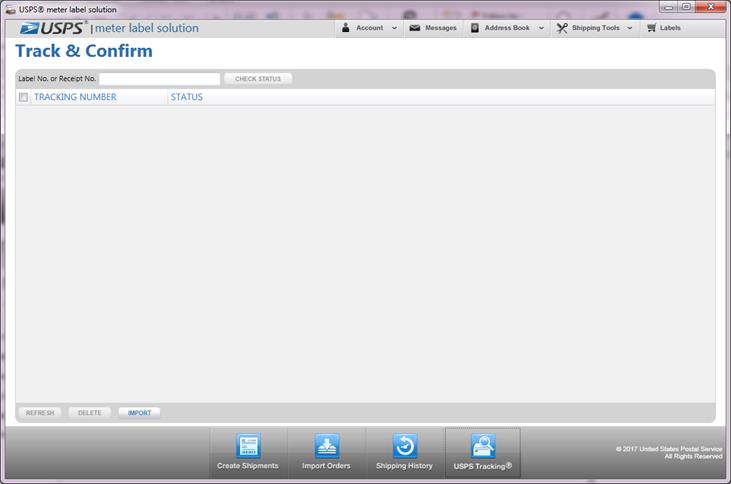
TIP
- There is no limit to the number of tracking
numbers that can be added to the track/confirm table; but all tracking numbers
will be removed upon exiting the application. Invalid tracking numbers will not
be allowed to be added to the track/confirm table. Tracking status is
auto-updated per the frequency you specify in the account preferences (Account
> Preferences > General > ‘Auto Update Tracking Information Every:’
dropdown).
4 In order to obtain the newest scan event information for tracking numbers
that already exist in the table, click Refresh.
Delete Tracking Numbers
1 Click Track and Confirm Tool tab
on the lower navigation main tab or the Shipping Overview navigation under
Track.
2 Check the records to be deleted.
3 Click Delete.
Chapter 16
Shipping Dashboard and SCAN Forms
Chapter 16.
Shipping Dashboard and SCAN Forms
In this introduction to Shipping
Dashboard and SCAN Forms, you’ll learn how to do the following:
ONLINE connection status:
·
Close out your pending SCAN Forms
ONLINE & OFFLINE connection status:
·
View your outbound shipments
·
View your pending and closed SCAN Forms
·
Open your current dashboard view preferences
·
Create new pending SCAN Form
·
Edit your pending SCAN Form
·
Add Labels to your pending SCAN Form
·
Remove Labels from your pending SCAN Form
·
Delete your pending and closed SCAN Forms
Getting Started
In this chapter you will learn how to use the Shipping Dashboard to view your
outbound shipments and manage your SCAN Forms. This Shipping Dashboard provides
you visibility into the statuses of all your outbound shipments and allow you
to do more than just create SCAN Forms at the time of checkout. While you can
still print at the time of checkout, you can now create new pending SCAN Form
from scratch, edit already created pending SCAN Forms, delete current pending
and closed SCAN Forms and close out pending SCAN Forms once completed. You can
also open the current dashboard view preferences within Shipping Dashboard
view.
In order to view the Shipping Dasboard you may:
- Click on
the Package Management button on the bottom navigation bar and select
Shipping Dashboard option which will navigate you to the Shipping
Dashboard.
- On the
Shipping Overview page, click on the View tab then select View Available
Shipping Tools option -> Shipping Dashboard.
- Click on
the Shipping Tools button on the top navigation bar and select Shipping
Dashboard option which will navigate you to the Shipping Dashboard.
View your Outbound Shipments
1
Navigate to the Shipping Dashboard from the
Shipping Overview page, Shipping Tools or via Package Management button.
2
Select the Outbound Shipments option from the
select dashboard view dropdown, it will show the summary of your outbound
shipments.
a.
NOTE: Outbound Shipments will be set up as
the default view.
3
The
Outbound Shipments datagrid will
display:
a.
SCAN Form ID
b.
Pre-Shipment
c.
Accepted
d.
In-Transit
e.
Alerts
f.
Delivered
g.
Total
4
To view packages of a certain outbound
shipment, select the hyperlinked package number under a particular status
column.
5
Shipment Details datagrid, located below the Outbound Shipments datagrid, will
display all the packages that are inside the selected outbound shipment.
6
The
Shipment Details datagrid will display:
a.
Expand
b.
Status
c.
Shipping Info
d.
Package and Service Info
TIP
-In the Shipment Details datagrid you can
check the status of your packages through a hyperlink tracking number similarly
to the way you check it in the Shipping
History page. (see Check Status of
Packages)
Open your Current
Dashboard View Preferences – Outbound Shipments
Once inside the
Outbound Shipments dashboard view you can open up Shipping Dashboard
preferences page from there
1
Navigate to the Shipping Dashboard from the Shipping
Overview page, Shipping Tools or via Package Management button.
2
Select the Outbound Shipments option from the
select dashboard view dropdown.
a.
NOTE: Outbound Shipments will be set up as
the default view.
3
Click on Dashboard Preferences button
View your Pending
SCAN Forms
1 Navigate to the Shipping Dashboard from the
Shipping Overview page, Shipping Tools or via Package Management button.
2 Select the Pending SCAN Forms option from the
select dashboard view dropdown, it will a list of all your pending SCAN Forms.
a. NOTE: Outbound Shipments will be set up as
the default view.
3 The Pending datagrid will display:
a. SCAN Form Name
b. Shipment Date
c. Creation Date
4 To view labels of a certain pending SCAN Form,
select the checkbox of the pending SCAN Form you want to view.
5 Selected Pending SCAN Form Labels
Preview datagrid, located below the Pending datagrid, will display all the labels that are inside the
selected pending SCAN Form.
6 The Selected Pending SCAN Form
Labels Preview datagrid will display:
e.
Status
f.
Shipping Info
g.
Package Service Info
Open your Current
Dashboard View Preferences – Pending SCAN Forms
Once inside the
Pending SCAN Forms dashboard view you can open up SCAN Forms preferences page
from there
1
Navigate to the Shipping Dashboard from the
Shipping Overview page, Shipping Tools or via Package Management button.
2
Select the Pending SCAN Forms option from the
select dashboard view dropdown.
a. NOTE: Outbound Shipments will be set up as
the default view.
3
Click on SCAN Forms Preferences button
Create New Pending SCAN Form
Once inside the
Pending datagrid you can create a new pending SCAN Form:
1
Click on Create New Pending SCAN Form button.
2
A list of compatible labels will appear
in the first datagrid for you to add to your pending SCAN Form.

3
Select label(s) from the upper datagrid and click Add Labels button.
IMPORTANT: Labels are required to share the same
Ship Date and From ZIP Code™. If the labels selected do not meet these
conditions, an error message will display

4
The label selected will be added to the
SCAN Form Labels (lower) datagrid.
5
Click Save once you have added all the labels you
want to the pending SCAN Form. A pop-up window will appear showing that the pending
SCAN Form was saved and given a SCAN Form name.

The SCAN Form
Name consist of:
·
From ZIP Code™
·
Date and Time it was created for a total of 11-12 digits
·
Payment Type
Add Labels to your Pending SCAN Form
1
Select a pending SCAN Form from the Pending datagrid to see all
the labels in the pending SCAN Form.
2
Click on Edit Pending SCAN Form button and the Edit Pending SCAN Form
page will display.

TIP
- In Edit
Pending SCAN Form page you can add labels to your pending SCAN Form while
viewing the pending SCAN Form information.
-Pending SCAN
Form Info:
-Shipment
Date
-# Labels
-Label Types
-Creation Date
- In
the Pending SCAN Forms Labels (upper)
datagrid you can view all your labels currently in the selected pending SCAN
Form.
-Select
labels from the datagrid below the SCAN Form Labels datagrid.
-Click
Add Labels button when you have selected all the labels you want to add to
the selected SCAN Form. 
3
Click Update button before leaving the page to make
sure your changes are saved. A pop-up window will appear showing that the pending
SCAN Form was updated.
Remove Labels from your Pending SCAN Form
Removing labels can be done
from a number of different places in the Shipping Dashboard, when adding labels
in the Edit Pending SCAN Form page and when creating a new pending SCAN Form.
Removing Labels from the Edit Pending SCAN Form Page
When you are adding labels to a pending SCAN Form you may
find that you do not want the labels you just added or that you see a label
already in the pendng SCAN Form that you no longer want.
1 Select the Pending SCAN Forms dashboard view in dropdown in the
Shipping Dashboard.
2 Select a pending SCAN Form in the pending
datagrid.
3 Click on Edit Pending SCAN Form button
4 Select a label(s) from the SCAN Form Labels datagrid
5 Click Remove Labels button
6 Click Update button to save your changes.
Removing Labels
when Creating a New Pending SCAN Form
1 Select the Pending SCAN Forms dashboard view in dropdown in the
Shipping Dashboard.
2 Select a pending SCAN Form.
3 Click on Create New Pending SCAN Form button
4 Click Remove Labels button once you have added at least
one label to the SCAN Form Labels datagrid.
5 Click Save button when you are ready to create
the pending SCAN Form.
TIP
- At anytime
you can get back to the Pending SCAN Forms view by clicking on the Back to Pending SCAN Forms button.
Deleting SCAN Form(s) can be useful if you started to
create SCAN Form(s) and the order was cancelled or no longer needed.
1 Select the Pending SCAN Forms dashboard view in dropdown in the
Shipping Dashboard.
2 Select your pending SCAN Form(s) from the
pending datagrid
3 Click on Delete Pending SCAN Forms button.
4 Click Yes on the pop-up window to complete the
removal of the SCAN Form(s).
Close Out your Pending SCAN Forms
Closing out your pending
SCAN Form(s) means that you have made all changes needed and want to print out
the pending SCAN Form(s) to prepare for shipment. There are two ways to close
out your pending SCAN Form(s), the first is manually, by clicking on the Close Out Pending SCAN Forms button and
the second is done automatically by the application at the end of day, which is
at 12:00 AM CT.
Manual Close Out
Pending SCAN Forms
1 Select your pending SCAN Form(s) from the Pending datagrid in the Pending SCAN Forms dashboard view.
2 Click on Close Out Pending SCAN Forms button
3 Click Yes button to close the pending SCAN Form(s) when
the Close Out Pending SCAN Forms pop-up
window appears.
4 In order to close out, the pending SCAN Form(s) must have a shipdate of the
current date or a future date.
5 Once the application verifies the pending SCAN Form(s) can be closed:
a.
If one pending SCAN Form was selected
for close, it will be printed.
b.
If more than one pending SCAN Form was
selected, the SCAN Forms will be closed and the SCAN Form can be printed from
the Shipping History (see Re-Create PS Form 5630, Confirmation Services Certification, (SCAN Form)).
6 The pending SCAN Form(s) will then be moved to the Closed datagrid in the Closed
SCAN Forms dashboard view and have a status of Closed.

Auto Close Out (Need
to update Screenshots)
1 The application will automatically close out all pending SCAN Forms with
a shipdate that matches the current date at 12:00 AM CT daily.
Note: the application will perform the
Auto Close Out
2 Click OK button when the pop-up window appears.
3 If there is a minute of idle time, the application will proceed to close
out the pending SCAN Forms.
4 Once the application verifies the pending SCAN Forms can be closed, the
pending SCAN Forms can be printed from
the Shipping History (see Re-Create PS Form 5630, Confirmation Services Certification, (SCAN Form)).
5 The pending SCAN Forms will then be moved to the Closed datagrid in the Closed
SCAN Forms dashboard view and have a status of Auto-Closed.

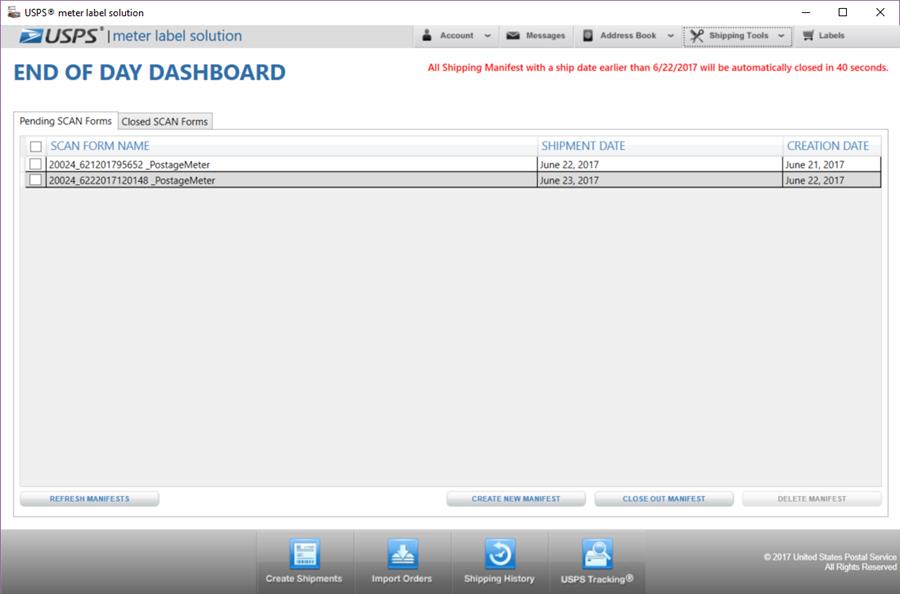
TIP
- If you
attempt to exit the application before auto-close out occurs and there are
pending SCAN Forms to close, a pop-up window will appears: Would you like to close all pending SCAN Forms with today’s shipdate
now?
1. If you Click Yes button, the application will close all pending SCAN Forms
with today’s shipdate and exit the application.
2. If you Click No button, the application will exit without closing the
pending SCAN Forms with today’s shipdate.
NOTE: If you do this and do not log
back into the application before 12:00 AM CT, the pending SCAN Forms will
Auto-Close once the application is relaunched.
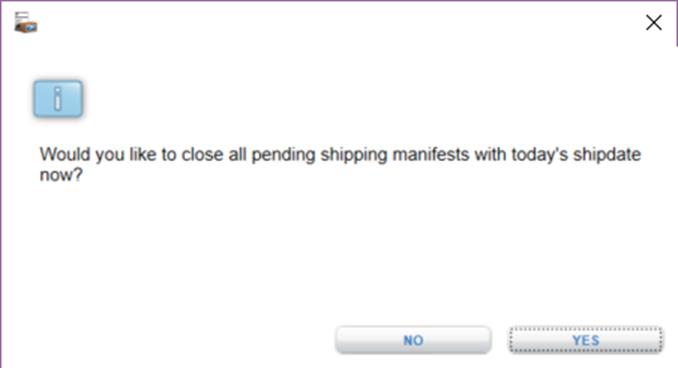
View your Closed SCAN
Forms
1
Navigate to the Shipping Dashboard from the Shipping Overview page, Shipping
Tools or via Package Management button.
2
Select the Closed SCAN Forms dashboard view from the dropdown if it isn’t the
default view, it will show a list of all your closed SCAN Forms.
3
The
Closed datagrid will display:
a.
SCAN Form Name
b.
Status
c.
Shipment Date
d.
Creation Date
4
To view labels of a certain closed SCAN Form, select the checkbox of the closed
SCAN Form you want to view.
5
Selected Closed SCAN Form Labels Preview datagrid, located below the Closed
datagrid, will display all the labels that are inside the selected closed SCAN
Form.
6
The
Selected Closed SCAN Form Labels Preview datagrid will display:
a.
Status
b.
Shipping Info
c.
Package Service Info
Open your Current Dashboard View Preferences
– Closed SCAN Forms
Once inside the Closed SCAN Forms dashboard view you can
open up SCAN Forms preferences page from there
1
Select the Closed SCAN Forms dashboard view from the dropdown if it isn’t the
default view
2
Click on SCAN Forms
Preferences button
Deleting SCAN Form(s) can be useful to remove the SCAN
Form(s) that are closed.
1 Select the Closed SCAN Forms dashboard view in dropdown in the
Shipping Dashboard.
2 Select your closed SCAN Form(s) from the
closed datagrid
3 Click on the Delete Closed SCAN Forms button.
4 Click Yes button on the pop-up window to
complete the removal of the closed SCAN Form(s).
Chapter 17
Preferences
Chapter 17. Preferences
In this introduction to preferences, you’ll learn how to do the
following:
ONLINE & OFFLINE connection status:
·
Save your preferences
·
Create multiple profiles of preferences
·
Restore default preferences
Getting Started
The Preferences
section allows you to set the most often re-used fields when creating Domestic
Label, International Label, Customs 2976/CN22 Form, Customs 2976-A/CP72 Form,
Electronic Merchandise Return Label, Open and Distribute™ Label, or APO/FPO/DPO and Possessions, Territories and Freely Associated
States (PTFAS) Label. Your preferences will automatically populate the selected
fields every time you launch USPS® meter label solution software. In addition,
default view of the USPS® meter label solution application upon launching, default
view for the Shipping Dashboard, default values for when creating Package
Pickup, and much more can also be set in preferences. A profile of preferences
can be created one at a time for each sender address specified in the labels at
any given time.
Save Your Preferences
1 Click Account in and upper
navigation and then click on the Preferences
option. You can also access the Preferences option through the Shipping
Overview navigation, under Manage-> Manage and Update Account Settings.
2 Click General (default).
·
The address currently selected as the
default Sender address displays on the summary tab. This indicates the profile
preferences that can currently be saved.
TIP Multiple
Profiles for Preferences
- To create a new
profile of preferences for a different address, first edit sender address and then return to these instructions.
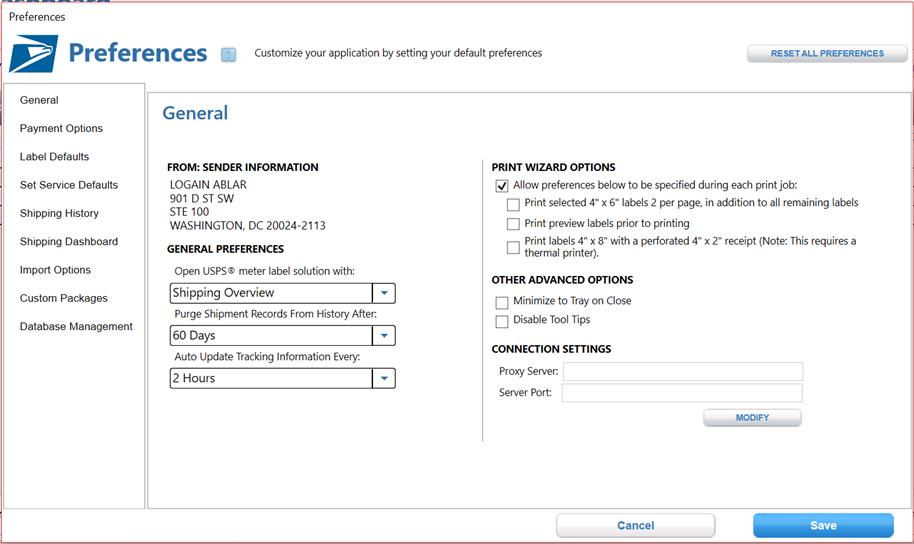
3 Select a page from the open USPS®
meter label solution application with dropdown to display upon launching
the application.
4 Enter Connection Preferences. For
more details on how set connection settings, refer to Modify Connection Settings section.
·
Select General Preferences.PURGE FROM
HISTORY AFTER: 60, 90, 120 days,
or hold indefinitely, represent the number of days you wish to keep old
printed labels in Shipping History. If 120 days is selected, labels that were
printed more than 120 days ago and Package Pickup(s) whose collection dates
were more than 120 days ago will automatically be permanently deleted upon
launching the USPS® meter label solution application. Once these labels/Package
Pickup records are deleted, they cannot be retrieved. IMPORTANT: Information deleted or purged from Shipping
History cannot be retrieved. If you wish to save your historical information
outside of Click-N-Ship® for Business, copy
the information displayed in the Shipping History table and paste into a
Microsoft Excel or click on the ‘export results’ button in Shipping History.
·
TRACKING
INFORMATION AUTO UPDATE FREQUENCY: the “Auto Update Tracking Information Every:” dropdown
allows you to select the frequency with which you would like the tracking
information for your shipment to be updated. This applies only to labels
printed within the last 30 days.
·
PRINT WIZARD
OPTIONS: These checkboxes allow you to indicate enhanced print preferences when
printing labels from the Shipping Cart. These items include: ability to print
select labels 2 per page (4x6), ability to print preview print jobs prior to
sending to printer, and print a 4X2 receipt on 4X8 stock.
·
OTHER ADVANCED
OPTIONS: This section allows you to change the preference to use the X button to completely exit the USPS®
meter label solution application or turn off Tooltips.
5 Click Payment Options.
6 Click on the Payment Default dropdown and select a payment option (Note:
Only enabled options shall appear in the dropdown).

7 Click Label Defaults.
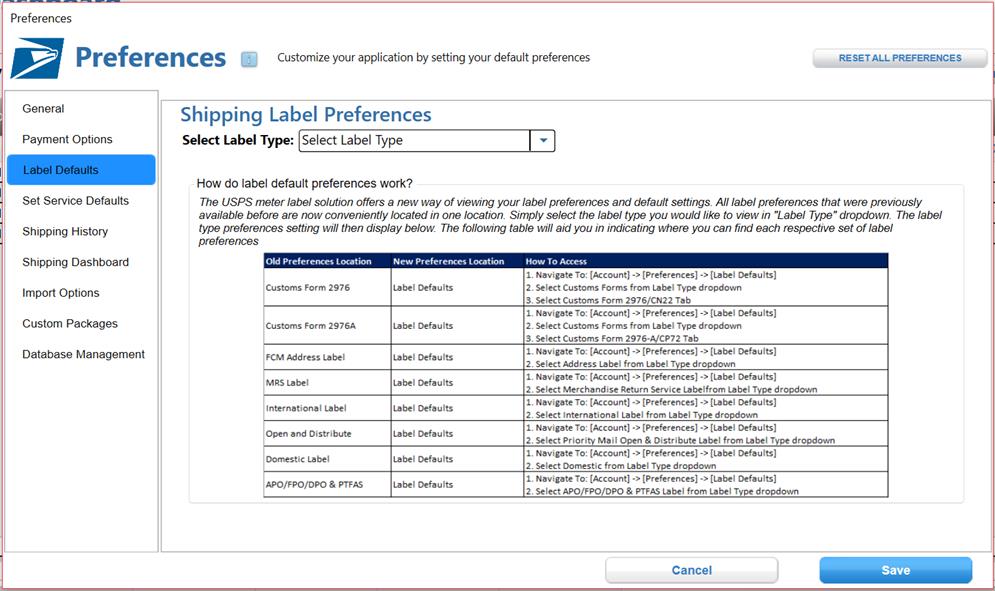
TIP
- The
USPS meter label solution has introduced a new way of viewing your label
preferences. All your label preferences and configurations that have been saved
will be conveniently carried over for you for your previous version(s) of the
application. You can find your label defaults by selecting the Label Defaults
preference option. Then, simply select the label type you would like to view in
the "Label Type" dropdown above. The label type preference settings
that you select will display below. The table above indicates where you can
find each respective set of label preferences.
8 Select Domestic Label from Label Type dropdown.
9 Enter Default Domestic Package
Details.
10 Enter Default Domestic Package
Options.
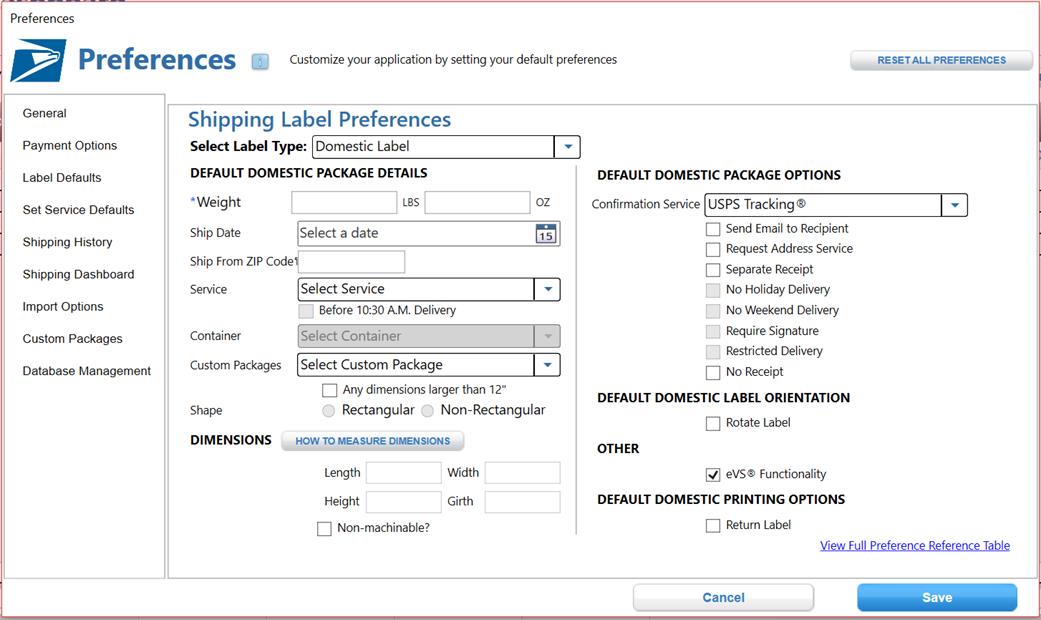
11 Select International Label
from Label Type dropdown.
12 Enter Default International Package
Details.
13 Enter Default International Content
Details.
14 Enter Default International Package
Options.
15 Select APO/FPO/DPO & PTFAS
from Label Type dropdown.
16 Enter Default Package Details.
17 Enter Default Package Options.
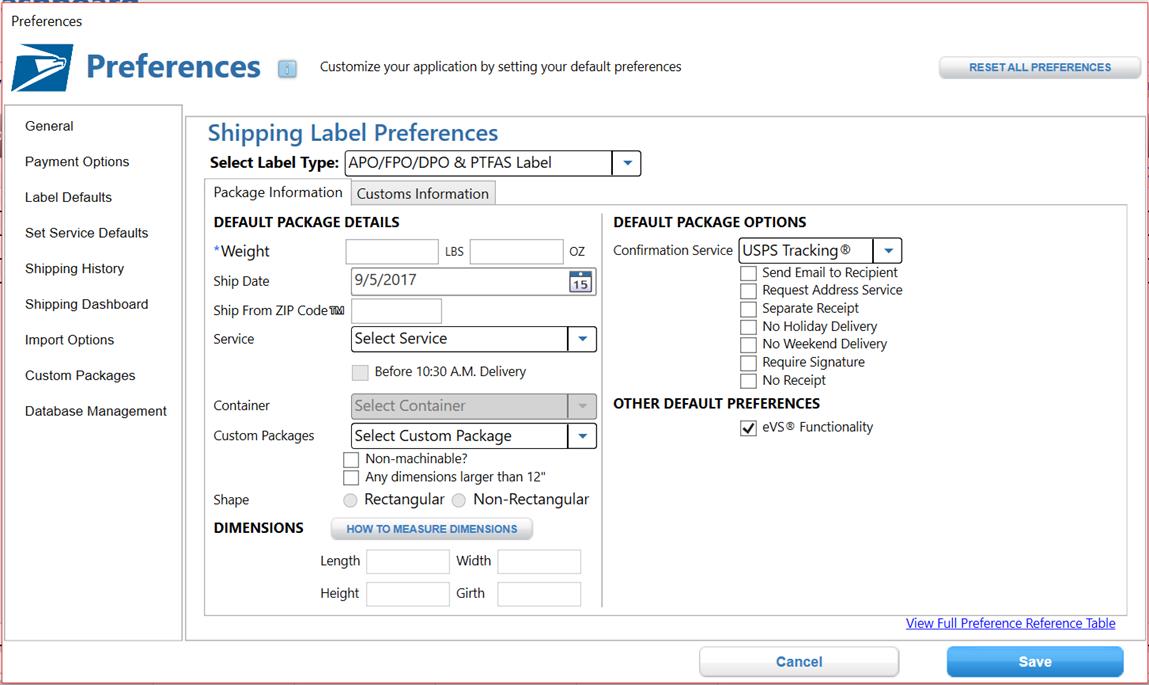
18 Click on Customs Information tab.
19 Enter Default Customs Information Package
Details.
20 Enter Default Customs Information
Content Details.
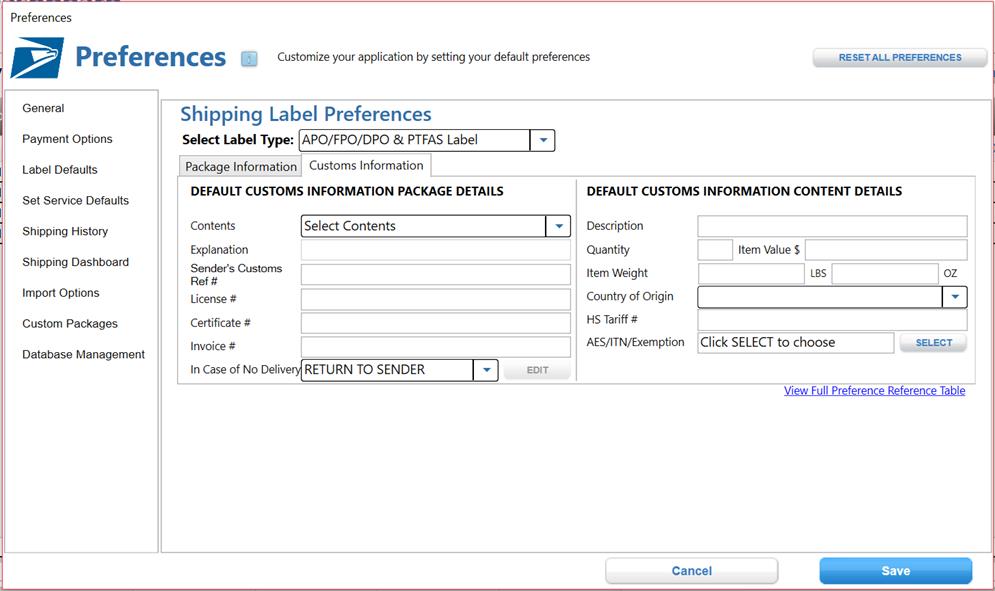
21 Select Priority Mail Open &
Distribute™ Label from Label Type dropdown.
22
Enter Default Open and Distribute™ Package Details.
23
Enter Default Open and Distribute™ Package Options.
24 Select Merchandise Return Service Label
from Label Type dropdown.
25 Enter Default Retailer Information.
26
Enter Default MRS Label PDU
Information.
27
Enter Default MRS Label Package
Details.
28 Enter Default MRS Label Service Options.
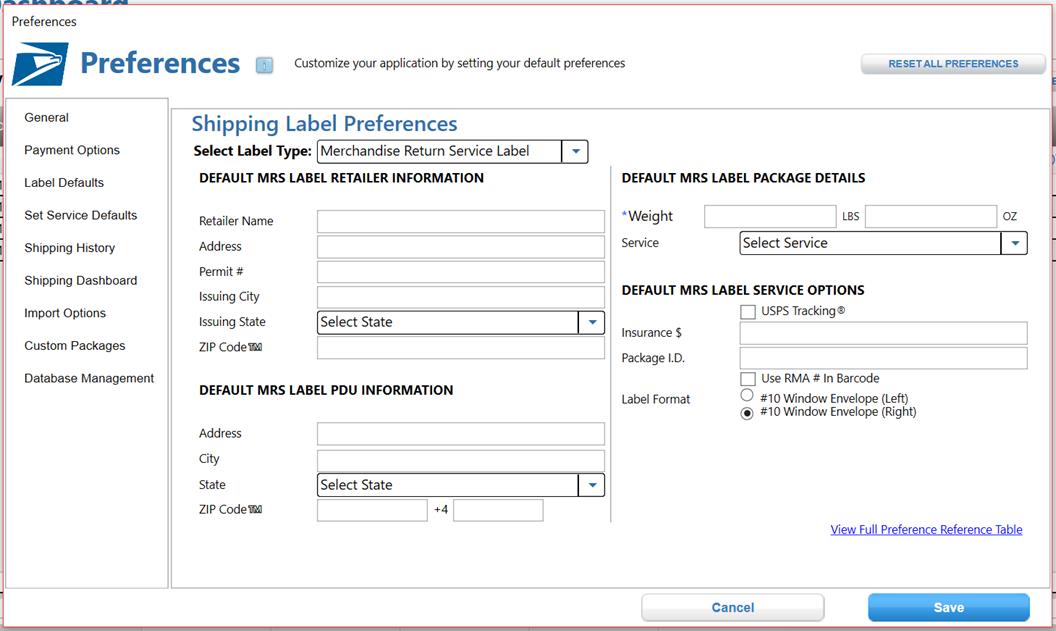
29 Select Address Label from Label
Type dropdown.
30 Enter Default Stock Type.
31 Select Default Label Information.
32 Select Customs Forms from
Label Type dropdown.
33 Click on Customs Form 2976-A/CP72 tab.
34 Enter Default Customs Form 2976A
Package Details.
35 Select Default Customs Form 2976A Content
Details.
36 Select Default Customs Form 2976A
Destination Options.
37 Click on Customs Form 2976/CN22 tab.
38 Enter Default Customs Form 2976
Package Details.
39 Select Default Customs Form 2976
Content Details.
40 Select Default Customs Form 2976
Destination Options.
41 Click Set Service Defaults.

TIP
- The
USPS® meter label solution will offer a new feature which allows customers to
specify what USPS® services and containers options are available to them when
creating labels. Using this new feature you are now able to customize your
USPS® meter label solution, enabling you to work more efficiently and
effectively when processing shipments.
42 Select Domestic Label from
Label Type dropdown.
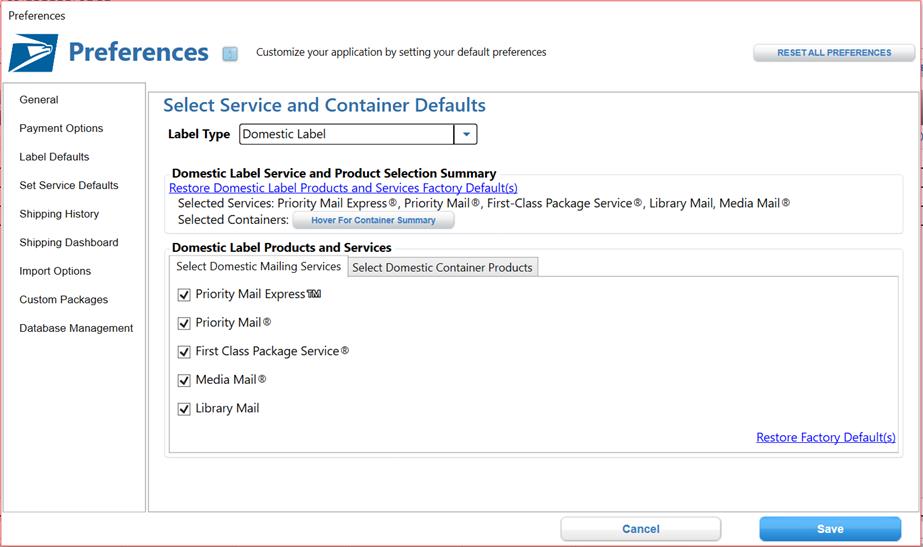
43 Select International Label
from Label Type dropdown.
44 Select APO/FPO/DPO & PTFAS
Label from Label Type dropdown.
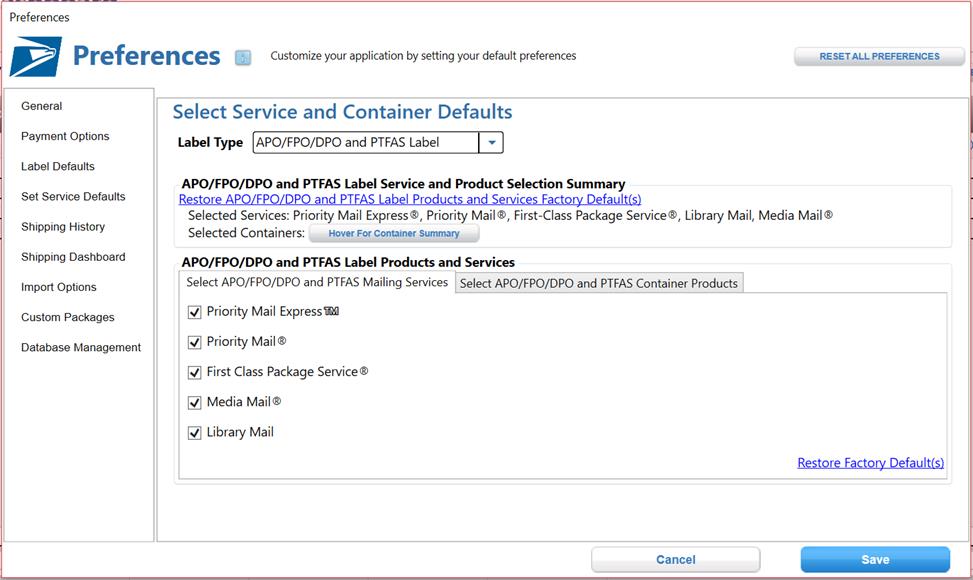
45 Click Shipping History.
46 Click on User Reporting tab.
47 Enter Quick Summary Report Options.
48 Enter Top Report Configuration.

49 Click on Package Pickup tab.
50 Enter Package Pickup Preferences.
51 Click Shipping Dashboard.
52 Click on Shipping Dashboard
tab.
53 Select Default View
·
OUTBOUND:
Outbound Shipments, Pending SCAN Forms, or Closed SCAN Forms, represent the
different dashboard views to be shown first each time you visit the Shipping
Dashboard.
54 Click on SCAN Forms tab.
55 Select Purge Options
56 Select Reset Reminders you
would like to be shown
·
PURGE EXPIRED
SCAN FORM RECORDS FROM HISTORY AFTER: 60, 90, 120 days,
or hold indefinitely, represent the number of days you wish to keep SCAN
Form with a status of “Auto-Closed” in the Closed SCAN Forms view in the
Shipping Dashboard. If 120 days is selected, “Auto-Closed” SCAN Forms more than
120 days ago will automatically be permanently deleted upon launching the USPS®
meter label solution application. Once these “Auto-Closed” SCAN Form records
are deleted, they cannot be retrieved. IMPORTANT:
Information deleted or purged from Shipping Dashboard cannot be retrieved.
·
PURGE CLOSED
SCAN FORM RECORDS FROM HISTORY AFTER: 60, 90, 120 days,
or hold indefinitely, represent the number of days you wish to keep SCAN
Form with a status of “Closed” in the Closed SCAN Forms view in the Shipping Dashboard.
If 120 days is selected, “Closed” SCAN Forms more than 120 days ago will
automatically be permanently deleted upon launching the USPS® meter label
solution application. Once these “Closed” SCAN Form records are deleted, they
cannot be retrieved. IMPORTANT:
Information deleted or purged from Shipping Dashboard cannot be retrieved.
·
RESET
REMINDERS: This section allows you to turn off confirmation pop-up windows
57 Click Import Options.
58 Setup/Edit or Delete Imports on the Import
Management tab
59 Delete or view Import Mappings 
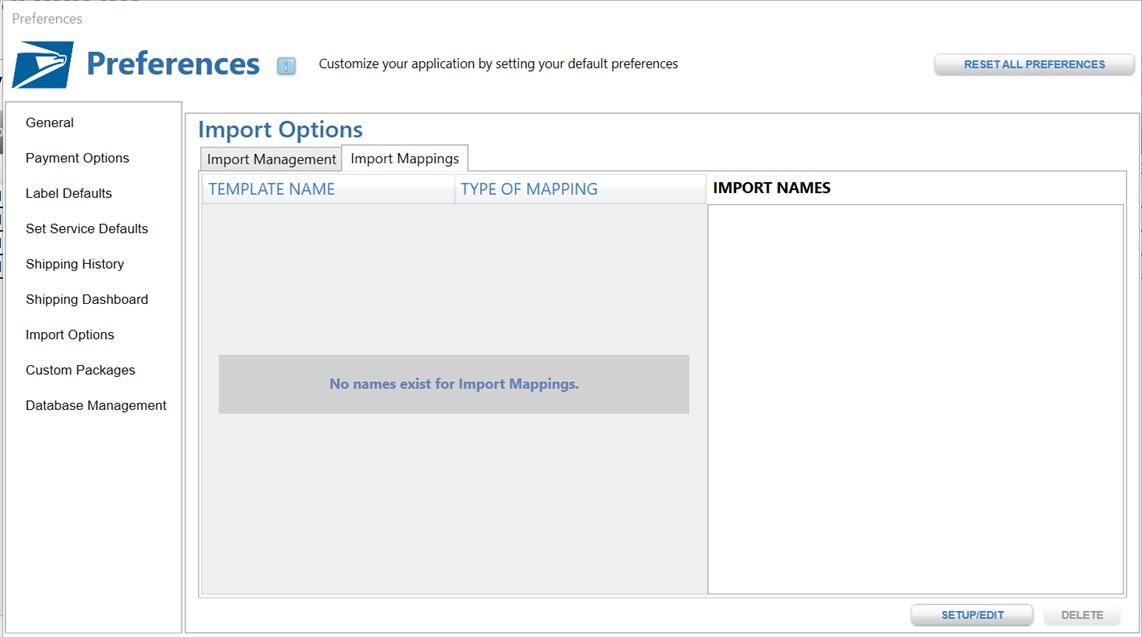
60 Click Custom Packages.
61 Enter a custom package name.
62 Enter Length, Width, Height and Girth.
63 Click Save.
64 View message that indicates that all preferences will take effect upon
creating the next shipping label. Click OK.
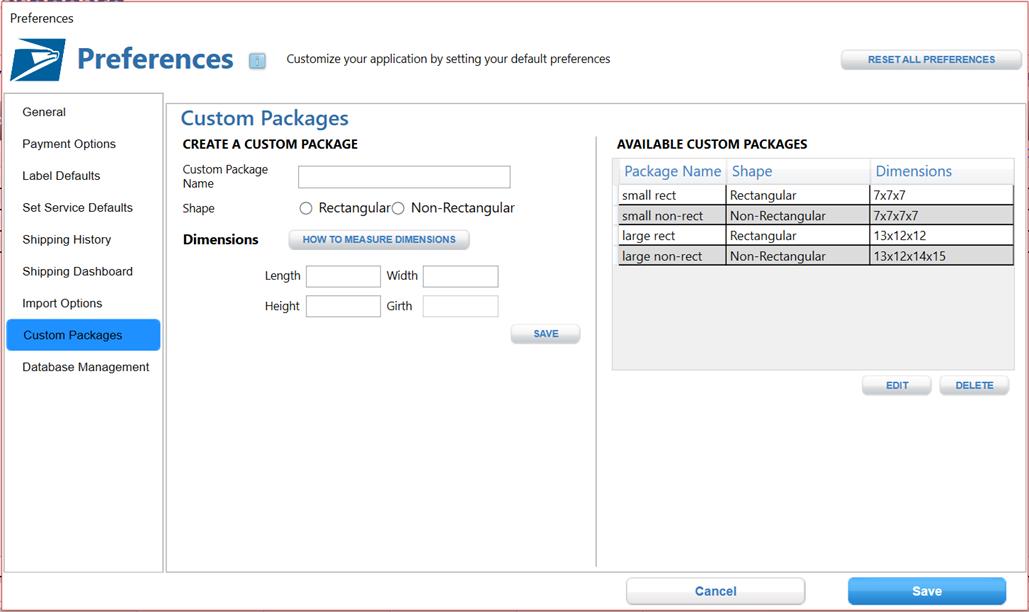
TIP
- In order to
have preferences take effect immediately, either click Clear All Label Fields button on the shipping label form or Clear button on Package Pickup or
simply exit and re-launch the application. This was done in order to prevent
the user from losing currently stored shipping label information.
65 Click Database Management.
66 Click Configure New Data Source to create new data source.
67 Click Modify Current Mapping to modify your current data source mapping.
68 Click Modify Default Mapping to modify your default data source mapping.
69 Click Delete Data Source to delete your existing data souce.
70 Click Delete Database to delete your existing database.
71 Click Delete Mapping to delete your existing mapping.
72 Click Set As Default Configuration to set new changes as default
configuration.
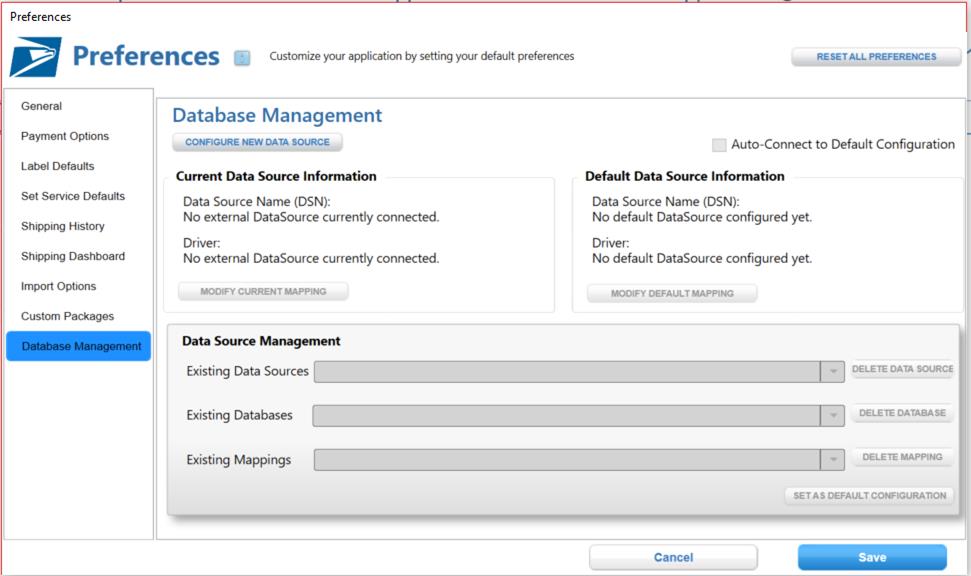
Restore Default Preferences
1 Click Account in and upper
navigation and then click on the Preferences
option. You can also access the Preferences option through the Shipping
Overview navigation, under Manage-> Manage and Update Account Settings.
2 Click Reset All Preferences. Preferences
in all of the tabs for the specified Sender address indicated on the Summary
tab will automatically be reset to their original settings that took effect
upon original installation.
3 Click Save.
4 View message that indicates that all preferences will take effect upon
creating the next shipping label. Click OK.
TIP
- In order to
have preferences take effect immediately, either click Clear All Label Fields button on the shipping labels form or Clear button on Package Pickup or
simply exit and re-launch the application. This was done in order to prevent
the user losing currently stored shipping label information.
Chapter 18
Help
Chapter 18. Help
Click Help to view full instructions for USPS®
meter label solution software.
1
Click Account - Help option on the upper navigation or use the Shipping Overview navigation, the Help
page will be under Manage-> Manage
and Update Account Settings.
Use the following tabs to find
information easier:
CONTENTS: The contents tab allows you to click on keywords in order to easily
reference quick instructions related to a specific area of the application.
INDEX: Allows you to
type in a keyword and conducts a search based on the content keywords defined.
SEARCH: Allows you to type in a keyword and search ALL content in the Help file
in order to find any information related to the keyword entered. Under Options
> Search Highlight On will allow you to easily find the keyword that was
entered within each related module.
Chapter 19
About
Chapter 19.
About
Click Account - About or or use the Shipping Overview navigation under Manage->
Manage and Update Account Settings to view material regarding USPS® meter
label solution software trademark information and customer support. In
addition, users can easily access the privacy policy and terms and conditions
that were initially available during registration.
IMPORTANT: When
contacting Customer Support, whether via email or phone, please provide the
identification number (located within the ‘Registered To:’ section).
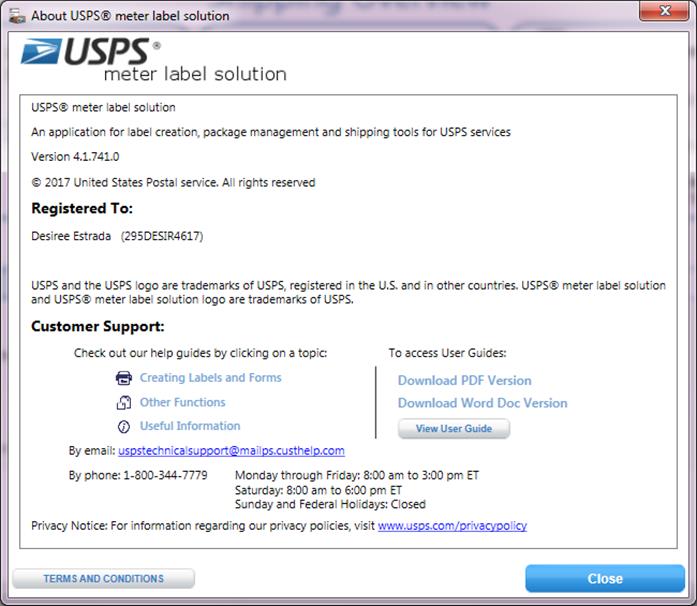
Chapter 20
Message Center
Chapter 20. Message Center
Click the Messages tab or use the Shipping Overview navigation under View-> View Messages to view the
latest news from USPS®. Be
sure to check when the message center tab turns yellow. News can include
weather alerts, country restrictions or if there are new messages available on
the USPS® meter label solution software browser. If you are ONLINE and cannot
access the message center, be sure to update connection settings via
Preferences > General tab.
TIP
- Your Internet
Explorer browser connection settings must be set correctly in order to access
the Message Center within the Click-N-Ship for Business® application,
even if manual settings have been indicated under the Preferences link.


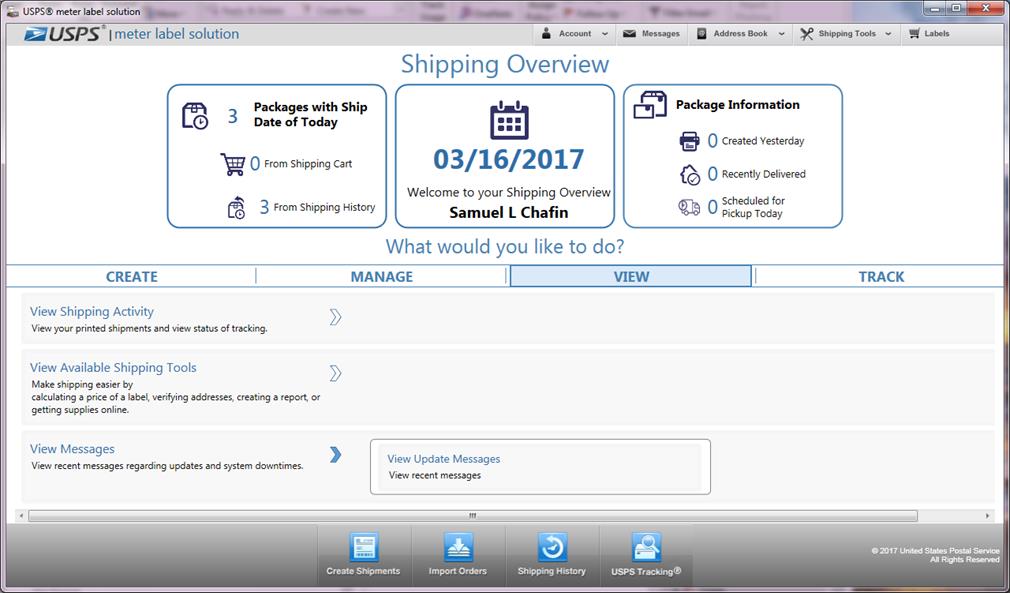
Chapter 21
Troubleshooting
Chapter 21. Troubleshooting
This document provides answers to frequently asked
questions about USPS® meter label solution software.
Q. How
do I set my Screen Resolution to be a minimum of 1024 x 768?
A. Right click on your desktop and select
properties. Click on the Settings tab and drag your screen resolution to be set
at 1024 x 768.
Q. When
I highlight multiple rows, only the first and last records actually check off.
A. There is a difference between selecting
(i.e., highlighting) and checking records throughout the USPS® meter label
solution application. When selecting (i.e., highlighting) rows, make sure to
click on one of the read-only fields prior to checking the checkbox. See Shortcuts section for more information.
Q.
I received an error, “Another Instance of USPS® meter label solution software
is already running!”, but I do not appear to have USPS® meter label solution
software running.
A.
USPS® meter label solution software
will run in the task bar, as opposed to exiting, when clicking ‘X’. To display
the current session of the USPS® meter label solution application double-click
on the system tray on the task bar. Note: If you wish to exit the application
entirely upon clicking ‘X’, see Preferences > General section for more details.
Q. I
get an error message stating, “Unable to connect to remote server.” What does
this mean and what should I do?
A. This error message indicates that your
computer is not able to connect to a network. This could either mean that
Click-N-Ship for Business® could
not connect to the USPS.com® Web Services or may indicate that
the preferences > General
settings are incorrect. Please verify these settings with your system
administrator.
Q. I
am receiving a message indicating that USPS® meter label solution software
could not connect to the Message Center Server, but I know that the proxy
settings I manually entered in my Preferences are correct.
A. The Message Center actually is displaying
a browser within the Click-N-Ship for
Business® application; therefore even if manual
proxy settings are established in Preferences > General tab you MUST have
the correct proxy settings in your Internet
Explorer®
browser to access the Message Center. In order to fix, exit the USPS® meter
label solution application, verify that your Internet Explorer proxy settings
are correct, and re-launch. Proxy settings in Internet Explorer can be found
under Tools > Internet Options >
Connections > LAN Settings.
Q.
I received an error, “USPS® meter label solution could not detect your network connection
status. Please verify that any desktop security software (intrusion protection,
firewall, virus protection, etc.) allows USPS® meter label solution to run as a
trusted application. Please contact your
system administrator or USPS® Customer Care Center (uspstechnicalsupport@mailps.custhelp.com).” What should I do?
A.
This message indicates that there
is another application on your desktop that is preventing USPS® meter label
solution software from identifying your connection status. To fix this, you
must identify which software is preventing this application and ensure that it
is notified to run USPS® meter label solution software as a trusted
application.
Q.
How do I uninstall USPS® meter label solution software?
A. USPS® meter label solution software can be
uninstalled through the Add/Remove Programs function under the Start menu. IMPORTANT:
Uninstalling USPS® meter label solution software will NOT remove any of your
data or registration information.
This ensures that all of your information will remain intact, regardless
if a new version of USPS® meter label solution software is downloaded. Please note that the add/remove programs
function location may differ for Vista users.
Q. I
received a .NET®
Framework Initialization Error when attempting to launch USPS® meter label
solution software. What should I do?
A. under Start
> Control Programs > Add/Remove Programs run a repair on .NET® Framework 4.5 and re-launch USPS® meter
label solution software.
Q. Is Windows 98®
supported?
A. No. USPS® meter label solution software
supports Vista®, Windows 7® and
Windows® 8, Windows® 10. Please refer to System Requirements for further details. XP Home®, XP Professional®,
Q. Is
Windows XP Home® and XP Professional® supported?
A. No. USPS® meter label solution software
supports Vista®, Windows 7® and
Windows® 8, Windows®
10. Please refer to System Requirements for further details. XP Home®, XP Professional®,
Q.
When installing on a Vista® machine,
I received the following error message while running the setup.exe file, “Unable to save file: c:\\Windows\Downloaded
Installations\ {A42486BE-D155-4ECA-AC29-089D0|Assistant 3.0.msi. The system cannot find the path specified.” What
should I do?
A. Upon clicking OK in this dialog box, you will be prompted to select a different
path. Select the Public > Public
Downloads folder and click OK; then
complete the installation process as normal.
Q. How
do I remove my data and my registration information if I want to install a
clean-version of USPS® meter label solution software under the same logon name?
A. The default location for USPS® meter
label solution software files is the following. Although, please note that
during the installation process you do have the ability to change the
destination location of these files:
WARNING:
Completing the following steps WILL PERMANENTLY DELETE ALL DATA FROM YOUR USPS®
METER LABEL SOLUTION SOFTWARE. It is
recommended that a backup file be saved.
BE SURE TO COMPLETE BOTH STEPS. Please
note that the hard drive (ex. C:\) may differ depending on the default hard
drive setup on the individual computer:
1
To
remove the registration, remove the folders in the following mapping: C:\Documents
and Settings\<logon name>\Local Settings\Application Data\Click-N-Ship
for Business
2
To
remove the database, remove the Database
and Images folders in the following
mapping: C:\Documents and Settings\<logon>\Local Settings\Application
Data\Click-N-Ship for Business Delete all
folders
Q. My
question is not answered in the FAQ. What should I do?
A. Contact uspstechnicalsupport@mailps.custhelp.com
.
Having trouble upgrading your version of USPS®
meter label solution software? Read below for the most Frequently Asked
Questions
Q. Is
there any way to bypass the upgrade process?
A. No. All updates to USPS® meter label
solution software are mandatory.
Q. How
do I upgrade my version of USPS® meter label solution software if I am not an
admin user?
A. You must be a System Administrator in
order to complete any updates and/or uninstall/re-install USPS® meter label
solution software. Once your system administrator has upgraded to the new
version of USPS® meter label solution software, all non-admin users will be
automatically updated.
Q.
Upon upgrading USPS® meter label solution software, will I lose all of my data?
A. No. Upon upgrading to a new version of USPS®
meter label solution software, all your data will remain intact; data includes
registration information, preferences, address book contacts, shipping cart
labels, Shipping History information, and Package Pickup(s).
Q. I
keep receiving ‘Invalid email’ when attempting to register, but everything
looks correct.
A. Verify that no spaces exist within your
email addresses.
Q. Do
I have to register with USPS® meter label solution software?
A. Yes. Registration is required prior to
accessing USPS® meter label solution software.
Q. Do
I need Adobe Acrobat to view my labels?
A. In the USPS® meter label solution
application, you do not need Adobe Acrobat Reader® 5.0
or higher to “Print Label”. The new USPS® meter label solution software does
not use Adobe® for printing the electronic MRS
Label. However, if you use the “Email Label To Customer” option, a PDF
attachment will be emailed to the customer and retailer, the customer and the
retailer require Adobe Acrobat® Reader 5.0 or higher to open and print
the electronic MRSLabel.
Q. I
am attempting to highlight a service when viewing Compare Service Types, but
the highlighted service changes before I am able to click Apply Selected
Service. How do I select a specific service?
A. You must either double-click the service
you wish to select or click where there is white space on the row the
service is listed on (as opposed to the hyperlink). Clicking on the white space
will ensure the service remains highlighted while moving the mouse to click Apply Selected Service.
Q. I
modified an address in the Recipient section and clicked Save to Address Book,
but my address in my address book was not updated, why?
A. Clicking Save to Address Book only adds new
addresses to the Address Book. If the exact same address is added more than
once, a new Short Name will be created. To modify an existing address you must
go into the Address Book and click the Edit panel. See Edit Address section for more details.
Q. I
attempted to print multiple copies of my label, through the print dialog box,
but only one copy printed.
A. The application will only allow one copy
of the label to be printed at a time. In addition, changing any of the format
options in the print dialog box will not take effect as labels must be printed
based on USPS® standards.
Q. The
Ship Date dropdown doesn’t appear to include today’s date. What should I do?
A. The Ship Date dropdown currently
repopulates every time the application is launched. If the application has been
running in the task bar for more than four days, you must exit the USPS® meter
label solution application and re-launch in order for the ship date dropdown to
repopulate with today’s date.
Q. Can
I print ONLY 1 page of a label?
A. For all labels, when printing
immediately, you can specify a consecutive range of pages you wish to print via
the print dialog box. For example, if you are creating a domestic label w/
separate receipt and click ‘print’, you can indicate that you wish to only
print 1 out of 2 pages in order to avoid printing the ‘separate receipt’ page.
Q. How
do I ‘check’ the address when in the process of creating a shipping label?
A. Prior to saving a label to the shipping cart,
you can click Calculate which will
automatically check your address and re-populate the Recipient address with the
validated information. Please note that if you do not click calculate prior to
saving to the shipping cart, your address will automatically be checked and
display validated at the time of saving the label.
Q. In
what type of units do I enter Length, Width, Height, and Girth?
A. Length, Width, Height, and Girth should
be measured, rounded to the nearest integer and entered in by inches.
Q. Does USPS® meter label solution software support thermal
printers?
A. Yes. USPS® meter label
solution software supports all Zebra/ZDesigner printers.
Q. Why
can’t I enter Value of Contents in on the domestic label?
A. The ability to calculate the insurance,
based on the value of contents entered, is currently not available at this time
via the Create Shipping Label. To view the amount of insurance available, based
on a specific value of contents, see Shipping
Tools
section.
Q.
Since USPS® meter label solution software prints only single-ply labels for Priority
Mail Express® service, how do I obtain a receipt?
A. USPS® meter label solution software
replaces the usual Priority Mail Express®
multi-ply label with a single-ply label and a printed Online Label Record.
When delivering the package to the Post Office™, present the printed Online
Label Record to USPS® personnel to receive the service
guarantee and become eligible for a refund if the service guarantee isn’t met.
Q. How
do I know if my package is non-machinable?
A. Non-machinable is a mail pieces that
cannot be sorted on mail processing equipment because of size, shape, content,
or address legibility. Such mail must be processed manually.
Q. Why
is the “Leave Shipment if no Response” option not available for all domestic
labels?
A. The Leave Shipment if No Response option
is only available for domestic labels that do not require a signature or
additional insurance. In most cases, Priority Mail shipments include free
insurance up to $50. For more
information, visit usps.com/easyshipping.
With Priority Mail shipping, the Leave Shipment if no Response option is
only available when insurance equal to or greater than $200 has not been added and
the USPS Signature service is has not been added. Priority Mail Express® pieces automatically
come with the USPS Signature Service, therefore the Leave Shipment if No
Response option is unavailable. However,
if you choose to waive the signature by deselecting the “Require Signature”
option, this will serve the same function as the Leave Shipment if No Response
option.
Q.
What is the 10:30 A.M. delivery option available with Priority Mail Express®
service?
A. The 10:30 A.M. delivery option is a new
service offering available (for a fee) when shipping via Priority Mail Express®
service. Service availability is based
on the origin and destination ZIP Code™ and Post Office™ acceptance time. If you choose not to utilize the 10:30 A.M.
delivery service, mail will be delivered to the destination address at either
12P.M. or 3 P.M., depending on the service available for the origin and
destination ZIP Code™.
Q. Why
can’t I print a label for live animal shipments with USPS® meter label solution
software?
A. Live animal shipments can only be presented
at a retail Post Office™ and may require special handling service be purchased.
USPS® meter label solution software displays messaging directing users to
retail for live animal shipments to ensure proper handling and processing.
Q. Why
do I need to notify USPS if I am shipping cremated remains or mailable hazardous
materials?
A. Shipments of cremated remains or
hazardous materials require special attention for handling and processing. By indicating if the shipment includes
cremated remains or hazardous materials, the USPS® can improve
visibility internally and ensure proper processing and handling. Cremated
remains can only be shipped with Priority Mail Express® service. Hazardous materials can be shipped with all
domestic services offered via USPS® meter label solution software. See the hazmat policy at
https://www.usps.com/send/can-you-mail-it.htm#2 for details.
Q. How
do I know what services are available to a specific destination country when
creating an international shipping label?
A. By selecting a destination country, and
entering the required package information, you can view all available services
by clicking Compare Service Types button.
All available services as well as their prices, based on the information
provided, will display. This feature is also available via the Calculate a
Price Shipping Tool.
Q.
What isn’t my mailing conditions being displayed?
A.
Hit the Calculate button
again to ensure that the correct mailing conditions are being displayed.
Q. I’m
getting an “Unable to calculate postage rates.” message when I calculate or try
to save to the shipping cart.
A. Not all services are available to every
country. Additionally, some countries have
limits on the weight that a service can be.
A list of countries, available services, and maximum weights for
services can be found on the USPS® Price List (http://pe.usps.com/text/dmm300/Notice123.htm)
Q. How
does Priority Mail Express International® with Money-Back Guarantee service
differ from regular Priority Mail Express International®?
A. Priority Mail Express International® with Money-Back guaranteed service provides
delivery of the shipment by the date provided in the application and printed on
the labels, otherwise the customer can request a refund for the cost of the
label. This service is only available
for participating countries.
Q. How
do I know if Priority Mail Express International® with Money-Back Guarantee
Service is available for an address?
A. The Confirm
Address button displayed on the International Label screen below the
international address fields provide the user with the ability to confirm if money-back
guarantee service is available for the entered country. This feature is only available when the
country selected qualifies for the money-back guarantee service and will
validate the address entered is correct and notify the user if money-back guarantee
service is available. If the address is
incorrect, the user will have the opportunity to select the correct address,
look up the correct address, or proceed with Priority Mail Express
International® service without the money-back guarantee.
Q. How
do I delete a content item that I have already added on the International
and/or Customs forms?
A. Right-click on the content item table and select delete item or highlight the
content item and click the delete item
button.
Q. How do I modify an existing content item?
A. You must double-click an existing content item in the table to re-populate
all information. IMPORTANT: Prior to re-adding the modified item, you must first
delete the existing content item in the table. To delete a content item, right
click on the content item and select delete
item.
Q. Why
can’t I enter all of my customs information when creating an international
shipping label?
A. When fields are grayed out on the create
shipping label page, it indicates that the fields do not apply based on the
service selected. You will notice that when different services are selected,
all information that does not apply will be disabled.
Q.
What is the USPS® Merchandise Return Service?
A. USPS® Merchandise
Return Service (MRS) enables a retailer to provide a customer with a return
shipping label (i.e., from customer to retailer), with postage being collected
from the permit holder only when a package is returned to them. A retailer must
pay an annual permit fee and establish an advance deposit account to pay
postage and extra service fees in order to use the Merchandise Return Service
option. Information about how to obtain MRS permits and establish and account
can be obtained at USPS.com, in DMM
505.3.0, or
from your local Post Office™.
Q. How
does USPS® meter label solution software support Merchandise Return Service?
A. In the USPS® meter label solution
application, you can print a Merchandise Return Service label to place inside
the outgoing package, or you can submit a label to the USPS® electronic
Merchandise Return Service for delivery to your customer via e-mail.
Q. I’m
getting an error “You already have 25 imports.
You must remove one to add a new import”.
A. You will need to delete an import from
preferences in order to create a new import.
Note, you can use an existing import without deleting an import. Below are the steps to delete import from the
Preferences.
1 Click Account in and upper
navigation and then click on the Preferences
option.
2
Select Import Options.
3
Select one or more imports to delete.
4
Click Delete
and agree to the confirmation popup.
Q. Why
aren’t all my eBay orders displaying?
A. Due to eBay limitations, only orders from
the last 30 days are displayed. If the
order is less than 30 days old, follow the following steps to ensure that no
filter is prohibiting the orders from displaying.
1
Select All from the Last Modified Date dropdown.
2
Select All from the Transaction Status dropdown.
Q. Can
I import Global Express Guaranteed®
(GXG®) labels?
A. At this time, Global Express Guaranteed® (GXG®) labels cannot be imported.
Q.
When I save my imported labels, I get an error saying that I have labels that
will not be imported.
A. Labels with validation errors will not be
imported. To correct errors on the
labels click Fix next to the label
in error, make the required updates and click the Fix button to save the changes.
Q.
Where can I find a sample of the label import files?
A. You
can find sample import files by accessing the below links:
· Sample
Domestic .csv file – https://www.usps.com/business/meter-label-solution/sample-import-files/domestic-sample.csv
· Sample
International .csv file - https://www.usps.com/business/meter-label-solution/sample-import-files/international-sample.csv
· Sample
Domestic .xml file – https://www.usps.com/business/meter-label-solution/sample-import-files/domestic-sample.xml
· Sample
International .xml file – https://www.usps.com/business/meter-label-solution/sample-import-files/international-sample.xml
Q. How
does the mapping page work?
A. The mapping automatically matches column
names from the imported file with the field names on the mapping page if the
names are identical. If a field is not
automatically mapped, you can select the desired column name from the dropdown
next to the field. Additionally, if you
wish to change the mappings of an auto mapped field, you will be able to do so
as well.
Q.
What kind of files can I import?
A. USPS® meter label solution software
currently supports CSV, XML, and Microsoft Access file types. Additionally, USPS® meter label solution
software allows you to import labels from your eBay account.
Q. I
cannot seem to access my existing address book contacts, instead I see a form
in which to add or edit an address.
A. Click cancel on the add or edit address book window that is currently
displayed. This will close the address book panel and return you to your
address contact information.
Q. It
appears that some of my addresses are no longer in Address Book. Where did they
go?
A. Conduct the following steps to ensure
that there is no filter that is prohibiting specific addresses from displaying:
1 Clear out Search For text.
2 Select All Columns in Search
dropdown.
3 Select All Addresses in the
Show dropdown.
4 Select All link below the
Search For box.
5 Click Go next to the All
Columns dropdown.
Q. Why
is the Country dropdown grayed out on my Sender Address in Address Book?
A. This represents that the current address
being viewed is also the same address that is listed as the Sender Address on
all of the labels. Since the sender address can only be a domestic address, the
Country cannot be modified until a new Sender address is selected. In order to
change the sender address, click Edit
on a create label page and select a new sender address. See Address Book and Create Label instructions for more details.
Q. How
do I select multiple addresses in the address book list?
A. See Shortcuts section for further details.
Q. How
many addresses can the Address Book hold?
A. The Address Book’s capacity is limited
only by the amount of space available on your hard drive.
Q. Can
I restore a deleted address?
A. No. Deleted addresses cannot be
recovered. When you delete an address, you are asked to confirm the deletion.
That is your last opportunity to decide whether or not you want to delete the
address. It is recommended to export addresses you wish to delete in order to
archive for future reference.
Q.
What can I use address groups for?
A. Groups provide a way to organize
addresses. If you run a small business, for example, you might have “Friends”,
“Family” and “Customers” groups. If you run multiple businesses, you could set
up an address group for each business.
Q. If
I remove an address from a group, does that delete those addresses from the
Address Book?
A. No. Removing addresses from a group does
not delete those addresses from the Address Book. Addresses removed from a
group are marked as Unassigned (unless previously assigned to another group).
You can view them by selecting Unassigned in the Show list.
Q. What
is the difference between ‘Export Error Log’ and ‘Export Failed’ Addresses
button in the ‘Failed Records’ pop-up in Address book?
A. The Export
Error log allows you to view the original row number (from the original
.csv imported file), the address as it was imported into the USPS® meter label solution
application, and the reason that the particular line failed. The Export Failed Addresses allows you to
simply create a new .CSV of only the failed addresses from your original
imported .CSV file. You can use this new .CSV file to modify any errors noted
in the Error Log.
Q.
What is .CSV file?
A. The comma-separated values (or CSV) file
format has each data record on a line, with each record containing data fields
separated by commas.
Q.
Where can I find a sample .csv file to import so that I can ensure my file
properly formatted?
A. You
can find sample import files by accessing the below links: https://www.usps.com/business/meter-label-solution/sample-import-files/address-sample.csv
Q. How
much time can I expect USPS® meter label solution software to take to import a
file?
A. There is no exact time estimate that will
be provided via USPS® meter label solution software at this time. Please note
that the larger the file, the longer the import process will take, depending on
your internet connection status and the time required to standardize these
addresses.
Q.
None of my addresses imported, why?
A. Verify that all of your proxies are
correct in Preferences > General
section prior to importing. Since domestic addresses are required be
standardized prior to importing, if your file contains domestic addresses and USPS®
meter label solution software cannot connect correctly, the addresses will fail
import.
Q. How
can I view which address lines failed during my import process?
A. The ability to view a report of which
address lines failed during the import process is currently not available
through the user interface at this time. In order to identify which lines
failed, conduct the failed
import
instructions for further instructions.
Q. I
attempt to import a .csv file and the entire application froze.
A. In this case, we recommend ending the
task by clicking Ctrl > Alt >
Delete, selecting the task, and clicking End Task. This may have occurred
due to a bad file or internet connection. First, refer to the Import
Address Specifications
section in the user guide to ensure that your .csv file is correctly formatted
prior to importing into the USPS® meter label solution application. Then
re-launch, and try again. If you are still having problems, contact uspstechnicalsupport@mailps.custhelp.com.
Q. I
re-imported a address import file and expected some of the addresses to be
overwritten, but instead the system created a whole new address record. Why?
A. The system recognizes whether or not an
imported address is the same as an existing address record if and only if the
‘short name’ detailed is the same. If you initial did not provide a ‘short name’
for each address record upon importing, the system will have created a short
name for you; therefore it is recommended that you export the entire address
book (which will include the associated short names) if you wish to make
modifications offline and then e-import.
Q. In
the ‘Failed Records’ detailed pop-up, is the row numbers referring to my
original .csv file that I imported or is it referring to the new .csv
file that can be exported by clicking ‘Export Failed Addresses’ from the Failed
Records pop-up.
A. The row numbers referenced on the Failed
Records pop-up references the row number on the original imported .csv file.
The new .csv file that can be created of ONLY failed addresses is to allow
users to easily pull out failed address lines.
Q. Is
there a way to export only certain addresses?
A. By selecting a group from the “Select
Desired Address Group” dropdown, you can export only addresses in the specified
group.
Q.
What is a PENDING shipping label?
A. USPS® meter label solution software must
be able to communicate with a USPS® Server to process and create your
shipping label. When communication isn’t possible, you cannot print labels –
you can only save them to the Shipping Cart. In the Shipping Cart, these labels
with have PENDING in the Status column. You can print pending labels from the
Shipping Cart after communication is established. See Detailed Description of Shipping Cart
Status for
further details.
Q. I
printed a label in the Shipping Cart and now it’s gone. Where is it?
A. All printed shipping labels are listed in
the Shipping History page (click the Shipping History button near the top of Click-N-Ship
for Business® to
see the list).
Q. Can
I restore a deleted shipping label?
A. No. Deleted shipping labels cannot be
recovered. When you delete a shipping label, you are asked to confirm the
deletion. That is your last chance to decide whether you really want to delete
the label.
Q. How
do I select multiple labels in the shipping cart list?
A. See Shortcuts section for further details.
Q. My label is in ERROR. Is there any way I can check what error the
label has?
A. Yes. Click
on the ERROR link that displays
under the STATUS column for that label. A popup window opens displaying details
about the error.
Q.
When I click ‘print’ from the ‘print preview’ view in the Shipping Cart,
nothing happens and my label does not move to ‘Shipping History’
A. Most likely, you are OFFLINE and your
default printer is a network printer (vs. a local printer). Since network
printers require you to be connected to the network, you must be ONLINE in
order to print or if you wish to print READY labels offline, change your
default printer to a local printer.
Q.
What are the different types of 4x6 labels that are eligible to be printed
two-per page when indicating print preferences?
A. 4x6 labels include
· Domestic Priority Mail®
· Domestic First-Class Mail® parcel
· Domestic First-Class Package Service®
· Domestic Library Mail
· Domestic Media Mail®
· International Priority Mail Express International®
· International Priority Mail International®
· International First-Class Mail International®
· International First-Class Package International Service®
Q. Why
aren’t the receipts/mailing instructions pages for my 4x6 labels printing out?
A. Prior to printing if you specify that you
wish to print two 4x6 labels per page, USPS® meter label solution software will
NOT print any of the corresponding receipt or mailing instructions page
associated with the labels.
Q. Is
it possible, when printing two 4x6 labels on one page, for an international
label and a domestic label to be printed on the same page?
A. Yes.
Q. Is
there a way to check the status of ALL my labels in Shipping History?
A. Yes. Verify that none of your
labels are checked, and click check
status. You will be asked to confirm whether or not you wish to check the
status of all of the labels in your Shipping History table, as it may take
sufficient processing time.
Q. Why
aren’t any of my tracking details displaying when I click the tracking number
hyperlink?
A. In order to view tracking details under Shipping
History section, you must exit out of the Package Pickup view by clicking hide Package Pickup and be ONLINE.
Q.
When I click Cancel and Reschedule Package
Pickup, will my previous request be cancelled?
A. Yes. Upon re-scheduling a Package Pickup
request please note that a new
confirmation number will be available upon completing your request. See Cancel and Reschedule Package Pickup instructions for more details.
Q. I
selected (i.e., highlighted) a label in Shipping History and clicked Create Package
Pickup, but none of my packages moved over to the Package Pickup view, why?
A. You must check which items you wish to include in your Package Pickup request
prior to clicking Create Package Pickup. Clicking Create Package Pickup without
checking any items will simply create a blank Package Pickup form in which you
can then add and remove labels.
Q. I
selected a label to be added to a Package Pickup request and it no longer
appears under my Shipping History view.
A. When creating a Package Pickup request,
any labels that have been added to the Package Pickup request will temporarily
not display in the Shipping History table. Once you have completed scheduling
your Package Pickup requests, the labels that are a part of the Package Pickup request
will reappear in your Shipping History table and will include a
confirmation number in the last column of the table to illustrate that they are
part of the Package Pickup request.
Q. In
the Package Pickup view, I placed a checkbox next to the labels I wished to include
in my scheduled pickup, but after scheduling it, it appears that all of
my labels were included.
A. Clicking the checkboxes only
relates to the Remove from Package
Pickup button. If you do not wish to include labels currently in your Package
Pickup view, you must first check
those labels and click Remove from Package
Pickup prior to Scheduling the Package Pickup.
Q. Why
won’t the USPS® meter label solution application let me cancel or modify a Package
Pickup request?
A. Package Pickup(s) can only be cancelled
and/or modified prior to 2AM CST of the day of the pickup. Any modifications at
this time are prohibited.
Q. I
clicked on show scheduled Package Pickup, but do not see a list of all
scheduled Package Pickup(s).
A. Click close on the Package Pickup view that you are currently on. Upon
completing this action, you will be returned to a list of all scheduled Package
Pickup(s).
Q. Why
doesn’t the Schedule Package Pickup button do anything when I click it?
A. Package Pickup must include at least one
domestic Priority Mail Express® or Priority Mail® package, so review the packages you’ve selected to be
sure one such package is present. Also, make certain all required fields are
filled in.
Q. Can
I schedule a Package Pickup request for next week?
A. No. Package Pickup request(s) can only be
scheduled for the next scheduled delivery day.
Q. Can
I remove a package from a scheduled Package Pickup request?
A. No. Once a Package Pickup request is
scheduled you cannot remove a package from it without canceling the current collection.
USPS® meter label solution software makes canceling and editing labels in a
package easy by making use of the Cancel
and Reschedule Package Pickup functionality. See Cancel and Reschedule Package Pickup section for more details.
Q. I
want to calculate postage with Insurance and a confirmation service (USPS
Tracking® or USPS Signature™), but both fields are disabled.
A. Insurance, USPS Tracking®, and USPS
Signature™ fees can only be calculated when using specific services. To calculate postage with Insurance, USPS
Tracking®, or USPS Signature™, select a service option from the Service
dropdown and an option from the Container dropdown, if available.
Q. Why
can’t I add certain tracking numbers to the tracking table?
A. If a tracking number does not have a
status that is deemed valid (i.e., information has been archived), a message
will immediately appear indicating why the tracking number is invalid.
Q.
What does address verification do?
A. Address verification compares the address
you entered to the USPS® list of known addresses. If you entered
an address incorrectly (wrong ZIP Code™ or misspelled street name, for
instance), verification automatically updates the address fields with the
correct information.
Q.
What happens if an address can’t be verified?
A. If USPS® meter label solution software
cannot verify an address, it will display a message identifying a possible
problem. Correct the problem and try verifying the address again.
Q. Why
does address verification change addresses to all uppercase letters?
A. USPS® has
standardized on uppercase letters to eliminate capitalization inconsistencies
during information processing and automated mail processing.
Q. Do
we need a SQL database to use the ODBC capabilities?
A. No.
While we realize a SQL database is an efficient way to organize and
store data, some businesses are more comfortable with flat files such as Excel
spreadsheets and CSV files. As such, the
application interfaces with these files.
Q.
What databases are currently supported by the application?
A. Microsoft Access, SQL Server, and
MySQL.
Q.
What are the benefits of integrating my database?
A. In short, it will make your shipping
experience more efficient through quicker label creation and enhanced
visibility of customer shipment information. Leveraging the database allows
users to auto-populate required fields within each label module via a search
box. Within the Database Access module,
it is as simple as searching your customer database and selecting the label
type to auto-populate. Also within the Database Access module, users can
quickly view and track a selected customer’s shipments.
Q. What
data sources are supported by the application?
A.
|
Data
Source
|
Driver
|
|
Excel
|
Microsoft Excel Driver (*.xls, *.xlsx, *.xlsm, *.xlsb)
Download this driver here: https://www.microsoft.com/en-us/download/details.aspx?id=13255
|
|
CSV
|
Microsoft Access Text Driver (*.csv, *.txt)
Download this driver here: https://www.microsoft.com/en-us/download/details.aspx?id=13255
|
|
Access
|
Microsoft Access Driver (*.mdb, *.accdb)
Download this driver here: https://www.microsoft.com/en-us/download/details.aspx?id=13255
|
|
MySQL
|
MySQL ODBC 5.3 ANSI Driver
Download this driver here:
https://dev.mysql.com/downloads/connector/odbc/5.1.html
|
|
SQL Server
|
SQL Server Native Client 11.0 (Select newest version)
Driver should be installed upon installation of SQL
Server
|
Q.
Which connection is better suited?
A.
|
File Type
|
Description
|
Currently
Supported?
|
|
Flat File
|
A database stored as an ordinary unstructured file.
|
.csv (comma separated values)
|
|
.XLSX, .XLS
|
Open XML spreadsheet file format used with Microsoft
Excel.
|
Microsoft Excel
|
|
Relational Database
|
Collective set of multiple datasets organized by tables,
records, and columns.
|
Microsoft Access, MySQL, SQL Server
|
Q. Why
aren’t my preferences taking affect?
A. In order to avoid overwriting existing
information entered on the labels, you must either click clear all label fields on each of the respective labels and/or
finish saving to cart. Exiting and
re-launching USPS® meter label solution software will also allow preferences to
take effect immediately for all labels.
Q. Can
I have different preferences setup for different Sender Addresses within the
same copy of USPS® meter label solution software?
A. Yes. Every time you select a new Sender
Address by clicking edit sender address
in the Create Shipping Label
section, a new profile is created and new preferences can be set. Please note
that when a new sender address is selected, all preferences defined in the
previous sender address are automatically duplicated. In order to reset
preferences to blank for all fields, click reset
preferences in Preferences.
Q. If
I recreate a label, will the Sender Address’s preferences that are populated in
the Sender field take affect after I print the current label?
A. No. Recreating labels from Shipping
History only temporarily populates the Sender Address in the respective label.
After printing/saving to shipping cart, the current Sender addresses’
preferences will populate the create shipping label fields.
Q. How
can I tell which addresses I have created preferences for?
A. This functionality is not available at
the current time. You can only view the preferences that have been saved for
the current Sender Address.
Q.
What do the preference settings do?
A. Most of the preferences automatically
populate fields when you are creating labels. By presetting fields to the
values you use most often, you will reduce label creation time and minimize
errors.
Q. Do
I have to fill in every preference field?
A. No fill in just the fields that will be
the same for most labels. Preference fields you don’t fill in will remain blank
(or at least their default settings) when you create labels.
Q. If
I set preference fields, will I have to use those values in every label?
A. No. When you are creating labels, you can
override any pre-populated field.
Q. How
should I set the Connection Preferences in the General tab?
A. In most cases, select the Use Internet
Explorer option. If you have a proxy server, select the Use Proxy Server option
and fill in the Address and Port. If you aren’t certain which option to select,
check with your System or Network Administration.
Q.
What does ‘Specify Print Preferences’ checkbox represent?
A. If this is checked, you will have the
ability to view the enhanced print preferences page during every print job from
the Shipping Cart. This will allow you to indicate special print features such
as ability to print two 4x6 labels on a single page or print preview a set of
selected labels prior to printing.
Q. Why
is the Messages section yellow?
A. The Messages section is yellow when new
information is available from USPS®. When you open the Messages, the tab
changes back to its normal color.
Q.
What kinds of information shows up in the Messages?
A. What you see in the Messages may change
from day to day. Messages may include USPS® news,
USPS® meter label solution software announcements and tips, special promotions
and information from USPS® partners.
Chapter 22
Appendix
Chapter 22.
Appendix
Domestic Service Descriptions
Priority Mail Express® – Delivery is made in one day (Priority Mail Express
1-Day™) or two days (Priority Mail Express 2-Day™) to most U.S. locations 365 days a year, including Sundays
and holidays for an extra charge. Note: Sunday and holiday delivery is not available through CNSB
Must be mailed by scheduled acceptance time.
The scheduled delivery date is based on the originating and destinating
ZIP Code™(s) as well as Post Office™ acceptance time.
Applicable
packages for the above services:
o Standard/Customer’s Own Packaging – For sending a package up to 70 pounds and maximum length
plus girth of 108 inches.
o Flat Rate Envelope (12.5” x
9.5”) – For sending a document for one rate, regardless of weight. Official
USPS® packaging or Label
127R is required for domestic USPS®
flat rate products; these can
be obtained online at the Postal Store or at your local retail Post Office™ for free.
o Legal Flat Rate Envelope
(9.5” x 15”) – For sending legal documents for one rate, regardless of
weight. Official USPS® packaging or Label 127R is
required for domestic USPS®
flat rate products; these can
be obtained online at the Postal Store or at your local retail Post Office™ for free.
o Padded Flat Rate (12.5” x
9.5”) – Lined with with bubble
padding to provide a little extra protection to the package contents. Official
USPS® packaging or Label
127R is required for domestic USPS®
flat rate products; these can
be obtained online at the Postal Store or at your local retail Post Office™ for free.
o Small Flat Rate Box (8.625” x
5.375” x 1.625”) – For sending a small package for one rate, regardless of
weight up to 70 lbs. Official USPS®
packaging and stickers is required for USPS®
flat rate products; these can be obtained online at the Postal Store or at your
local retail Post Office™ for free.
o Medium Flat Rate Box (11.25” x
8.75” x 6”) – For sending a medium-sized package for one rate, regardless of
weight up to 70 lbs. Official USPS®
packaging and stickers is required for USPS®
flat rate products; these can be obtained online at the Postal Store or at your
local retail Post Office™ for free.
o Medium Flat Rate Box 2 (14” x
12” x 3.5”) – For sending a medium-sized package for one rate, regardless of
weight up to 70 lbs. Official USPS®
packaging and stickers is required for USPS®
flat rate products; these can be obtained online at the Postal Store or at your
local retail Post Office™ for free.
o Large Flat Rate Box (12.25” x
12.25” x 6”) – For sending a large-sized package for one rate, regardless of
weight up to 70lbs. Official USPS®
packaging and stickers is required for USPS®
flat rate products; these can be obtained online at the Postal Store or at your
local retail Post Office™ for free.
Priority
Mail® – In most cases, delivery is made in one day (Priority Mail 1-Day™), two days (Priority Mail Express 2-Day™), or three days (Priority Mail 3-day™) to most U.S. locations 365 days a year. Delivery date is
based on the originating and destinating ZIP Code™(s) and Post Office™
acceptance time. Exceptions and restrictions apply. Visit https://www.usps.com/ship/priority-mail.htm for details.
Applicable packages for the above services:
o Standard/Own Packaging –
For sending a package up to 70 pounds and maximum length plus girth of 108
inches.
o Flat Rate Envelope (12.5” x
9.5”) – For sending a document for one rate, regardless of weight. Official
USPS® packaging and
stickers is required for USPS®
flat rate products; these can
be obtained online at the Postal Store or at your local retail Post Office™ for free.
o Legal Flat Rate Envelope
(9.5” x 15”) – For sending legal documents for one rate, regardless of
weight. Official USPS® packaging and stickers is
required for USPS® flat
rate products; these can
be obtained online at the Postal Store or at your local retail Post Office™ for free.
o Gift Card Flat Rate Envelope (10” x 7”) – For sending gift/greeting cards (and
oversized cards) for one rate, regardless of weight. Official USPS® packaging and stickers is
required for USPS® flat rate
products; these can be obtained
online at the Postal Store or at your local retail Post Office™ for free.
o Window Flat Rate Envelope (5”
x 10”) – For sending pre-addressed envelopes visible through a clear window for
one rate, regardless of weight. Official USPS® packaging and stickers is required for USPS® flat rate products; these can be obtained online at the Postal Store or at your
local retail Post Office™ for free.
o Small Flat Rate Envelope (6”
x 10”) - For sending folded or small (e.g., passports) documents for one rate,
regardless of weight. Official USPS®
packaging and stickers is required for USPS®
flat rate products; these can
be obtained online at the Postal Store or at your local retail Post Office™ for free.
o Padded Flat Rate Envelope
(12.5” x 9.5”) – Lined with bubble
padding to provide a little extra protection to the package contents. Official
USPS® packaging and
stickers is required for USPS®
flat rate products; these can
be obtained online at the Postal Store or at your local retail Post Office™ for free.
o Small Flat Rate Box (8.625” x
5.375” x 1.625”) – For sending a small package for one rate, regardless of
weight up to 70 lbs. Official USPS®
packaging and stickers is required for USPS®
flat rate products; these can be obtained online at the Postal Store or at your
local retail Post Office™ for free.
o Medium Flat Rate Box (11.25” x
8.75” x 6”) – For sending a medium-sized package for one rate, regardless of
weight up to 70 lbs. Official USPS®
packaging and stickers is required for USPS®
flat rate products; these can be obtained online at the Postal Store or at your
local retail Post Office™ for free.
o Medium Flat Rate Box 2 (14” x
12” x 3.5”) – For sending a medium-sized package for one rate, regardless of
weight up to 70 lbs. Official USPS®
packaging and stickers is required for USPS®
flat rate products; these can be obtained online at the Postal Store or at your
local retail Post Office™ for free.
o Large Flat Rate Box (12.25” x
12.25” x 6”) – For sending a large-sized package for one rate, regardless of
weight up to 70lbs. Official USPS®
packaging and stickers is required for USPS®
flat rate products; these can be obtained online at the Postal Store or at your
local retail Post Office™ for free.
Media Mail® – for sending parcels,
or large envelopes with specific contents and that is
neither mailed or required to be mailed as First-Class Mail nor entered as
Periodicals. Contents is limited to books, manuscripts, sound
recordings, recorded videotapes and recorded computer-readable media.
Library Mail – for sending
items between schools, colleges, universities, public libraries, museums, or
herbarium or a nonprofit religious, education, scientific, philanthropic
(charitable), agricultural, labor, veterans, or fraternal organization or
association and that is neither mailed or required to
be mailed as First-Class Mail nor entered as Periodicals.
Domestic Service Options
Summary: The
list below displays the weight limit and size options available for each of the
domestic mail service container options.
Ö
Priority Mail Express®: Standard/Customer’s
Packaging weight limit is 70 lb. 0 oz.
Ö
Priority Mail Express®: Flat Rate
Envelope weight limit is 70 lb. 0 oz.
Ö
Priority Mail®: Standard/Customer’s Packaging weight limit is 70 lb. 0 oz.
Ö
Priority Mail®: Flat Rate Envelope weight limit is 70 lb. 0 oz.
Ö
Priority Mail®: Small Flat Rate Box weight limit is 70 lb. 0 oz.
Ö
Priority Mail®: Medium Flat Rate Box weight limit is 70 lb. 0 oz.
Ö
Priority Mail®: Large Flat Rate Box weight limit is 70 lb. 0 oz.
Ö
First-Class Package Service®:
Parcel weight limit is 0 lb. 13 oz.
Ö
Library Mail weight limit is 70 lb. 0 oz.
Ö
Media Mail® weight limit is 70
lb. 0 oz.
International Service Descriptions
Global Express Guaranteed® = Global Express
Guaranteed® (GXG®) international delivery provided by FedEx
Express® (FedEx Express® is a registered trademark of the Federal Express Corporation
and is used by permission) in 1-3
business days (For many major markets.
Actual number of days may vary.
See Publication 141 at http://about.usps.com/publications/pub141/intro1.htm#Service) to more than 190 countries with a money-back guarantee (Some
restrictions apply. See GXG money-back
guarantee details at http://about.usps.com/publications/pub141/welcome.htm).
Priority
Mail Express International® = Expedited air service
to over 185 countries with delivery time average of 3-5 business days and a
money-back guarantee to select destinations. Tracking available and free
insurance up to $100 for nonnegotiable documents or $200 for merchandise
depending on contents (Visit usps.com/ship/service-chart.htm and International
Mail Manual, available at http://pe.usps.com/text/imm/welcome.htm for details). Check destination country weight
limitations.
Priority
Mail International® =
Accelerated air service with 6 - 10 business days standard delivery. Tracking available to major destinations with
ordinary indemnity included at no additional cost based on the item’s weight.
No indemnity is provide for the Priority Mail Flat Rate envelopes or the Priority
Mail Small Flat Rate priced boxes.
First-Class
Mail International® and First-Class Package International Service® = Airmail service worldwide up to 4 pounds and up to $400
in value. Registered Mail™ service is
available.
International Service Options
Summary: The
list below displays the weight and content item limits for each of the
international mail service options. International mail services options
available vary by destination country. Refer to the International Mail Manual
for additional information
Ö
Global Express Guaranteed® weight limit is 70 lb. 0 oz. and content item limit is 30 items.
Ö
Priority Mail Express International® weight
limit is 70 lb. 0 oz. and content
item limit is 30 items. Note: by
choosing ‘Priority Mail Express International®’ the Abandon option of In Case
Of No Delivery will be disabled.
Ö
Priority Mail Express International® /
Flat Rate Envelope weight limit is 4 lb.
0 oz. and content item limit is 5
items.
Ö
Priority Mail Express International® /
Legal Flat Rate Envelope weight limit is 4
lb. 0 oz. and content item limit is 5
items.
Ö
Priority Mail Express International® /
Padded Flat Rate Envelope weight limit is 4
lb. 0 oz. and content item limit is 5
items.
Ö
sPriority Mail International® weight limit is 70 lb. 0 oz. and content item limit is 30 items.
Ö
Priority Mail International® / Flat Rate Envelope weight
limit is 4 lb. 0 oz. and $400 in value and content item
limit is 5 items.
Ö
Priority Mail International® / Small Flat Rate Box
weight limit is 4 lb. 0 oz. and $400
in value and content item limit is 5
items.
Ö
Priority Mail International® / Medium Flat Rate Box
weight limit is 20 lb. 0 oz. and
content item limit is 30 items.
Ö
Priority Mail International® / Large Flat Rate Box
weight limit is 20 lb. 0 oz. and
content item limit is 30 items.
Ö
First-Class Package International
Service® package (small
packet) weight limit is 4 lb. 0 oz. and
$400 in value and content item
limit is 5 items.
Chapter 23.
Resources
Order Self-Adhesive Labels (https://store.usps.com/store/browse/subcategory.jsp?categoryId=shipping-labels&categoryNavIds=shipping-supplies%3Ashipping-labels)
Order Shipping Supplies (https://store.usps.com/store/)
Domestic Mail Manual (http://pe.usps.gov/text/dmm300/dmm300_landing.htm)
International Mail Manual (http://pe.usps.gov/text/imm/welcome.htm)
IMM® Extra Services (http://pe.usps.gov/text/imm/immc3_001.htm)
General Information
1-800-ASK-USPS® or (800) 275-8777
Hours of Operation:
Monday through Friday from 8:00 a.m. to 8:30 p.m. (Eastern Time)
Saturdays from 8:00 a.m. to 6:00 p.m. (Eastern Time)
Closed Sundays and Holidays
Domestic Package Tracking
1-800-222-1811
Hours of Operation:
Monday through Friday from 7:30 a.m. to 10:30 p.m. (Eastern Time)
Saturdays, Sundays and Holidays from 9:00 a.m. to 8:00 p.m. (Eastern Time)
International Package Tracking
1-800-222-1811
Hours of Operation:
Monday through Friday from 8:00 a.m. to 9:30 p.m. (Eastern Time)
Saturdays from 9:00 a.m. to 7:00 p.m. (Eastern Time)
Closed Sundays and Holidays
Federal Relay (TDD/TTY)
1-800-877-8339
Hours of Operation:
Monday through Friday from 7:30 a.m. to 10:00 p.m. (Eastern Time)
Saturdays from 8:00 a.m. to 8:00 p.m. (Eastern Time)
Sundays and Holidays from 9:00 a.m. to 8:00 p.m. (Eastern Time)
USPS® Internet Customer Care
Center uspstechnicalsupport@mailps.custhelp.com
Chapter 24
Glossary
Chapter 24. Glossary
Add to: add an address
to multiple groups.
AES/ITN: data required
for sending Priority Mail Express International®, and Priority Mail
International® Standard/Customer’s
Packaging, Medium Flat Rate Box, and Large Flat Rate Boxes, which require a customs form 2976/CN22 or a customs form 2976A/CP72.
APO/FPO/DPO
information: describes mailing conditions for sending a mail piece to
an Army Post Office™ (APO), Fleet Post Office™ (FPO), or Diplomatic Post
Office™ (DPO) address.
Check Status: updates the
tracking status of selected labels.
Contents: general
description of the package contents.
Country of
Origin: the country from which the item(s) being mailed originated from.
Create electronic
MRS label: creates an electronic Merchandise Return Service label. (Note: Labels can be created by manually
entering information or by creating a label from a CNSB domestic label that has
already been printed.
Create Package
Pickup: creates a new Package Pickup request.
Customer Reference
#: a number
identifier chosen by the user for the recipient.
Default Sender
Address: indicates the address currently displayed in the Sender Address for all
of the labels. This address is the same address that displays on the Summary
tab of the Preferences link, indicating that saved preferences are tied to this
Sender Address.
Edit Sender
Address: changes/modifies sender address for the selected shipping label.
Error: label has
errors that need to be corrected.
Export
Addresses: copies selected addresses into a .csv file and saves them in a user
defined location.
HS Tariff
Number: a 6
digit number used to classify products for customs purposes as a
means amongst international business community to standardize
import/export classifications. When users ship products internationally,
they are required to assign products this 6 digit long code that complies
with the HS (Harmonized System) standard. All businesses required to
determine/assign code. Selling a single item, however, such as from an
auction site, internationally may not require a HS number, only a customs form.
Import
Addresses: imports a .csv file of addresses into the address book.
In: searches in a
chosen field of a table for the criteria entered in ‘Search for’.
Leave Shipment
If No Response: option that notifies the carrier to leave the customer’s
shipment when there is no response at the destinating address.
Ordinary
indemnity value: an indemnity (provided at no charge) value that is
associated with a Priority Mail International® label for a Priority Mail International
parcel, (excludes the Priority Mail International Small Flat Rate Priced Box),
for which indemnity coverage against loss, damage, or missing contents, up to
the amounts shown in IMM Exhibit 232.83, is provided
as part of the
service. Indemnity is limited to the lesser of the actual value of
the contents or the maximum indemnity based on the weight of the article.
Open Address
Book: inserts a recipient address into the selected shipping label from the
Address Book.
Package Pickup
Location: identifies where the package will be left for collection.
Mailing Permit: a
payment method for bulk and commercial mailings. (Note: Permit payment is only eligible
for Electronic Merchandise Return labels and Open and Distribute™ labels using USPS®
meter label solution software.)
Move to: move an
address from one group to another.
No Holiday
Delivery: will not deliver the Priority Mail Express® package on a Holiday.
Non-Machinable:
mailpieces
that cannot be sorted on mail processing equipment because of size, shape,
content, or address legibility. Such mail must be processed manually.
No Weekend
Delivery: will not deliver the Priority Mail Express® package on a Weekend.
Package ID: an ID
created/specified by the retailer to associate a label to a product, or
customer. It really is wholly retailer defined. It is an
identifier of the package coming back that a retailer may or may not choose to
use.
Permit
Number: the merchandise return
service (MRS) permit holder guarantees payment of the proper postage and extra
service fees (except for insurance and certificate of mailing purchased by the
sender) on all parcels returned via a special label produced by the permit
holder. MRS permit
information can be obtained from your local Post Office™.
Pending: label is in
queue.
Product
Tracking Service (PTS): The system that provides the status of Priority
Mail®, Priority
Mail Express®, and Package Services (Library Mail and Media Mail®) packages with USPS Tracking®.
PS Form 5630: a Confirmation Service Certification form
that is required for Priority Mail Open and Distribute™ containers.
Quantity: number of
items being shipped.
Ready: label is ready
to be printed.
Recreate Label
or Form: recreates a label or form that has already been printed.
Request Service
Address: directs the Postal Office™ on how to handle a mail piece that cannot be
delivered.
Require
Signature: authorizes delivery of a Priority Mail Express® piece requiring
a recipient signature.
Return Label: prints a Merchandise
Return Service (MRS) label to be used by the recipient if he or she sends the
mailed item back to the sender. Postage
is collected only for items returned.
Save to Address
Book: saves the recipient address information to the Address Book.
SCAN Form: a form (PS Form 5630) that contains a master barcode that
represents the packages in a shipment which is scanned when your shipment is presented
to by the Postal Service™ for mailing. This single scan
enters all of your associated packages into our Track & Confirm database as
"Shipment Accepted" and allows both you and the recipient to see when
the package entered the mailstream.
Search for: searches a
table for the criteria entered in the text box.
Send Email to
Recipient: generates and sends an email to the recipient informing
them of shipment details.
Separate
Receipt: prints a separate receipt showing details about the shipping label.
Service: lists the mail
service types available to ship a package.
Ship Date: the date the
package will be delivered to the Postal Service.
Ship from ZIP
Code™: identifies the ZIP Code™ from which the
package is being shipped if different from the sender address.
Show: shows only the
group or status selected in the table.
USPS Signature™ Service: provides date, ZIP Code™, time your
package was delivered and requires a signature from the person who accepts the
package.
Unit Value $: represents the
value of a single item. For example, a box of 50 pens is worth $1.00; therefore
the unit value is $1.00.
Unit Weight: represents the
weight of a single item. For example, a box of 50 pens weights 1 lb 0 ounces;
therefore the unit weight is 1 lbs. 0 ounces.
USPS Tracking®
Service: provides date, ZIP Code™ and time your
package was delivered.
Value of
Contents: identifies the value of the contents being shipped.